Furniture / Bedroom Furniture
IKEA PAX Wardrobe Cabinet Assembly Instructions
A comprehensive assembly guide for the IKEA PAX wardrobe cabinet insert. This manual covers the necessary tools, safety precautions, step-by-step assembly, and installation procedures to ensure a secure setup.
Quick answers from the manual
Quick answer
- This manual provides instructions for assembling and installing the IKEA PAX wardrobe cabinet unit. p. 1, 24
Key actions
- Assemble the wardrobe frame using the provided hardware. p. 5, 12
- Install the assembled unit into the existing wardrobe structure. p. 13, 23
Technical specifications
| Parameter | Value | Meaning | Pages |
|---|---|---|---|
| Depth | 58 cm (22 7/8 ") | Depth of the wardrobe unit. | p. 24 |
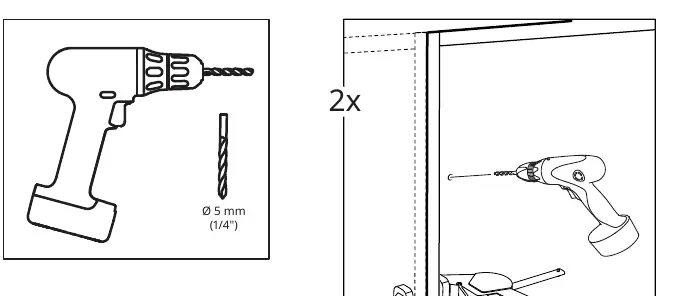
| Drill bit size | 5 mm (1/4 ") | Required drill bit size for installation. | p. 2, 20 |
Where to find it in the PDF
- Tools and Safety p. 2, 3
- Parts List p. 4
- Frame Assembly p. 5, 12
- Installation p. 13, 23
- Final Dimensions p. 24
Table of contents
Manual images
Click an image to enlargeQuick guide from the manual
This manual provides instructions for assembling and installing the IKEA PAX wardrobe cabinet insert. Before beginning, ensure you have sufficient space and that your ceiling height meets the requirements. The assembly process requires two people for safety and ease of installation.
Tools required
To assemble this unit, you will need the following tools:

- Screwdriver
- Hammer
- Spirit level
- Ladder
- Clamp
- Power drill with a 5 mm (1/4 inch) drill bit
- Tape measure
Safety precautions
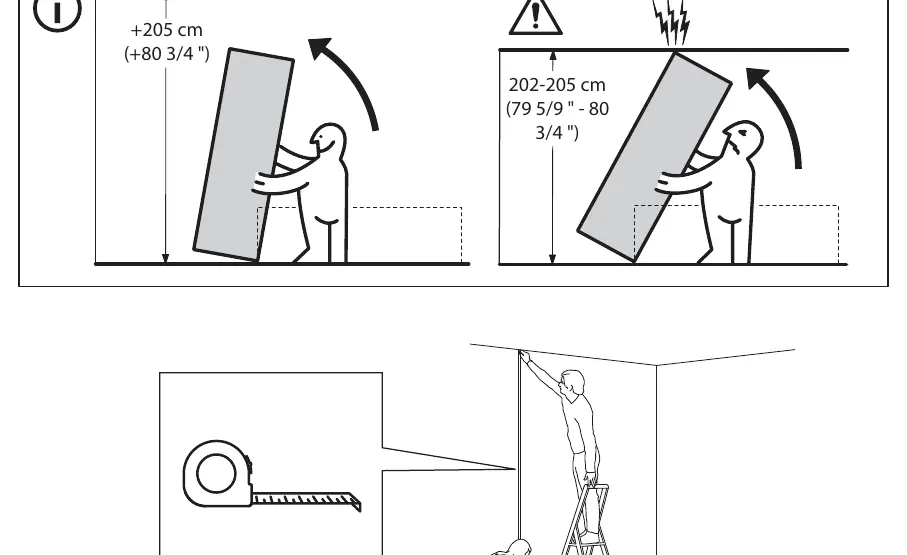
- Ceiling Height: Ensure your ceiling height is between 202-205 cm.
- Two-person assembly: Always assemble and move the unit with two people to prevent injury or damage.
- Stability: Do not climb on the unit. Ensure the unit is properly secured and level during installation.
- Damage prevention: Assemble on a soft surface (like a rug) to avoid scratching the panels.
Assembly and installation
The assembly process is divided into two main phases: building the frame and installing it into the existing wardrobe structure.
Frame assembly
- Prepare the side panels by inserting the required dowels and hardware.
- Attach the base and shelves to the side panels using the provided screws and locking mechanisms.
- Ensure all connections are tight and the frame is square.
Installation
- Position the assembled unit into the desired location within the wardrobe.
- Use a spirit level to ensure the unit is perfectly vertical and horizontal.
- Secure the unit to the existing wardrobe structure using the provided mounting hardware.
- Drill pilot holes where necessary using the 5 mm drill bit as indicated in the diagrams.
- Finalize the installation by securing all locking mechanisms and checking for stability.
Manufacturer information
IKEA
Practical help
Common problems
Unit does not fit in the space
Verify that your ceiling height is between 202-205 cm. If the ceiling is lower, the unit will not fit.
Unit feels unstable
Ensure the unit is level using a spirit level and that all mounting screws are fully tightened.
Before use
- Check that ceiling height is 202-205 cm
- Gather all required tools (screwdriver, hammer, level, ladder, clamp, drill)
- Ensure two people are available for assembly
- Clear the assembly area and protect the floor
- Verify all parts are present according to the parts list
Specs in practice
- Ceiling Height Requirement
- 202-205 cm (79 5/9 - 80 3/4 inches)
- Drill Bit Size
- 5 mm (1/4 inch) for mounting holes
Images and diagrams
- Pictograms indicate the use of specific tools for each step.
- Arrows show the direction of insertion or movement for panels and screws.
- Crossed-out symbols indicate prohibited actions or incorrect assembly methods.
Model compatibility
- Designed specifically for the PAX wardrobe system.
- Requires a minimum ceiling height of 202 cm.

Manual page author
Michael Turner
Technical manual editor
Reviews PDF manuals for structure, safety notes, and practical product details so readers can find the right information quickly.