Lighting / Fixtures
Immax PEACOCK LED Bedside Lamp with Clock User Manual
Quick guide for the Immax PEACOCK LED Bedside Lamp with Clock. Learn how to set the time, configure alarms, adjust RGB lighting, use the night light, and manage USB charging settings.
Table of contents
Manual images
Click an image to enlargeQuick guide from the manual
The Immax PEACOCK LED Bedside Lamp is a multifunctional device featuring a clock, alarm system, RGB lighting, and USB charging. To ensure proper operation, use a power adapter with PD or QC protocols and place the device on a flat surface with a slope of less than 6 degrees. The lamp features two alarm settings: Alarm 1 for weekdays (Monday-Friday) and Alarm 2 for weekends (Saturday-Sunday).
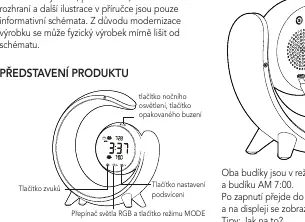
Product Overview
The device features a front panel with touch-sensitive controls for the night light, snooze function, RGB light mode, and backlight adjustment. The rear or base section contains the power port, USB output port, and battery cover. The display shows the current time, alarm status, and day of the week.

Power Connection
Connect the lamp to a power source using an adapter that supports PD (Power Delivery 2.0/3.0) or QC (Qualcomm Quick Charge 2.0/3.0) protocols. The power cord must also support these protocols. Do not use the lamp if the cable is damaged.
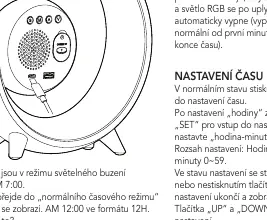
Time and Alarm Settings
Time Setting: In normal mode, press the SET button to enter time settings. Use the SET button to cycle through hours, minutes, year, month, and day. Use the UP and DOWN buttons to adjust values. The system will exit settings automatically after 30 seconds of inactivity.
Alarm Setting: Press the MODE button to enter alarm mode. Use the SET button to configure hours, minutes, and snooze settings. Use the DOWN button to toggle between Alarm 1 and Alarm 2, and to enable or disable the alarms.
Lighting Functions
Night Light: When the alarm is not active, short touch the night light button to turn it on. Long touch the button to steplessly dim the light.
RGB Light: Short touch the RGB button to turn on the light (defaults to the last used mode). Short touch again to cycle through RGB modes. Long touch the button to turn off the RGB light function.
Sound and Snooze
The device offers 7 types of natural sounds. The snooze function dims the night light and gradually lowers the sound volume before turning off. During the alarm, you can press the white noise, RGB light, or backlight adjustment buttons to cancel the alarm sound.
USB Charging
The lamp includes a USB-A output port for charging external devices, providing a maximum output of 10.5W (5V/2.1A).
Safety and Maintenance
- Clean the surface with a soft cotton cloth; do not use corrosive solvents.
- The light source is irreplaceable; stop using the device if the light source wears out.
- Do not disassemble the device in case of failure; contact the manufacturer.
- Ensure the device is not placed on slopes greater than 6 degrees.
Manufacturer information
Immax
Practical help
Common problems
Alarm not triggering
Ensure the date is set correctly. Alarm 1 is for weekdays (Mon-Fri) and Alarm 2 is for weekends (Sat-Sun).
Light does not turn on
Check the power adapter; it must support PD or QC protocols. Ensure the cable is not damaged.
Device is unstable
The lamp cannot be used on surfaces with a slope greater than 6 degrees.
Before use
- Use a power adapter with PD or QC protocol.
- Ensure the power cable supports the required protocol.
- Place the lamp on a flat surface (slope < 6 degrees).
- Set the current date and time correctly.
- Check that the alarm mode (1 or 2) is enabled.
Specs in practice
- USB Output 5V/2.1A
- Charging port for external devices.
Images and diagrams
- Front Panel: Contains buttons for night light, snooze, RGB mode, and backlight adjustment.
- Rear/Base: Contains power port, USB output, and battery cover.
Model compatibility
- Requires PD or QC protocol power adapter.
- Not suitable for slopes greater than 6 degrees.

Manual page author
Emily Carter
User documentation editor
Prepares concise manual descriptions and highlights the most useful setup, operation, and maintenance information for readers.