Lighting / Ceiling Fans
User Manual for Immax NEO LITE VARIABLE Smart LED Ceiling Light with Fan
Quick guide for the Immax NEO LITE VARIABLE Smart LED Ceiling Light with Fan. Includes installation steps, remote pairing, fan balancing, troubleshooting, and safety instructions.
Table of contents
Manual images
Click an image to enlargeQuick guide from the manual
This document provides essential instructions for the installation, operation, and maintenance of the Immax NEO LITE VARIABLE Smart LED Ceiling Light with Fan. Key procedures include mounting the fan, pairing the remote control, and balancing the fan blades to prevent wobbling. Always ensure the power is disconnected at the main fuse before performing any installation or maintenance tasks.
Product Description
The Immax NEO LITE VARIABLE is a smart LED ceiling light with an integrated fan, controlled via Tuya Wi-Fi. It features adjustable light color temperatures (3000K, 4000K, 6000K) and multiple fan speeds. The unit is designed for indoor use and requires a ceiling capable of supporting at least 45 kg.

Installation
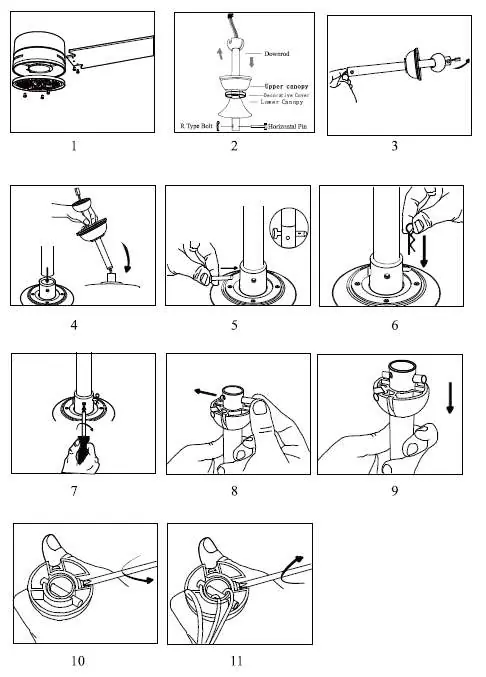
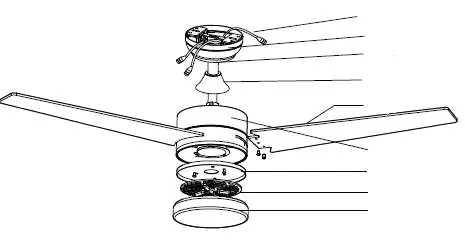
Installation should be performed by a qualified professional in accordance with local electrical codes. Ensure the mounting bracket is securely attached to the ceiling junction box. The fan must be properly grounded. Refer to the provided diagrams for the assembly sequence, including the downrod, canopy, and blade attachment.
Remote Control Pairing
To pair the remote control with the fan: turn the fan off and then on. Within 30 seconds of turning it on, press and hold the "Fan/on off" button on the remote control for 5 seconds. A long beep will sound, indicating that the remote control has successfully paired with the fan.
Fan Balancing
If the fan wobbles during operation, follow these steps:
- Ensure all blades are screwed tightly to the flywheel.
- Check that the fan is firmly installed.
- If oscillation persists, use the provided balancing kit.
- Attach the balancing clip to one blade and test the fan speed. Repeat this process with all blades to identify which one improves the stability the most.
- Once the optimal blade is found, move the clip to different positions on that blade to minimize oscillation.
- Remove the clip and install the balancing weight in its place.
Troubleshooting
- Fan not starting: Check all fuses or circuit breakers. Turn off power and verify all wire connections.
- Fan makes noise: Allow a few days for the fan to "break-in" at medium or high speed. Check that all bolts in the fan assembly and light kit are tight. Ensure the mounting bracket is secure.
- Fan not heating air: The fan may be running in reverse; check the rotation direction. Ensure there are no obstructions in the room.
Cleaning and Maintenance
Always disconnect the power before cleaning. Clean the outer surface with a soft, damp cloth. Do not allow internal parts, especially the circuit board, to get wet. Never use wire cloths, abrasive, or chemical cleaners. Tighten screws at least once a year to prevent clicking sounds.
Safety Warnings
- Do not connect the fan to a dimmer switch.
- The fan must be completely stopped before changing the rotation direction.
- Keep the remote control out of direct sunlight.
- Do not dispose of batteries in fire.
- Not intended for use by children under 8 years of age.
- Ensure a minimum distance of 150 cm from the tip of the blades to the wall.
- Minimum distance between fan blades and the floor must be 2.3 m.
Manufacturer information
Immax
Practical help
Common problems
Fan wobbling
Check blade screws, ensure firm installation, and perform dynamic balancing using the provided kit.
Fan not starting
Check fuses/circuit breakers and verify all electrical wire connections.
Fan makes noise
Allow a 'break-in' period of a few days, check screw tightness, and ensure the mounting bracket is secure.
Fan not moving air effectively
Check if the fan is running in reverse and ensure no objects are obstructing airflow.
Before use
- Ensure the ceiling can support 45 kg.
- Verify all electrical wire connections are secure.
- Ensure the mounting bracket is firmly installed.
- Check that no objects obstruct the airflow.
- Ensure a minimum distance of 2.3 m from the floor.
- Verify the fan is not installed in a damp or wet room.
Specs in practice
- Lamp wattage
- 24W power consumption for the LED light.
Images and diagrams
- Steps 1-11: Assembly of the fan motor, downrod, and canopy.
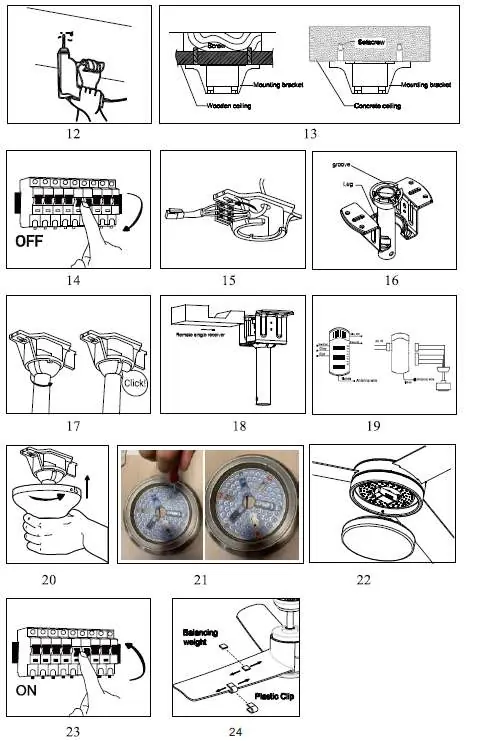
- Steps 12-13: Mounting bracket installation on wooden or concrete ceilings.
- Steps 14-18: Electrical wiring and receiver connection.
- Steps 20-22: Final assembly of the light kit and cover.
- Step 24: Balancing procedure using the clip and weight.
Model compatibility
- Do not connect to a dimmer switch.
- Not intended for use by children under 8 years of age.
- Suitable for 6-10 hours of daily operation.
- Requires Tuya Wi-Fi protocol.

Manual page author
Emily Carter
User documentation editor
Prepares concise manual descriptions and highlights the most useful setup, operation, and maintenance information for readers.