Toys / RC Models & Drones
User Manual for Indiamart 155-5A Stunt Car
Quick guide for the Indiamart 155-5A Stunt Car. Learn how to charge the battery, install remote control batteries, operate the stunt car, and perform maintenance to ensure long-lasting performance.
Table of contents
Manual images
Click an image to enlargeQuick Start Guide
To begin using your stunt car, follow these steps:
- Ensure the stunt car battery is fully charged and installed.
- Install 2x 1.5V AA batteries into the remote control.
- Turn on the power switch on the stunt car.
- Place the car on a flat surface.
- Turn on the remote control. Wait for the transmitter indicator light to stop flashing before operating the joysticks.
Packing List
- 1x Stunt Car
- 1x Remote Control
- 1x 3.7V Battery
- 1x USB Charging Cable
- 1x User Manual
Battery Installation and Charging
Stunt Car Battery: Connect the battery pack to the charging cable and plug it into a computer USB port or a USB charger. The red light indicates charging is in progress; the light turns off when fully charged. Once charged, open the battery compartment on the car, connect the battery, and close the cover.
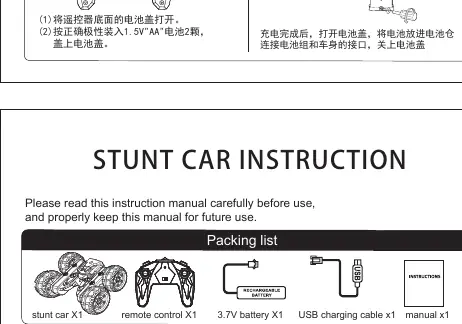
Remote Control Battery: Open the battery cover on the back of the remote. Insert 2x 1.5V AA batteries, ensuring correct polarity, and replace the cover.
Operation Method
Use the joysticks on the remote control to maneuver the car:
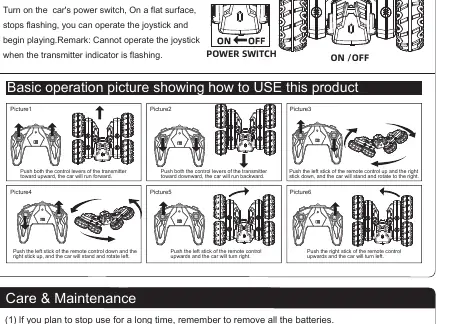
- Forward: Push both control levers upward.
- Backward: Push both control levers downward.
- Rotate Right: Push the left stick up and the right stick down.
- Rotate Left: Push the left stick down and the right stick up.
- Turn Right: Push the left stick upward.
- Turn Left: Push the right stick upward.
Care and Maintenance
- If the car will not be used for a long time, remove all batteries.
- Use a wet towel to gently wipe the car body clean.
- Do not expose the toy to high temperatures, high humidity, or direct sunlight.
- Do not submerge the toy in water to avoid damaging electronic components.
Safety Cautions
- Do not touch the wheels while the car is in motion.
- Do not play near roads, dangerous areas, puddles, mud, or sand.
- Pay attention to battery polarity during installation.
- Do not mix old and new batteries or different types of batteries.
- Adult supervision is required when charging the rechargeable battery.
- If the car speed slows down, the battery power is low; please recharge.
- If the remote control indicator becomes dim or does not light up, replace the batteries.
Practical help
Common problems
Car speed slows down significantly.
The battery power is low. Please charge the stunt car battery.
Remote control indicator is dim or not lit.
The remote control batteries are low. Replace them with new 1.5V AA batteries.
Cannot operate the joystick.
Wait for the transmitter indicator light to stop flashing before attempting to use the joysticks.
Before use
- Charge the stunt car battery fully using the provided USB cable.
- Install 2x 1.5V AA batteries in the remote control.
- Ensure the car power switch is set to ON.
- Place the car on a flat surface before turning on the remote.
- Check that the transmitter indicator light has stopped flashing.
Specs in practice
- 3.7V Battery
- The rechargeable battery pack used to power the stunt car.
- 1.5V AA Batteries
- Standard non-rechargeable batteries required for the remote control (not included).
Images and diagrams
- The operation diagrams illustrate how to move the car forward, backward, rotate, and turn using the two joysticks on the remote control.
Model compatibility
- Do not use non-rechargeable batteries.
- Do not mix old and new batteries.
- Do not mix different types of batteries.

Manual page author
David Miller
Documentation analyst
Organizes user manual content into clear summaries, with attention to model details, product context, and everyday usability.