Computers / KVM Switches
User Manual for Infobit iSwitch 201HK 4K60 2x1 KVM Switcher
Quick guide for the Infobit iSwitch 201HK 4K60 2x1 KVM Switcher. Learn how to connect devices, use hotkeys, configure RS-232 commands, and troubleshoot common setup issues.
Quick answers from the manual
Quick answer
- The iSwitch 201HK is a 2x1 KVM switcher that allows control of two computers with one set of peripherals. It supports 4K@60Hz, USB 3.0, and can be controlled via front panel buttons, IR remote, keyboard hotkeys, or RS-232 commands. p. 1, 3
Key actions
- Switch inputs using front panel p. 6
- Enable hotkey mode p. 6, 9
First start
- Connect HDMI and USB Host cables from both PCs to the switcher. p. 7, 12
- Connect the display to the HDMI output port. p. 7
Show 4 more answers Show less
Problems and fixes
Hotkey function disabled
Set the front panel Hotkey switch to ON.
p. 6, 9Maintenance and reset
- Reset to factory defaults p. 10
Technical specifications
| Parameter | Value | Meaning | Pages |
|---|---|---|---|
| Video Resolution | 4K@60Hz | Maximum supported resolution | p. 4 |
| Power Supply | 12V/1A | Required power input | p. 4, 5 |
Where to find it in the PDF
- Front Panel p. 6
- Rear Panel p. 7
- Application Example p. 12
Table of contents
Manual images
Click an image to enlargeQuick guide from the manual
The Infobit iSwitch 201HK is a 2x1 KVM switcher designed to control two computers using a single set of keyboard, mouse, and monitor. It supports resolutions up to 4K@60Hz and features USB 3.0 connectivity. Key operational modes include front panel button switching, IR remote control, and keyboard hotkeys. Note that the front panel Hotkey switch must be set to ON to enable keyboard/mouse hotkey functionality; when set to OFF, the USB ports operate in standard USB 3.2 Gen 1 mode.
Package Contents
- 1 x 4K60 2x1 KVM Switcher
- 1 x IR Remote
- 1 x 3-pin Phoenix Connector (male)
- 1 x IR Receiver Cable (1.5 meters)
- 2 x USB 3.0 Cables (1.8 meters)
- 2 x HDMI Cables (1.5 meters)
- 2 x Mounting Ears
- 4 x Machine Screws
- 1 x 12V/1A Power Supply
Installation and Connection
Connect your HDMI sources (PCs) to the HDMI input ports and connect the USB Host ports to the PCs using the provided USB cables. Connect your display device to the HDMI output port. Connect your keyboard, mouse, and other USB peripherals to the USB device ports on the front panel. Connect the power supply to the DC 12V port.
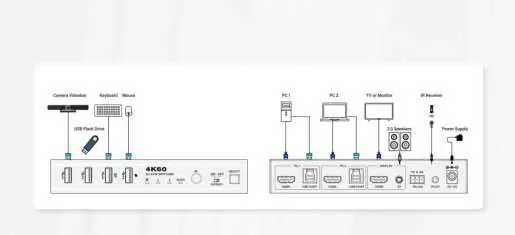
Operation Controls
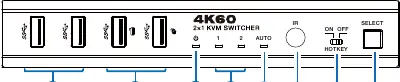
Front Panel
The front panel features USB 3.0 ports, status LEDs for power, input channels, and auto-switching, an IR window, a Hotkey switch, and a SELECT button for manual input switching.
Rear Panel
The rear panel contains the HDMI inputs for PC 1 and PC 2, USB Host ports, HDMI output for the display, L/R audio output, RS-232 port, IR EXT port, and the DC 12V power input.
Hotkey and Control Functions
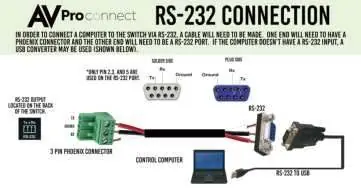
When the Hotkey switch is set to ON, you can use keyboard hotkeys (e.g., Scroll Lock + Scroll Lock + 1) to switch inputs. Mouse hotkeys are also supported via double-clicking the scroll wheel. The device also supports ASCII commands via the RS-232 port for advanced control.
Technical Specifications
- HDMI Compliance: HDMI 2.0
- HDCP Compliance: HDCP 2.3
- Video Resolution: Up to 4K@60Hz, 2K@60Hz/144Hz
- USB: USB 3.0 (up to 5Gbps)
- Power Supply: DC 12V/1A
- Operating Temperature: 32 - 104°F (0 - 40°C)
Practical help
Common problems
Hotkey switching not working
Ensure the Hotkey switch on the front panel is set to the ON position.
USB devices not recognized or slow
If the Hotkey switch is ON, the USB ports are limited to USB 1.1 mouse/keyboard. Set the switch to OFF to enable full USB 3.2 Gen 1 functionality.
No image on display
Verify HDMI cable length. For 4K60 4:4:4, use cables up to 5m. For 1080P, up to 10m.
Before use
- Ensure the power supply is 12V/1A.
- Use Premium High Speed HDMI cables for best performance.
- Connect USB Host cables to both PCs to enable KVM functionality.
- Set the Hotkey switch on the front panel according to your needs (ON for hotkeys, OFF for high-speed USB).
Show more Show less
Images and diagrams
- Front Panel: Shows USB ports, LEDs, and the critical Hotkey switch.
- Rear Panel: Shows input/output ports and power connection.
- Application Example: Illustrates the connection of PCs, monitor, and peripherals.
Model compatibility
- Compatible with Windows, Mac OS, and Linux.
- Supports HDR, HDR10, HDR10+, Dolby Vision, and HLG.

Manual page author
David Miller
Documentation analyst