Computers / KVM Switches
User Manual for IOGear Universal Secure KVM Switch
Quick guide for the IOGear Universal Secure KVM Switch. Includes installation steps, port switching, security features, and troubleshooting.
Quick answers from the manual
Quick answer
- The IOGear Universal Secure KVM Switch is a secure device for sharing peripherals between multiple computers. It features hardware-based security, including chassis intrusion detection and tamper-evident seals, and supports manual port switching via pushbuttons. p. 1, 9, 10
Key actions
- Install the KVM switch p. 16, 18
- Switch ports p. 21
First start
- Connect console peripherals, connect computers via KVM cables, connect power, and turn on the switch. p. 16, 18
Problems and fixes
All LEDs flashing
Chassis intrusion or self-test failure. Stop using the device and contact your dealer.
p. 6, 20, 21Maintenance and reset
- Press the reset button for more than 5 seconds to purge data and reboot. p. 8
Technical specifications
| Parameter | Value | Meaning | Pages |
|---|---|---|---|
| Video Resolution | 5120 x 2880 @ 60Hz | Maximum supported video output resolution. | p. 11, 34 |
Where to find it in the PDF
- Installation Diagram p. 27
Table of contents
Manual images
Click an image to enlargeQuick guide from the manual
The IOGear Universal Secure KVM Switch is designed for secure peripheral sharing between multiple computers. It features hardware-based security, including chassis intrusion detection and tamper-evident seals. Before installation, ensure all devices are powered off. Connect your console monitor, keyboard, and mouse to the rear panel, then connect the KVM cables to your computers. Power on the switch and then your computers.
Installation
To set up the KVM switch, follow these steps:
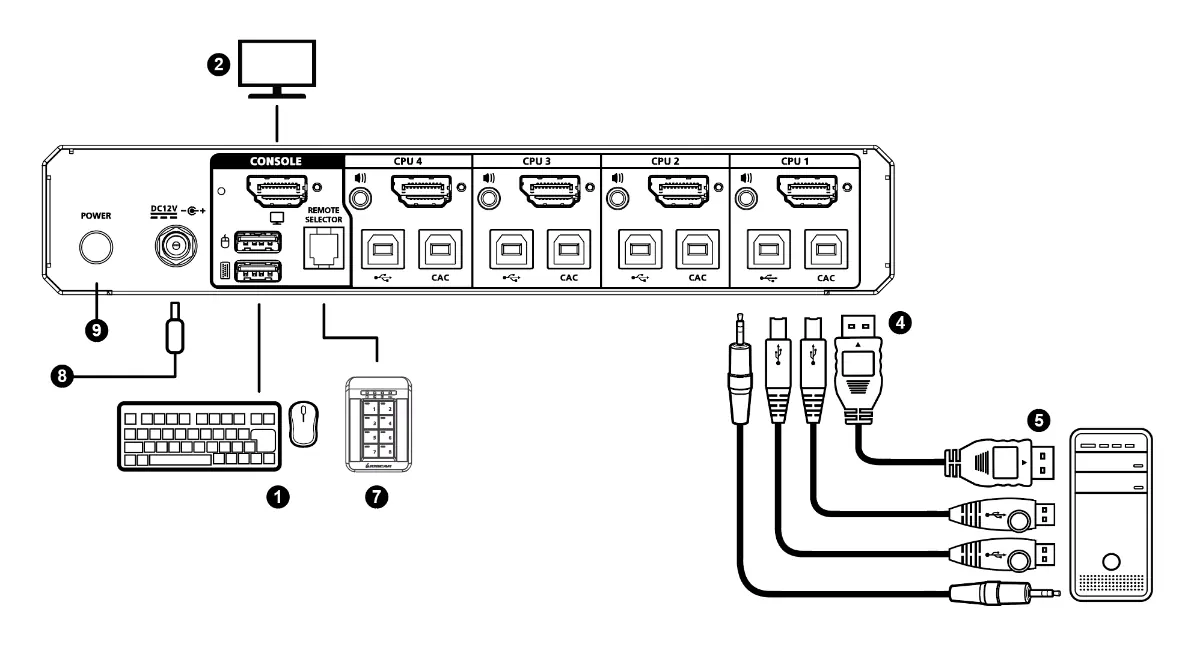
- Plug your USB keyboard and mouse into the USB console ports on the rear panel.
- Connect your console monitor(s) to the console video port(s) on the rear panel and power on the monitor.
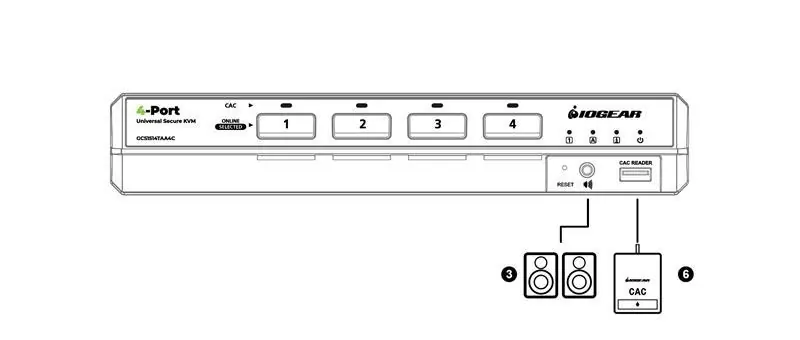
- Connect your speakers to the console speaker jack on the front panel.
- Using a KVM cable set, connect the video, USB, and speaker connectors to the KVM port section on the switch.
- Connect the other end of the KVM cable set to the respective ports on your computer.
- If using a CAC reader, plug it into the console CAC port on the front panel.
- Connect the power cord to the power socket and turn on the switch.
Operation
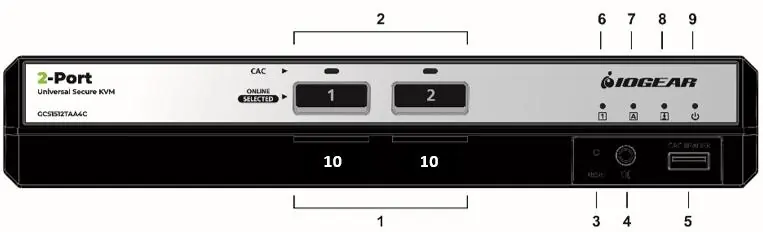
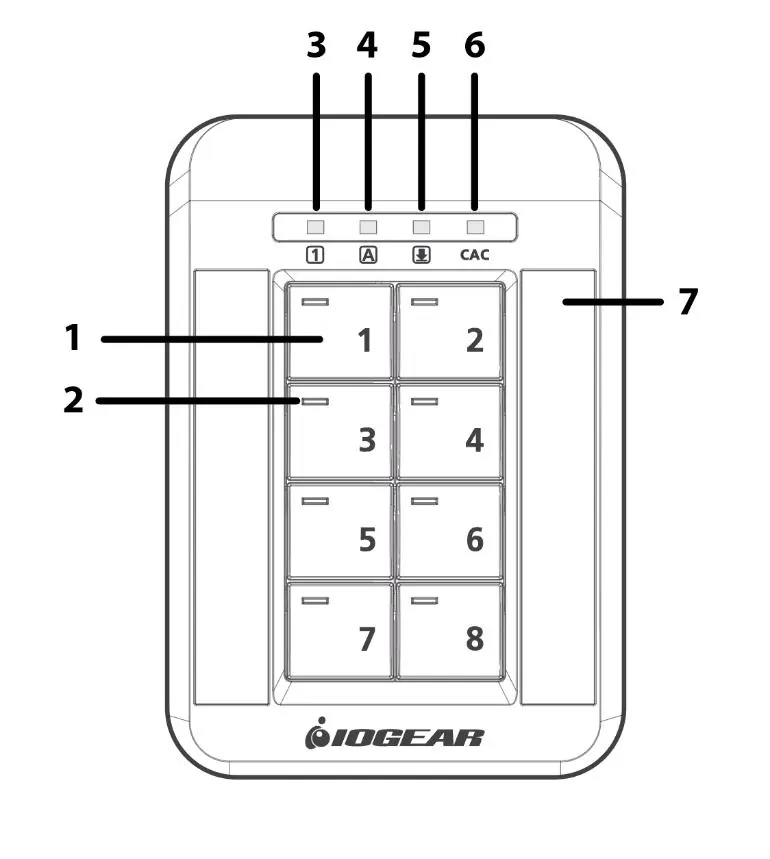
Manual port switching is performed by pressing the port selection pushbuttons on the front panel or the optional Remote Port Selector (RPS). Pressing a button brings the KVM focus (keyboard, mouse, monitor, audio, and CAC reader) to the computer attached to that port. The selected port LED will light bright green.
Security Features
The switch includes several security measures:
- Tamper-evident seals: Provide visual indication of intrusion. If missing or peeled, do not use the product.
- Chassis intrusion detection: The switch becomes permanently inoperable if the enclosure is breached.
- Restricted USB connectivity: Only qualified HID devices are supported. Non-qualified devices are rejected.
- Unidirectional data flow: Prevents data transfer between secure and unsecure computers.
Troubleshooting
If the switch fails to operate:
- All LEDs flashing: Indicates a chassis intrusion or self-test failure. Stop using the device and contact your dealer.
- Keyboard/Mouse not working: Ensure they are standard USB HID devices. Wireless keyboards/mice and multimedia keys are not supported.
- Video not displaying: Check cable connections and ensure the monitor is qualified.
Specifications
The switch supports video resolutions up to 5120 x 2880 @ 60Hz. It features a rugged metal enclosure and is designed for secure IT environments.
Practical help
Common problems
All front panel LEDs are flashing continuously
Chassis intrusion or self-test failure detected. Stop using the device immediately and contact your IOGEAR dealer.
Keyboard or mouse not functioning
Ensure you are using a standard USB HID device. Wireless devices and those with integrated hubs are not supported.
Video not displaying
Ensure the monitor is qualified and all cables are securely connected. Power cycle the switch.
Before use
- Check for tamper-evident seals on the enclosure
- Power off all computers and the switch before installation
- Use only qualified USB HID keyboards and mice
- Connect console monitor, keyboard, and mouse
- Connect KVM cables to computers
Specs in practice
- NIAP PP PSD v4.0
- Security certification for peripheral sharing devices.
- Video DynaSync
- IOGear technology that optimizes display resolution when switching ports.
Images and diagrams
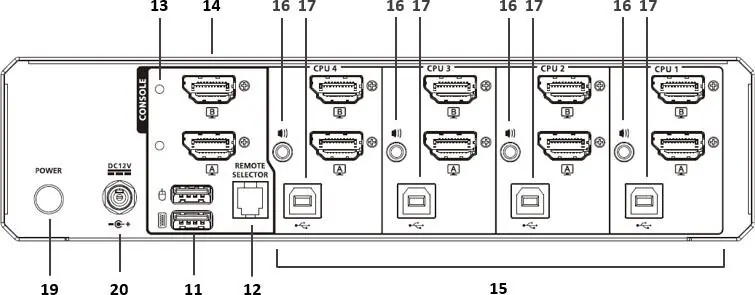
- Rear panel: Shows console ports (monitor, keyboard, mouse) and KVM ports (CPU 1-4).
- Front panel: Shows port selection buttons, LEDs, and CAC reader port.
Model compatibility
- Wireless keyboards and mice are not supported.
- Multimedia keys on keyboards will not function.
- Only standard analogue speakers are supported; microphones are prohibited.

Manual page author
David Miller
Documentation analyst
Organizes user manual content into clear summaries, with attention to model details, product context, and everyday usability.