Computers / KVM Switches
Quick Start Guide for IOGEAR 2/4-Port 4K KVMP Switch
Quick start guide for the IOGEAR 2/4-Port 4K KVMP Switch (GCS1932H and GCS1934H). Includes hardware installation steps, system requirements, and port switching methods.
Quick answers from the manual
Quick answer
- You can switch between computers using the front panel pushbuttons, keyboard hotkeys, or by double-clicking the mouse wheel button. p. 8
Key actions
- Ground the unit before connecting other cables. p. 5
- Connect console peripherals (monitor, keyboard, mouse) to the console ports. p. 5
First start
- Connect all cables (grounding, console, KVM, power) before turning on the computers. p. 5
Where to find it in the PDF
- Package Contents p. 2
- Hardware Installation p. 5, 6, 7
- Operation p. 8
Table of contents
Manual images
Click an image to enlargeQuick guide from the manual
This guide provides instructions for setting up and operating the IOGEAR 2/4-Port 4K KVMP Switch. The primary installation involves grounding the unit, connecting console peripherals (monitor, keyboard, mouse), and linking computers via the provided KVM cables. Switching between computers can be done manually via front panel buttons, via keyboard hotkeys, or by double-clicking the mouse wheel.
Package Contents
- GCS1932H or GCS1934H unit
- HDMI cables
- USB 3.0 cables
- Audio cable sets
- Power adapter
- Quick Start Guide
- Warranty Card
System Requirements
Console: HDMI monitor, standard wired USB keyboard, standard 3-button wired USB mouse, speakers (optional).
Computer: 1 x HDMI port, USB Type-A port, audio port (optional).
Operating Systems: Windows 2000, Vista, 7, 8.1, 10; Mac OS X 9.0+; Linux, UNIX.
Hardware Installation
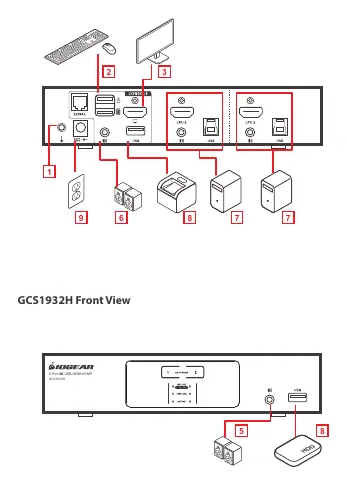
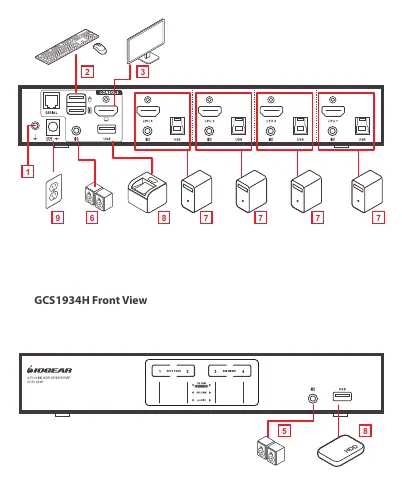
- Ground the unit by connecting a grounding wire to the grounding terminal and a suitable grounded object.
- Connect the USB keyboard and mouse to the console ports.
- Connect the HDMI monitor to the console ports.
- Turn the monitor power to ON.
- Connect the speaker into the speaker jack located on the front side panel.
- Connect the secondary speaker into the speaker jack located on the rear side panel.
- Connect the HDMI connectors into any available HDMI ports in the KVM Port section. Connect the USB and speaker connectors into the unit. Connect the other end of the KVM cables to their respective HDMI, USB, and speaker ports on the computers.
- Connect up to 2 USB peripherals into the USB 3.0 Type-A ports (front and rear panel).
- Connect the power adapter to an AC power source, then connect the power adapter cable to the unit's power jack.
- Turn all connected computers power to ON.
Operation
You can switch between connected computer sources using three methods:
- Manual: Press the port selection pushbuttons on the front panel.
- Hotkey: Enter combinations from the keyboard (refer to the full manual on the IOGEAR website).
- Mouse: Click the mouse wheel button twice (ensure mouse emulation is enabled).
Practical help
Common problems
Switching between ports not working via mouse
Ensure mouse and mouse wheel button emulation are turned ON.
Audio not working
Ensure audio cables are connected to both the KVM switch and the computer's audio ports.
Before use
- Verify you have the correct number of HDMI, USB, and Audio cables for your model (2 for GCS1932H, 4 for GCS1934H).
- Ensure you have a grounded object for the grounding wire connection.
- Confirm your computer has an available HDMI port and USB Type-A port.
- Ensure your keyboard and mouse are standard wired USB devices.
Images and diagrams
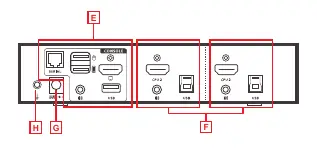
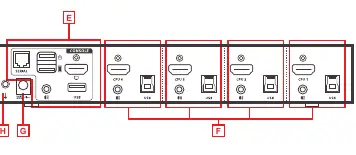
- The rear view diagrams identify the console ports (keyboard, mouse, monitor), KVM ports (for connecting computers), power jack, and grounding terminal.
- The front view diagrams identify the port selection pushbuttons, port LEDs, audio port, and USB 3.0 hub.
Model compatibility
- Compatible with Windows 2000, Vista, 7, 8.1, 10.
- Compatible with Mac OS X 9.0+.
- Compatible with Linux and UNIX systems.

Manual page author
Michael Turner
Technical manual editor
Reviews PDF manuals for structure, safety notes, and practical product details so readers can find the right information quickly.