Computers / KVM Switches
User Manual for iPGARD Advanced 2/4-Port HDMI Secure KVM Switch
Comprehensive user guide for the iPGARD Advanced 2/4-Port HDMI Secure KVM Switch. Includes installation instructions, CAC configuration, EDID learn, troubleshooting, and technical specifications.
Quick answers from the manual
Quick answer
- The iPGARD Advanced Secure KVM Switch allows secure control of multiple computers from a single console. It includes anti-tamper features, CAC support, and secure EDID emulation. p. 1, 4
Key actions
- Install the KVM switch p. 6, 7
- Configure CAC port p. 11
First start
- Power on the unit p. 6
Problems and fixes
No Power
Check power adapter connection and voltage.
p. 14Maintenance and reset
- Restore Factory Defaults p. 12
Technical specifications
| Parameter | Value | Meaning | Pages |
|---|---|---|---|
| Max Resolution | 3840x2160 @ 60Hz | Maximum supported video resolution. | p. 3 |
| Power | 12V DC, 2A/3A | Power adapter requirements. | p. 3 |
Where to find it in the PDF
- Technical Specifications p. 3
- Installation p. 5, 6, 7
Table of contents
Manual images
Click an image to enlargeQuick Guide from the Manual
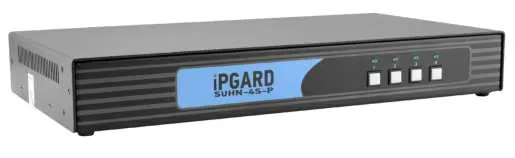
The iPGARD Advanced Secure KVM Switch is designed for secure control of multiple computers from a single console. Important: This device features anti-tamper switches and a tamper-evident seal. If the front panel LEDs are flashing and the buzzer is beeping, the unit has been tampered with and is permanently disabled. Ensure you use standard wired keyboards and mice; wireless devices and keyboards with integrated USB hubs are not supported.
Product Overview
The series includes 2-port and 4-port models with various configurations (HDMI, Dual-Head, Quad-Head, and CAC support). The device provides high isolation on USB channels and secure EDID emulation to prevent data leakage.
Installation
Single-Head Units:
- Ensure power is off.
- Connect HDMI output from each computer to the corresponding HDMI IN ports.
- Connect a USB cable (Type-A to Type-B) from each computer to the unit's USB ports.
- Connect audio cables (3.5mm) if required.
- Connect the monitor to the HDMI OUT console port.
- Connect a wired USB keyboard and mouse to the console ports.
- Power on the KVM using the 12V DC power supply, then turn on the computers.
Multi-Head Units: Follow similar steps, ensuring all HDMI ports for a single computer are connected to the corresponding channel on the KVM.
CAC Installation
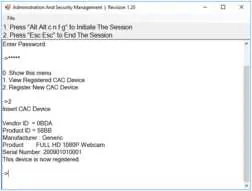
CAC (Common Access Card) installation is intended for system administrators. Connect the CAC device to the CAC port in the user console interface. CAC functionality can be enabled or disabled for specific channels using the front panel buttons.
Operation
EDID Learn: The KVM automatically learns the monitor's EDID upon power-up. If you connect a new monitor, a power cycle is required. The process is indicated by flashing LEDs on the front panel.
KM Switching: In addition to button switching, the device supports cursor-based switching between computers by moving the mouse cursor from one display to another (requires configuration).
Maintenance and Troubleshooting
Auditing: The Event Log can be dumped via the Administration and Security Management Program by accessing the menu with the 'cnfg' command.

Reset: Factory defaults can be restored via the Administration and Security Management Program menu.
Troubleshooting: If you experience issues, check all cable connections first. If the keyboard or mouse is not working, ensure they are not wireless and do not have internal USB hubs. If there is no power, verify the power adapter connection and voltage.
Technical Specifications
The device supports HDMI 2.0 with a maximum resolution of 3840x2160 @ 60Hz. It requires a 12V DC power adapter (minimum 2A, or 3A for Quad-head models). Operating temperature is 32° to 104° F (0° to 40° C).
Practical help
Common problems
No Power
Ensure the power adapter is securely connected and the output voltage is 12VDC. Replace the power supply if necessary.
No Video
Check all HDMI cable connections. Connect the computer directly to the monitor to verify the computer and monitor are functioning.
Keyboard/Mouse not working
Ensure the device is a standard wired HID keyboard/mouse. Wireless devices and keyboards with integrated USB hubs are not supported.
Front Panel LEDs flashing and buzzer beeping
The unit has been tampered with and is permanently disabled. Contact iPGARD technical support.
Before use
- Ensure power is turned off before connecting cables.
- Verify that you are using a standard wired keyboard and mouse.
- Confirm the monitor is connected to the console port.
- Ensure the power adapter is 12V DC (2A minimum, 3A for Quad-head).
- Check that all computers are running supported operating systems (Windows or Linux).
Specs in practice
- Max Resolution
- Supports up to 3840x2160 @ 60Hz.
- Power Requirements
- 12V DC, 2A minimum (3A for Quad-head models) with center-pin positive polarity.
- Security Accreditation
- Common Criteria Validated to NIAP, Protection Profile PSS Ver. 3.0.
Images and diagrams
- Front Panel: Displays port selection buttons and LEDs for port and CAC status.
- Rear Panel: Contains HDMI IN/OUT, USB, Audio, and Power ports.
Model compatibility
- Does not support wireless keyboards or mice.
- Does not support keyboards with integrated USB hubs.
- Does not support microphones or headsets with microphones.
- Supports Windows and Linux operating systems.

Manual page author
David Miller
Documentation analyst
Organizes user manual content into clear summaries, with attention to model details, product context, and everyday usability.