Computers / KVM Switches
Quick Start Guide for Tripp Lite B006-DP2UA2 and B006-DP2UA4 KVM Switch
Quick start guide for the Tripp Lite B006-DP2UA2 and B006-DP2UA4 2/4-Port USB 3.0 4K DisplayPort Dual Display KVM Switch. Includes installation steps, port switching methods, and hotkey configurations.
Quick answers from the manual
Quick answer
- The B006-DP2UA2/B006-DP2UA4 is a 2/4-port KVM switch. Installation involves connecting your keyboard, mouse, monitors, and audio devices to the console ports, then connecting each computer to the corresponding KVM port section using DisplayPort, USB, and audio cables. p. 2, 3, 5
Key actions
- Manual Switching: Press Port Selection button or Mode button then Port Selection button. p. 7
- Mouse Switching: Double-click scroll wheel. p. 7
- Hotkey Switching: [Scroll Lock] [Scroll Lock] [Enter] or [Scroll Lock] [Scroll Lock] [n] [Enter]. p. 8
First start
- Connect console devices, connect computers to KVM ports, connect power, then power on computers. p. 5, 6
Problems and fixes
Mouse switching disabled by default.
Enable via Hotkey Setting Mode.
p. 7Maintenance and reset
- Reset hotkey settings to default using [R] [Enter] in Hotkey Setting Mode. p. 9
Where to find it in the PDF
- Installation p. 4, 5, 6
- Operation p. 7, 8, 9, 10
Table of contents
Manual images
Click an image to enlargeQuick guide from the manual
This document provides installation and operation instructions for the Tripp Lite B006-DP2UA2 (2-Port) and B006-DP2UA4 (4-Port) DisplayPort Dual Display KVM Switches. The guide covers hardware setup, manual and hotkey switching methods, and advanced configuration modes.
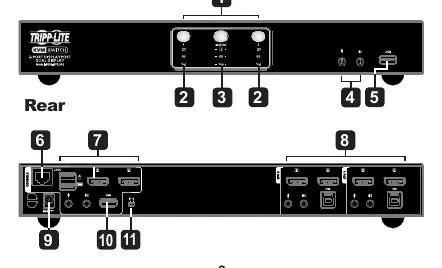
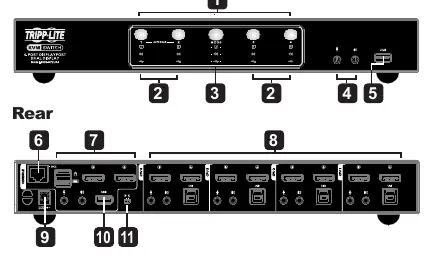
Product Features
The KVM switch features a front panel with LED status indicators, port selection pushbuttons, a mode selection button, audio ports, and a USB 3.1 Gen 1 peripheral port. The rear panel contains the console ports (keyboard, mouse, monitor), KVM ports for connecting computers (CPU1-4), a power jack, and a DCC port for daisy-chaining.
Installation
Follow these steps to install your KVM switch:
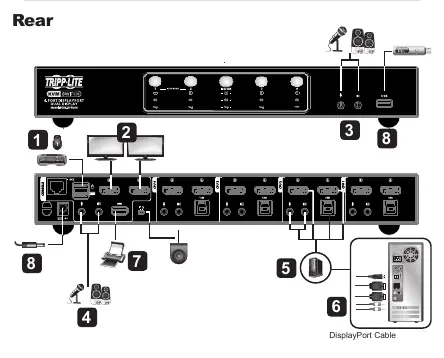
- Connect Console Devices: Plug your USB keyboard and mouse into the USB console ports on the rear panel.
- Connect Monitors: Plug your monitors into the DisplayPort console ports on the rear panel and power them on.
- Connect Audio (Front): Plug your primary microphone and speakers into the front panel audio jacks.
- Connect Audio (Rear): Plug secondary microphone and speakers into the rear panel audio ports if needed. Note that front panel audio has priority.
- Connect Computers: Using user-supplied DisplayPort cables, connect the DisplayPort, USB 3.0, microphone, and speaker cables to the corresponding KVM port section (e.g., CPU1) for each computer. Ensure all cables for a single computer are in the same KVM port section.
- Connect Peripherals: Optionally, plug USB peripherals into the front or rear USB 3.1 Gen 1 ports.
- Power On: Connect the included power adapter to the switch and an AC power source, then power on the computers.
Important: To prevent damage from power surges or static electricity, ensure all connected devices are properly grounded.
Operation
You can switch between computers using several methods:
- Manual Switching: Press the Port Selection pushbutton for the desired computer, or press the Mode Selection button once followed by the Port Selection button.
- Mouse Switching: Double-click the scroll wheel of your USB mouse to cycle through ports. This requires a 3-key scroll wheel mouse and must be enabled.
- Hotkey Switching: Tap the [Scroll Lock] key twice, then press [Enter] to cycle to the next port, or [n] [Enter] to select a specific port (where n is the port number). If [Scroll Lock] conflicts with other programs, [Ctrl] can be used instead.
Hotkey Setting Mode (HSM)
To configure advanced settings, invoke HSM:
- Press and hold [Num Lock].
- Press and release [-].
- Release [Num Lock].
- Press the desired function key:
- [H]: Toggle HSM invocation keys.
- [R] [Enter]: Reset hotkey settings.
- [T]: Toggle port switching keys.
- [U][P][G][R][A][D][E][Enter]: Invoke Firmware Upgrade Mode.
- [F1]: Set SPC mode for special operating systems.
- [F2]: Enable Mac keyboard emulation.
- [F4]: Print current settings.
- [F10]: Enable Windows keyboard emulation.
Practical help
Common problems
Mouse switching is not working.
Ensure you are using a USB 3-key scroll wheel mouse, mouse emulation is enabled, and the feature is not disabled by default.
Hotkey [Scroll Lock] conflicts with other software.
Use the [Ctrl] key instead of [Scroll Lock] for hotkey commands.
Before use
- Verify all connected devices are properly grounded.
- Ensure you have user-supplied DisplayPort cables available.
- Check that all connectors for a single PC are in the same KVM port section (e.g., all in CPU1).
Images and diagrams
- Front panel: LED status, port selection, mode selection, audio ports, USB peripheral port.
- Rear panel: Console ports (keyboard, mouse, monitor), KVM ports (CPU1-4), power jack, DCC port.
Model compatibility
- Supports USB 3-key scroll wheel mice for mouse switching.
- Requires user-supplied DisplayPort cables.

Manual page author
Emily Carter
User documentation editor
Prepares concise manual descriptions and highlights the most useful setup, operation, and maintenance information for readers.