Electronics / Televisions
User Guide for Insignia 55" 1080p 60Hz LED TV NS-55D420NA16
Quick guide for the Insignia 55" 1080p 60Hz LED TV (NS-55D420NA16). Includes setup, connection instructions, remote control usage, and troubleshooting.
Table of contents
Manual images
Click an image to enlargeQuick guide from the manual
This guide provides essential information for setting up and using your Insignia 55" 1080p 60Hz LED TV (NS-55D420NA16). Always follow safety instructions, especially regarding television placement and wall mounting, to prevent injury.
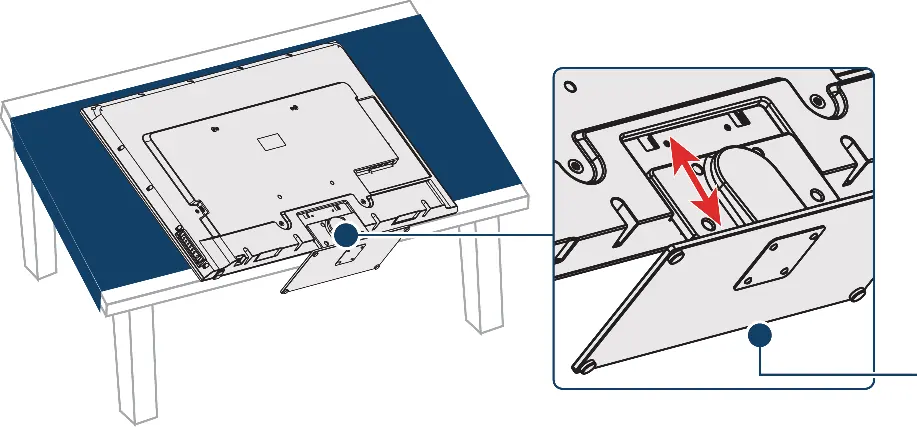
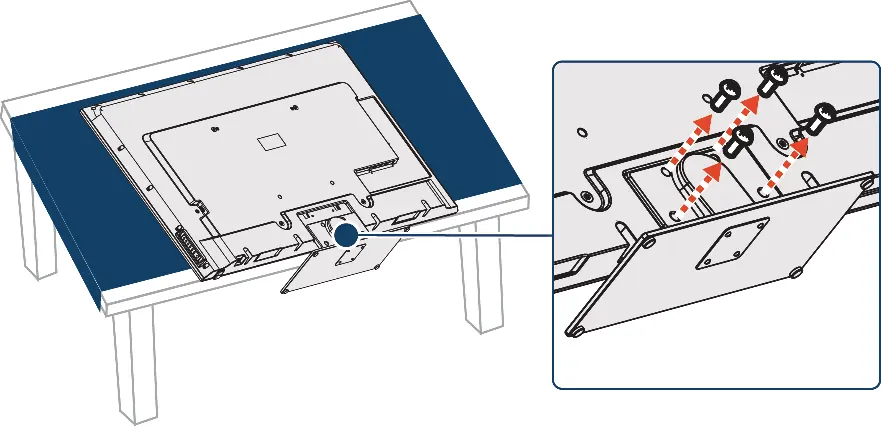
Installing the stand or wall-mount
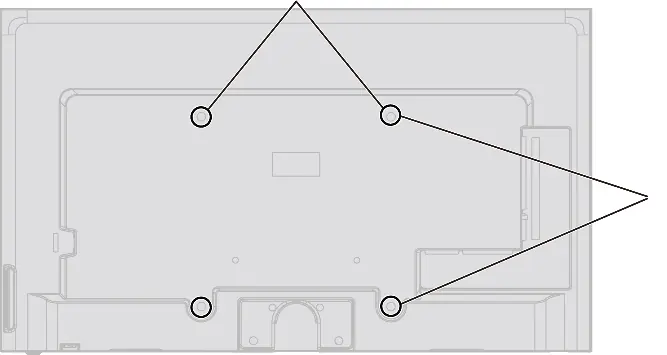
If placing the TV on a table, attach the stand column to the base using the provided ST4 x 16 mm screws, then secure the column to the TV using the M5 x 12 mm screws. If wall-mounting, ensure you use a UL-listed bracket and secure it using all four VESA mounting holes on the back of the TV.
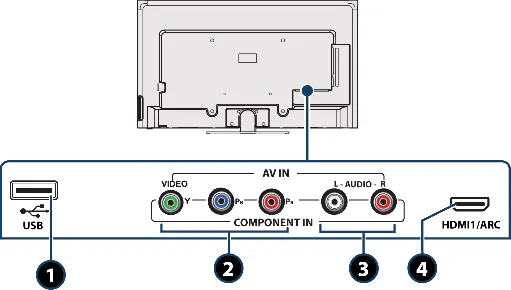
TV components
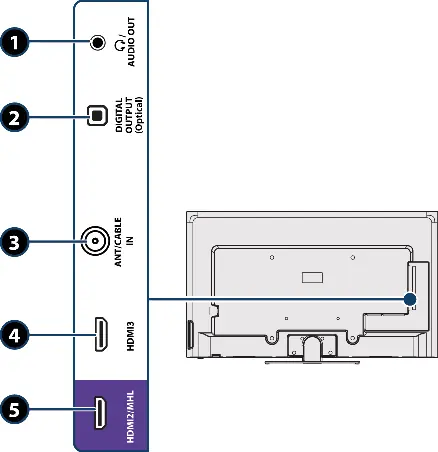
The TV features built-in controls on the right side for Menu, Input, Volume, Channel, and Power. Jacks are located on the side and back, including HDMI, USB, Component/AV, and Digital Audio Output.
Connecting devices
For the best video quality, use HDMI connections. The TV supports various inputs:
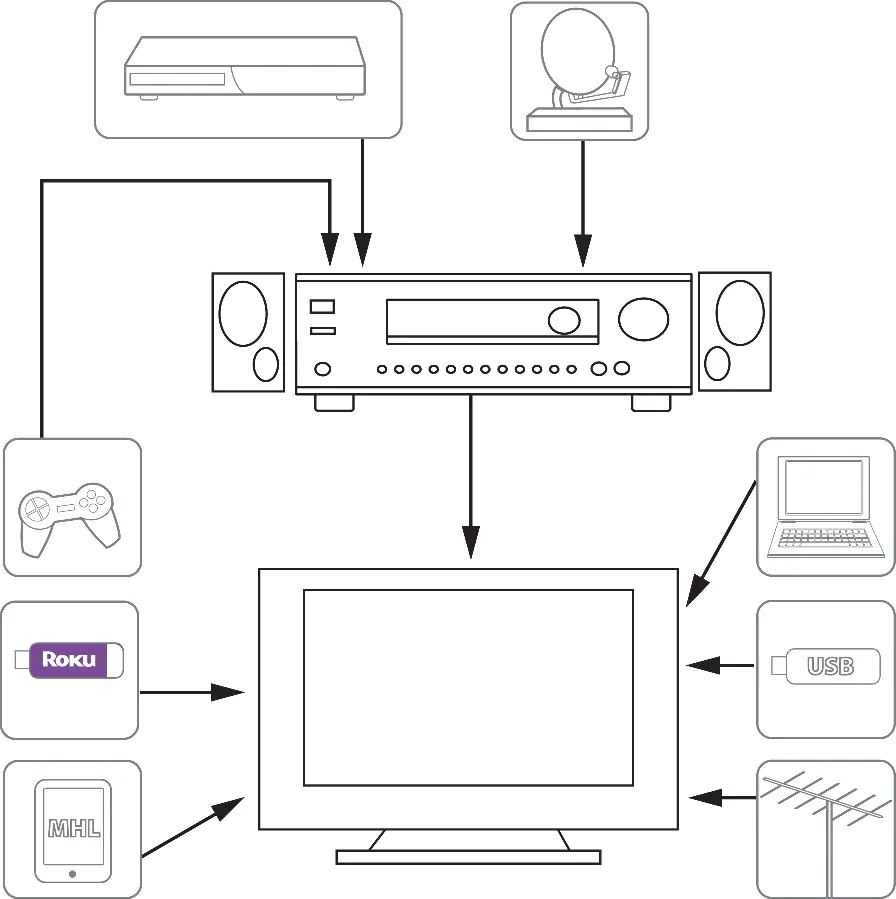
- HDMI: Best quality for cable/satellite boxes, game consoles, and computers.
- Component/AV: Good for older devices; note that these jacks are shared.
- Roku Streaming Stick / MHL: Must be connected to the purple HDMI2/MHL port.
- Audio: Connect sound bars or external speakers via the Digital Output (Optical) or Audio Out jack.
Remote control
The remote control allows you to navigate menus, change inputs, adjust volume, and control connected devices. Install two AAA batteries, ensuring correct polarity. Point the remote directly at the sensor on the front of the TV.
First-time setup
Upon turning on the TV for the first time, the Easy Setup wizard will guide you through selecting the language, viewing environment (Home vs. Store), time settings, and scanning for channels.
Menu settings
Access the on-screen menu by pressing the MENU button. You can adjust:
- Picture: Mode (Vivid, Standard, Energy Savings, Movie, Game, Custom), Aspect Ratio, and advanced settings.
- Audio: Mode, Balance, Bass, Treble, and TV Speaker settings.
- Channels: Auto Channel Search, Hiding channels, and Favorite channel lists.
- Parental Controls: Set passwords and block content based on ratings.
- Closed Captioning: Enable and customize captioning modes.
Troubleshooting
If you encounter issues:
- No power: Check the power cord connection and try unplugging/replugging.
- No picture/sound: Verify the input source, check cable connections, and ensure the Audio Only setting is off.
- Remote not working: Check batteries and ensure there are no obstructions.
- No signal: Check antenna/cable connections and ensure the correct input is selected.
Specifications
The TV features a 54.6-inch screen, 1080p resolution, and 60Hz refresh rate. Power consumption is 150W when on and less than 1W in standby.
Practical help
Common problems
No power
Ensure the power cord is plugged into a working outlet. Unplug the cord, wait 60 seconds, then plug it back in.
No picture or sound
Check that the correct input source is selected. Ensure video/audio cables are connected securely and the Audio Only setting is set to Off.
Remote control does not work
Check batteries, ensure they are installed correctly, and remove any obstructions between the remote and the TV sensor.
No signal error
Press INPUT to select the correct input for the device you are using. Check antenna or cable connections.
Before use
- Install remote control batteries.
- Connect antenna, cable, or satellite box.
- Connect the power cord.
- Place the TV on a stable surface or mount it securely.
- Ensure the TV is in a well-ventilated area.
Specs in practice
- Refresh rate
- 60Hz.
- Power consumption
- 150W (On), <1W (Standby).
Images and diagrams
- Side jacks include Headphone/Audio Out, Digital Output (Optical), Antenna/Cable In, HDMI3, and HDMI2/MHL.
- Back jacks include USB, Component/AV (Video/Y, Pb, Pr), L/R Audio, and HDMI1/ARC.
Model compatibility
- Roku Streaming Stick must be connected to the purple HDMI2/MHL port.
- MHL-enabled devices must be connected to the purple HDMI2/MHL port.
- Component video and AV (composite) jacks are shared; only one can be used at a time.

Manual page author
David Miller
Documentation analyst
Organizes user manual content into clear summaries, with attention to model details, product context, and everyday usability.