Home Appliances / Refrigerators
User Manual for Insignia 165-Can Beverage Cooler
Get the most out of your Insignia 165-Can Beverage Cooler with this user guide. Includes setup instructions, door reversal steps, temperature settings, maintenance tips, and troubleshooting for error codes.
Table of contents
Manual images
Click an image to enlargeQuick guide from the manual
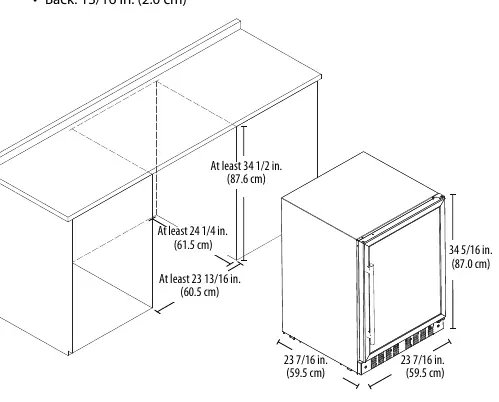
This beverage cooler is designed for household use to store up to 165 12-ounce cans. Before first use, remove all packaging and let the unit stand upright for 30 minutes to allow the cooling system to stabilize. Ensure the unit is placed on a level surface with adequate ventilation space (1/4 inch on top and sides, 13/16 inch at the back). Do not use extension cords or ungrounded adapters.
Safety instructions
- Do not use the appliance near water or in moist areas.
- Keep ventilation openings clear of obstruction.
- Do not use mechanical devices to accelerate defrosting.
- Do not damage the refrigerant circuit.
- Never allow children to play with or crawl inside the cooler.
- Unplug the unit before performing any maintenance.
- This unit is not designed for use in an RV or with an inverter.
Installation and setup
The cooler is designed to be built into cabinets. Ensure the floor or countertop is strong enough to support the unit when fully loaded. To level the cooler, turn the feet clockwise to raise or counter-clockwise to lower; the front feet should be slightly higher than the back feet.

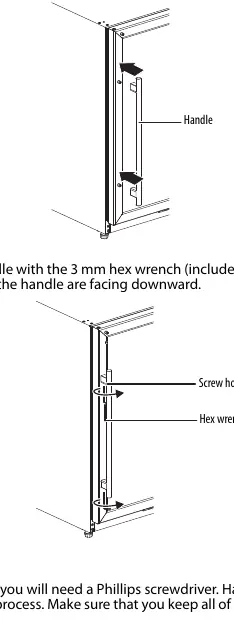
Installing the handle: Align the handle with the two bolts on the glass door and secure it using the included 3 mm hex wrench, ensuring the screw holes face downward.
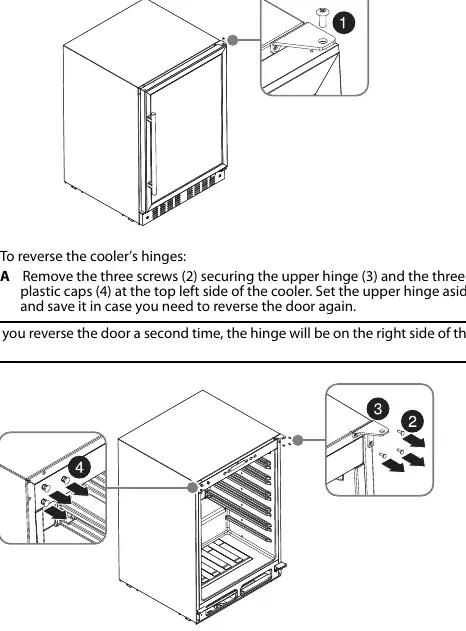
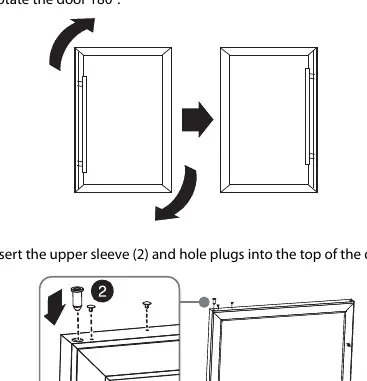
Reversing the door: This process requires a Phillips screwdriver and assistance. Ensure the cooler is unplugged and empty. You will need to remove the upper hinge, rotate the door 180 degrees, and reinstall the hinges and door support on the opposite side. Ensure the light switch block and door stopper are installed on the side without the handle.
Operating your beverage cooler
Plug the cooler into a dedicated, grounded wall outlet. Run the cooler for 3 to 4 hours before adding beverages to allow it to reach a stable temperature.
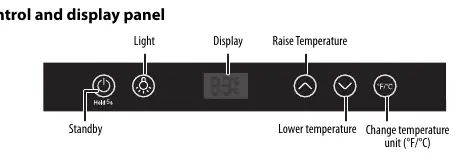
Control panel functions:
- Standby: Hold the power button for 5 seconds to stop cooling and turn off the light.
- Temperature adjustment: Use the up and down arrows to adjust the temperature between 34° and 50° F (1° to 10° C).
- Unit toggle: Press the °F/°C button to switch temperature units.
- Lighting: Press the light button to toggle the interior light while the door is closed.
The cooler features a memory function that resumes the previous temperature setting after a power outage.
Maintenance and cleaning
Clean the interior periodically with a damp, warm cloth and mild dish soap. Do not use hard brushes, steel wool, or organic solvents. Clean the door gasket to ensure a proper seal. The unit features auto-defrosting; water drains into a pan above the compressor and evaporates automatically.
Troubleshooting
If the cooler does not operate, check the power connection and circuit breaker. If the door does not close, adjust the shelves and level the unit. If the cooler is not cold enough, check the door seal and allow time for cooling. If the unit makes unusual noises, ensure it is level and moved away from the wall.
Error codes:
- E1: Chamber temperature sensor fault.
- E4: Defrosting temperature sensor fault.
- E6: Communication fault.
- E9: High temperature alarm.
If these codes appear, contact your local dealer or service center.
Specifications
The cooler measures approximately 25 5/16 x 23 7/16 x 34 5/16 inches and weighs 100.3 lbs. It requires a 115V, 60Hz power supply and operates in ambient temperatures between 54° and 109° F.
Practical help
Common problems
Cooler does not operate
Ensure the plug is pushed completely into the outlet and check the house fuse or circuit breaker.
Door does not close completely
Adjust the shelves, clean the door gaskets, and level the cooler using the leveling feet.
Cooler is not cold enough
Ensure the door is closed properly, allow time for new beverages to cool, and set the control to a colder setting.
Unusual noises or vibrations
Level the cooler, move it away from the wall, and note that compressor and valve sounds are normal.
Before use
- Remove all exterior and interior packaging.
- Let the cooler stand upright for approximately 30 minutes before connecting to power.
- Clean the interior surface with a damp, warm cloth.
- Ensure the location is strong enough to support the cooler when fully loaded.
- Verify proper ventilation space (1/4 inch top/sides, 13/16 inch back).
Specs in practice
- Temperature range
- 34° to 50° F (1° to 10° C).
- Power requirements
- 115V, 60Hz.
- Ambient operating temperature
- 54° to 109° F (12° to 43° C).
Images and diagrams
- Control panel: Includes power/standby, light, temperature adjustment, and unit toggle.
- Door reversal: Requires Phillips screwdriver; involves moving hinges and door components.
Model compatibility
- Not designed for use in an RV or with an inverter.
- Do not use extension cords.

Manual page author
Michael Turner
Technical manual editor
Reviews PDF manuals for structure, safety notes, and practical product details so readers can find the right information quickly.