Home Appliances / Refrigerators
User Manual for Insignia 2-Door Compact Refrigerator NS-CF30SS9
Comprehensive user guide for the Insignia 2-Door Compact Refrigerator (NS-CF30SS9). Includes installation, operation, maintenance, door reversal instructions, and troubleshooting tips.
Quick answers from the manual
Quick answer
- The Insignia 2-Door Compact Refrigerator (NS-CF30SS9) is a free-standing appliance. Key maintenance includes manual defrosting every three months and ensuring proper ventilation (5 inches clearance). The thermostat should be set to '7' for initial cooling and '4' for normal use. p. 7, 9, 10
Key actions
- Let the refrigerator stand upright for 4 hours before plugging in. p. 7
- Defrost the freezer manually when ice reaches 1/4 inch thickness. p. 10
First start
- Remove packaging, place on a level surface with 5 inches of clearance, let stand for 4 hours, and set thermostat to '7'. p. 7, 9
Problems and fixes
Refrigerator does not work
Check power connection, voltage, and house fuse/circuit breaker.
p. 15Maintenance and reset
- Defrosting: Set thermostat to '0', remove food, leave door open to melt ice. p. 10
Technical specifications
| Parameter | Value | Meaning | Pages |
|---|---|---|---|
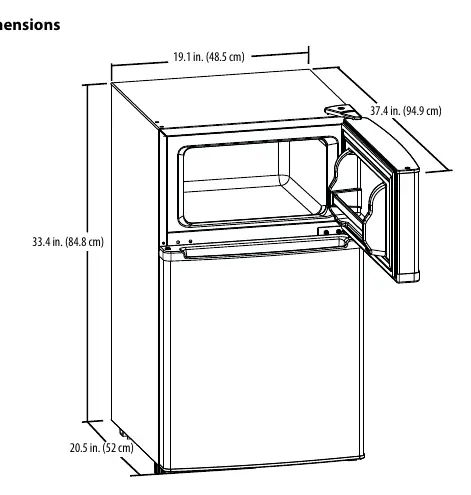
| Dimensions | 19.1 x 20.5 x 33.4 in | Width x Depth x Height | p. 18 |
| Power | 115 V~60 Hz | Voltage and frequency requirements | p. 18 |
Where to find it in the PDF
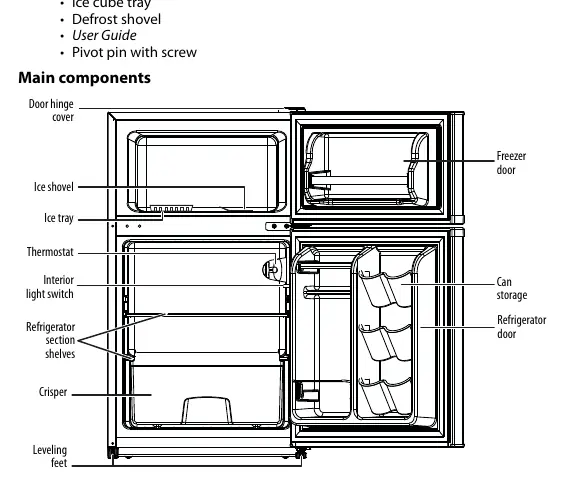
- Main Components p. 6
- Door Reversal p. 10, 11, 12, 13
Table of contents
Manual images
Click an image to enlargeQuick Guide
This refrigerator is designed for free-standing use. Before first use, remove all packaging and let the unit stand upright for at least four hours to allow the cooling system to stabilize. Clean the interior with a damp, warm cloth. Ensure the unit is placed on a level surface with at least 5 inches of clearance on all sides for proper ventilation.
Installation
Location: Place the refrigerator in a well-ventilated area away from direct sunlight and heat sources (stoves, radiators). It is not designed for built-in or recessed installation. The ambient temperature should be between 50°F (10°C) and 85°F (29.4°C).
Leveling: Proper leveling is essential to ensure the doors close and seal correctly. Adjust the leveling feet by turning them clockwise to raise or counter-clockwise to lower the unit.
Power Supply: Requires a 110V-120V, 60Hz power supply. Always plug into a dedicated, grounded 3-prong outlet.
Operation
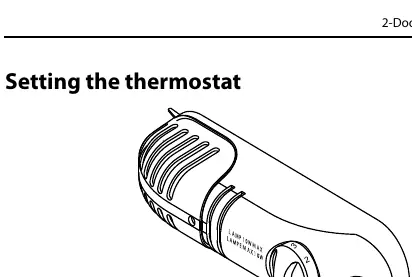
Thermostat: The thermostat controls the cooling. For the first use, set to '7' and run for at least two hours before adding food. Adjust towards '4' for normal operation. Setting '0' stops the cooling cycle.
Freezer: Designed for long-term storage of frozen foods. Place food in the freezer as quickly as possible after purchase.
Making Ice: Set thermostat to '7', fill the ice tray 2/3 full with water, and place on the bottom of the freezer. Once frozen, reset the thermostat to '4'.
Maintenance
Defrosting: This unit does not defrost automatically. Defrost every three months or when ice buildup reaches 1/4 inch (6 mm). Set thermostat to '0', remove all food, and leave the door open. Do not use hot water or electric heating devices to accelerate melting.
Cleaning: Turn off and unplug the unit. Wash the interior with a solution of one quart warm water and two tablespoons of baking soda. Dry thoroughly.
Interior Light: To replace the bulb, remove the lamp cover, unscrew the old bulb, and install a new 10W/12E bulb.
Door Reversal
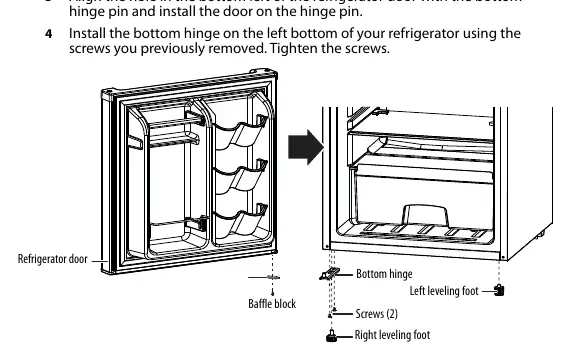
The door can be reversed to open from the opposite side. This process requires a 10 mm socket driver and a Phillips screwdriver. It is recommended to have an assistant. The process involves removing the top, middle, and bottom hinges, moving the pivot pin, and reinstalling the doors on the opposite side. Ensure the refrigerator is tilted backward (not laid flat) during this process to protect the cooling system.
Troubleshooting
If the refrigerator does not work, check the power connection, house fuse, or circuit breaker. If there is a bad odor, ensure food is wrapped in airtight packaging and clean the interior. If the door is hard to open, it may be due to a vacuum effect; wait 10-15 seconds after closing before trying to open it again.
Practical help
Common problems
Refrigerator does not work
Check if it is securely plugged in, verify the power source voltage, and check the house fuse or circuit breaker.
Bad odor
Wrap food in airtight packaging, remove spoiled food, and clean the interior.
Doors do not close completely
Ensure no food packages are blocking the door, clean the gaskets, and verify the unit is level.
Frost buildup
Ensure air outlets are not blocked, doors are fully closed, and perform a manual defrost.
Door is hard to open
Wait 10-15 seconds after closing for the vacuum to dissipate, or apply paraffin wax/petroleum jelly to the gasket edges.
Before use
- Remove all exterior and interior packaging.
- Let the refrigerator stand upright for approximately four hours before connecting to power.
- Clean the interior surface with a damp, warm cloth.
- Ensure the floor is strong enough to support the loaded refrigerator.
- Verify there is 5 inches of clearance on all sides for ventilation.
Specs in practice
- Power Requirements
- 115V~60Hz
- Annual Power Consumption
- 321 kWh
Images and diagrams
- Main components diagram shows the location of the thermostat, interior light switch, crisper, and leveling feet.
- Door reversal diagrams illustrate the removal and reinstallation of hinges and pivot pins.
Model compatibility
- Designed for free-standing use only; do not recess or build-in.
- Not designed for outdoor use.
- Ambient temperature must be between 50°F (10°C) and 85°F (29.4°C).

Manual page author
David Miller
Documentation analyst
Organizes user manual content into clear summaries, with attention to model details, product context, and everyday usability.