Home Appliances / Refrigerators
Insignia 130-Can Beverage Cooler
Quick guide for the Insignia 130-Can Beverage Cooler. Includes setup, door reversal, temperature control, maintenance, and troubleshooting steps.
Table of contents
Manual images
Click an image to enlargeQuick guide from the manual
This beverage cooler is designed for indoor, free-standing use. Before first use, remove all packaging and let the unit stand upright for 30 minutes to allow the cooling system to stabilize. Ensure there is at least 1.6 inches (4 cm) of clearance on all sides for proper ventilation. Do not use in RVs, with inverters, or in outdoor locations like garages.
Components
The cooler features a glass door, adjustable wood-trimmed shelves, an interior LED light, and a control panel located at the top interior. Leveling feet are provided at the bottom to ensure the unit sits flat, which is critical for proper door sealing and cooling performance.

Installation and Setup
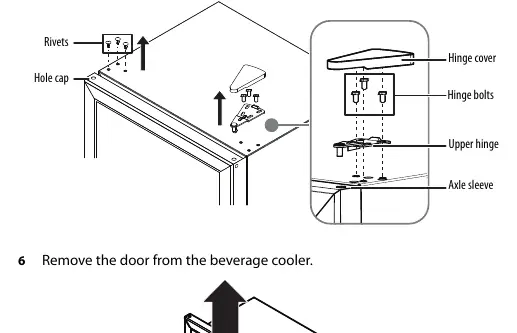
Place the cooler on a flat, sturdy surface. To level the unit, turn the leveling feet clockwise to raise or counter-clockwise to lower. If you need to reverse the door, you will need a 10mm socket wrench and a Phillips screwdriver. Ensure the unit is unplugged and empty before attempting to reverse the door. Do not lay the cooler completely flat during this process to avoid damaging the coolant system.

Operation
Plug the unit into a dedicated, grounded wall outlet. Wait 3 to 4 hours before adding beverages to allow the temperature to stabilize. Use the control panel to turn the unit on/off, toggle the interior light, and adjust the temperature. The temperature range is 34~50° F (1~10° C). Press both up and down buttons simultaneously for three seconds to switch between Fahrenheit and Celsius.

Maintenance and Cleaning
The cooler features an auto-defrost cycle. To clean the interior, turn off and unplug the unit, remove all beverages, and wash with a damp cloth. A baking soda solution (one quart warm water and two tablespoons baking soda) is recommended. Do not use gasoline, benzine, thinners, or abrasive cleaners. Clean the door gasket regularly to ensure a proper seal.
Troubleshooting
If the cooler does not operate, check the power connection and circuit breaker. If the door does not close, adjust the shelves or level the unit. If the cooler is not cold enough, ensure the door is closed properly and check the temperature setting. Error codes include E1 (Temperature sensor fault) and E4 (Defrost sensor fault); contact service if these appear.
Practical help
Common problems
Cooler does not operate
Ensure it is plugged in, check the house fuse or circuit breaker, and wait for power restoration if a failure occurred.
Door does not close completely
Adjust the shelf position, clean the door gaskets, and level the cooler using the leveling feet.
Cooler is not cold enough
Ensure the door is closed properly, allow time for new beverages to cool, or set the control to a colder setting.
Unusual noises or vibrations
Level the cooler with the feet and ensure it is not touching the wall.
Moisture buildup inside
Ensure the door is closed properly and move the cooler to a drier location.
Before use
- Remove all exterior and interior packaging.
- Let the cooler stand upright for 30 minutes before connecting to power.
- Clean the interior surface with a damp, warm cloth.
- Ensure 1.6 in. (4 cm) of space on all sides for ventilation.
- Plug into a dedicated, grounded wall outlet.
Specs in practice
- Temperature Range
- 34~50° F (1~10° C)
- Power Requirements
- 115 V~60 Hz, 1.2 A
Images and diagrams
- Control Panel: Includes Standby, Light, and Temperature +/- buttons.
- Door Reversal: Requires removing hinge bolts, upper/lower hinges, and door stopper.
Model compatibility
- Not designed for use in an RV.
- Do not use with an inverter.
- Not designed for use in a garage or outside.

Manual page author
Michael Turner
Technical manual editor
Reviews PDF manuals for structure, safety notes, and practical product details so readers can find the right information quickly.