Electronics / Speakers & Soundbars
User Manual for Insignia 2-Tap Beverage Cooler / Kegerator
Quick setup guide and user manual for the Insignia 2-Tap Beverage Cooler / Kegerator (NS-BK2TBS8 / NS-BK2TBK8). Includes assembly instructions, CO2 regulator setup, keg installation, temperature settings, and troubleshooting tips.
Quick answers from the manual
Quick answer
- This guide covers the assembly, CO2 setup, keg installation, and operation of the Insignia 2-Tap Beverage Cooler / Kegerator (NS-BK2TBS8 / NS-BK2TBK8). p. 1, 2
Key actions
- Assemble the casters and guard rail. p. 1
- Install the draft arm assembly. p. 1
- Connect the CO2 regulator and tank. p. 1
- Install the keg coupler. p. 2
First start
- Fill the CO2 tank (shipped empty). p. 1
- Set the temperature and let it cool for 48 hours. p. 2
Problems and fixes
Too much head
Check pressure (10-12 PSI), activate pressure relief valve, or check temperature.
p. 2Technical specifications
| Parameter | Value | Meaning | Pages |
|---|---|---|---|
| Temperature Range | 32°F to 50°F (0°C to 10°C) | Adjustable range for beer storage. | p. 2 |
| CO2 Pressure | 10-12 PSI | Recommended operating pressure. | p. 2 |
Where to find it in the PDF
- Assembly and Setup p. 1
- Keg Installation and Operation p. 2
Table of contents
Manual images
Click an image to enlargeQuick guide from the manual
This guide provides instructions for setting up and operating your Insignia 2-Tap Beverage Cooler / Kegerator. Before starting, ensure you have a filled CO2 tank, as the provided tank is shipped empty. The unit requires 3 inches of clearance on the back and sides for proper ventilation and should not be used with an extension cord.
Assembling your kegerator
Installing the casters: Tip the unit onto its side on a soft surface. Remove the front feet and install the locking casters in the front positions and the standard casters in the rear positions. Stand the unit upright and lock the casters to secure the unit.
Attaching the guard rail: Simply place the guard rail into the designated holes on the top of the kegerator.
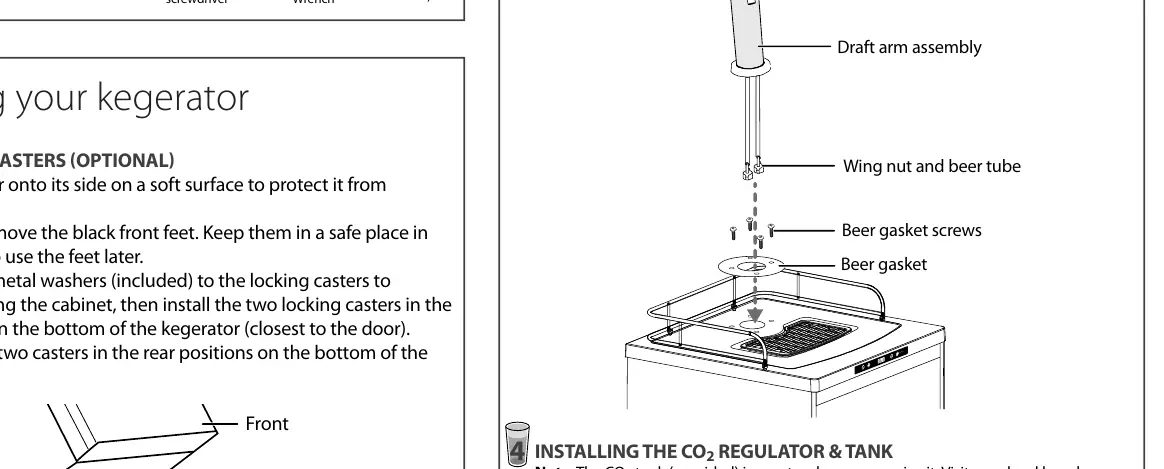
Installing the draft arm assembly: Remove the cabinet plug from the top. Align the beer gasket with the holes, pass the wing nut and beer tube through the worktop hole, and secure the draft arm to the worktop using the provided screws. Attach the beer tap handles by hand.
Installing the CO2 regulator and tank
Ensure the shut-off valve is closed. Attach the hose clamp to the gas line and connect it to the regulator. Tighten the clamp to prevent leaks. Screw the regulator nut onto the tank valve using an adjustable wrench. Secure the tank inside the unit using the retainer bolt and nut, or install the retainer on the back of the unit for extra space.
Installing the keg coupler
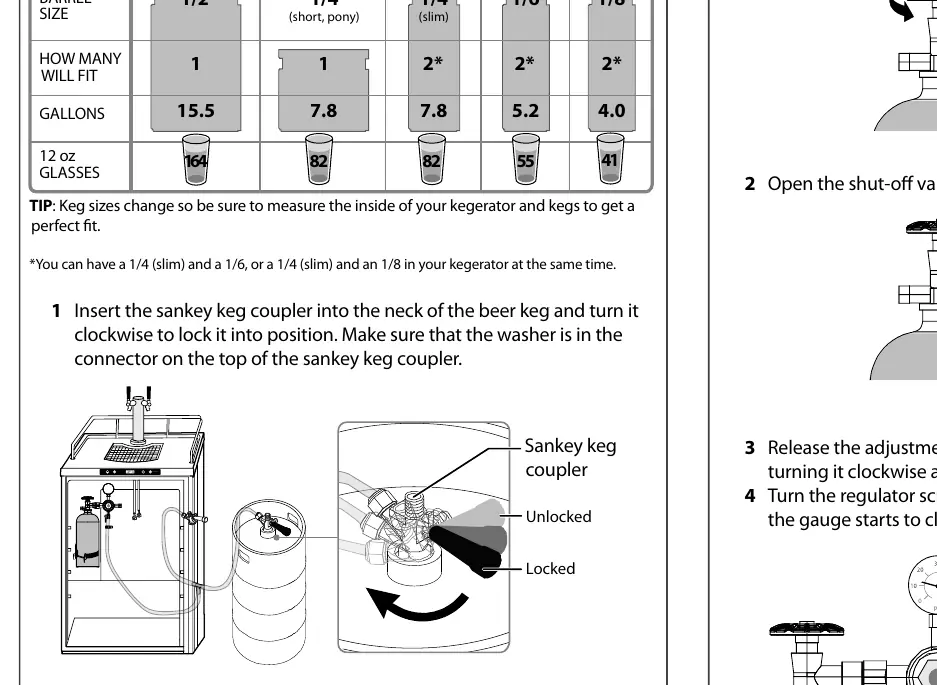
This unit accepts most brand name kegs (1/2 barrel or smaller). Insert the Sankey keg coupler into the keg neck and turn clockwise to lock. Connect the beer tube to the coupler and tighten the wing nut. Pull the black handle on the coupler and press downward to tap the keg.
Adjusting the CO2 regulator
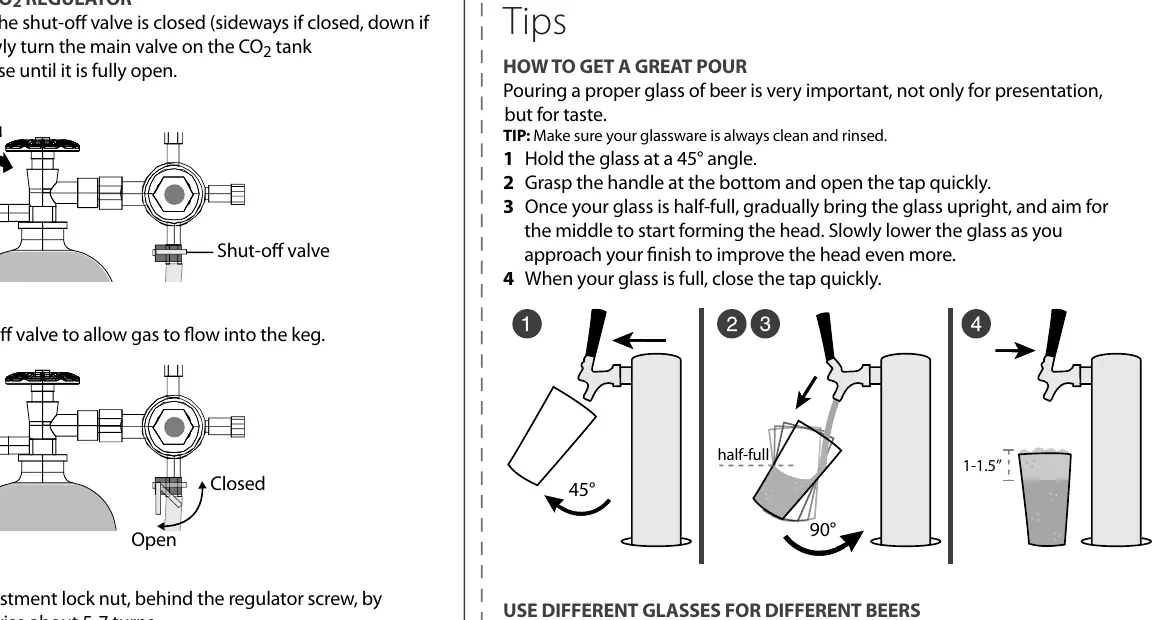
With the shut-off valve closed, open the main valve on the CO2 tank. Open the shut-off valve to allow gas flow. Release the adjustment lock nut behind the regulator screw. Turn the regulator screw clockwise to increase pressure, setting the gauge to 10-12 PSI. Tighten the lock nut to secure the setting.
Setting the temperature
Press the °F/°C button to toggle units. Use the - or + buttons to set the temperature between 32°F and 50°F (0°C to 10°C). Allow the unit to cool for 48 hours before adjusting further. Use the Quick Cool button to set the unit to its lowest temperature for 24 hours.
Tips for a great pour
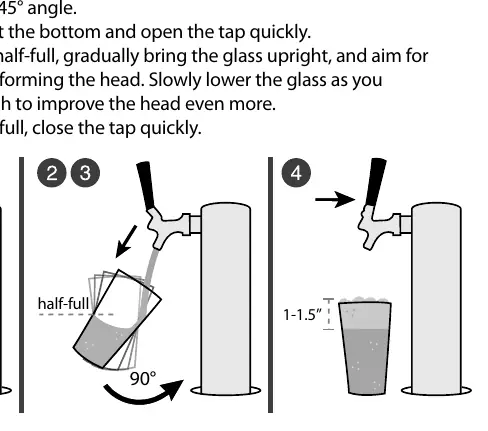
- Always use clean, rinsed glassware.
- Hold the glass at a 45° angle.
- Open the tap quickly and completely.
- As the glass fills, gradually bring it upright to form the head.
Practical help
Common problems
Too much head
Ensure CO2 pressure is between 10-12 PSI, activate the pressure relief valve on the coupler for 3 seconds, or check that the temperature is between 34°F and 38°F.
Flat beer / No head
Ensure the tap is opened quickly and completely, use clean glasses, or increase CO2 pressure.
Abnormal taste or smell
Clean the system or replace the keg.
Before use
- Ensure 3 inches of clearance around the back and sides of the unit.
- Do not use an extension cord.
- Have the CO2 tank filled at a local supplier (shipped empty).
- Ensure the shut-off valve is closed before connecting the CO2 tank.
- Place the kegerator on a soft surface during caster installation to prevent scratches.
Specs in practice
- CO2 Pressure
- Recommended operating pressure is 10-12 PSI.
- Temperature Range
- Adjustable from 32°F to 50°F (0°C to 10°C).
Images and diagrams
- The draft arm assembly connects the beer tube and wing nut to the cabinet top.
- The CO2 regulator connects to the tank valve and the gas line.
- The Sankey keg coupler locks onto the keg neck and connects to the beer tube.
Model compatibility
- Accepts most brand name kegs.
- Supports 1/2 barrel size or smaller.
- Can hold a 1/4 (slim) and 1/6, or a 1/4 (slim) and 1/8 keg simultaneously.

Manual page author
Michael Turner
Technical manual editor
Reviews PDF manuals for structure, safety notes, and practical product details so readers can find the right information quickly.