Furniture / TV Stands
Assembly Instructions for Invicta Interior 47816 TV Board
Comprehensive assembly and care guide for the Invicta Interior 47816 TV Board. This manual includes a detailed parts list, step-by-step installation instructions, and maintenance tips for the ceramic surface.
Quick answers from the manual
Quick answer
- This document is the assembly manual for the Invicta Interior 47816 TV Board. It covers the parts list, 22-step assembly process, ceramic surface care, and safety guidelines. p. 1, 2, 20
Key actions
- Assembly requires two people. p. 2
- Use a blanket or cardboard as a base during assembly. p. 23
Problems and fixes
Drawer alignment
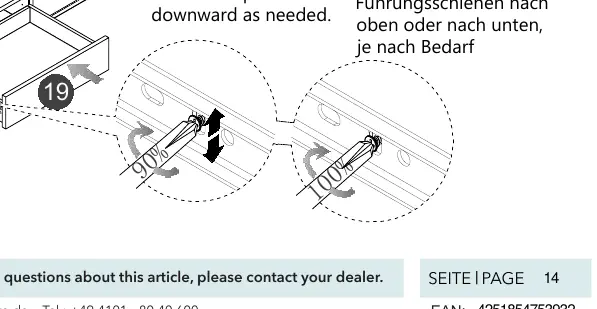
Loosen screws and shift slide rails upward or downward.
p. 15Maintenance and reset
- Regularly check that all screws are tight. p. 23
Where to find it in the PDF
- Parts List p. 2
- Assembly Steps p. 3, 4, 5, 6
- Care and Cleaning p. 21, 22
Table of contents
Manual images
Click an image to enlargeImportant Information
This manual provides assembly instructions for the Invicta Interior 47816 TV Board. Please note that assembly requires two people to avoid damage and injury. Before starting, check the packaging for transport damage and verify that all parts listed are present. Use a blanket or cardboard as a base during assembly to protect the floor and the furniture.
Parts List
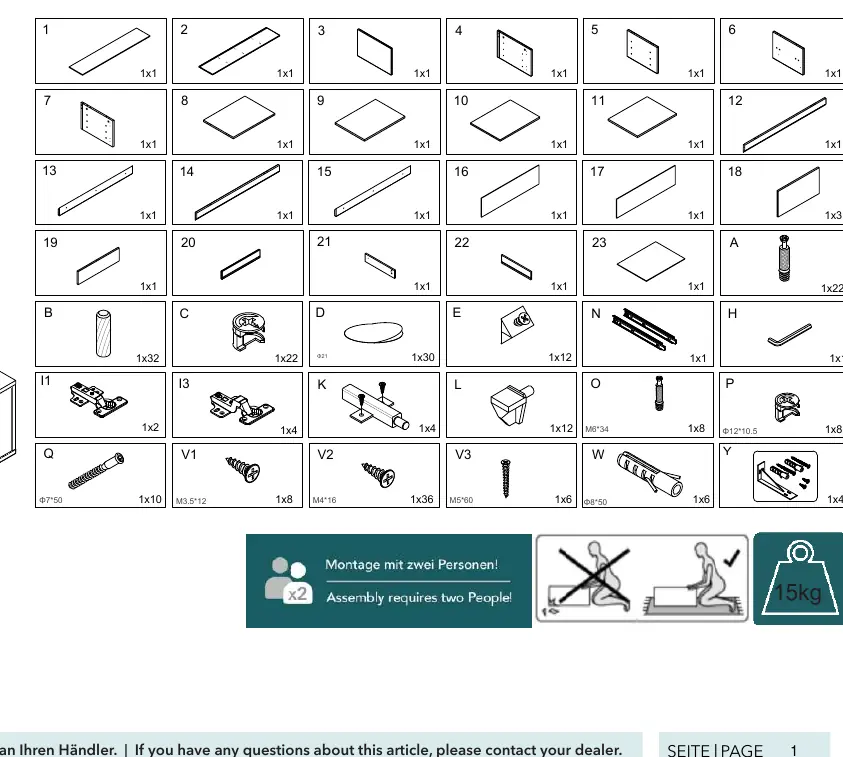
The package includes various panels, screws, hinges, and rails. Please refer to the parts diagram on page 2 to identify all components (labeled 1-23 and A-Y) before beginning the assembly process.
Assembly Instructions
The assembly process consists of 22 steps. Key stages include:
- Steps 1-2: Preparing panels with dowels and cam bolts.
- Steps 3-10: Assembling the main frame and internal structure.
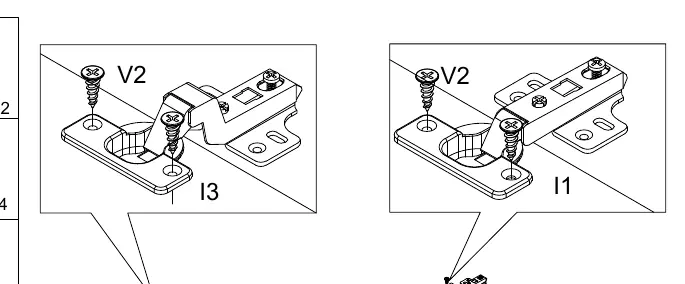
- Steps 11-13: Installing hinges and attaching doors.
- Steps 14-17: Assembling the drawers and adjusting the drawer front alignment.
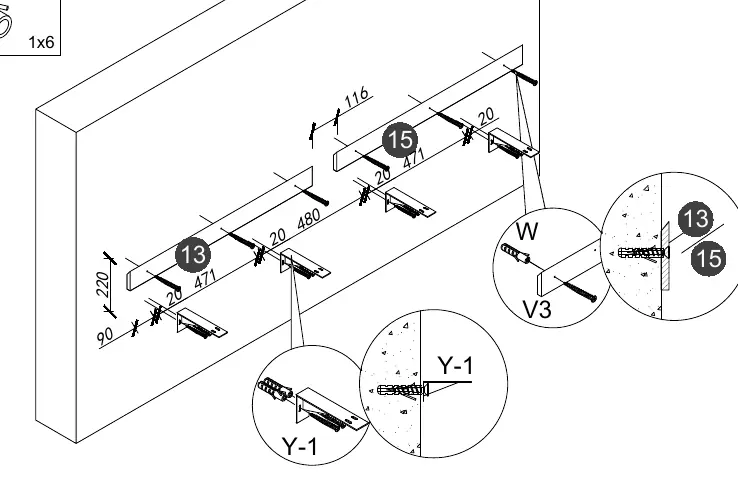
- Steps 18-21: Final assembly and wall mounting.
Ensure all screws are tightened securely after assembly to maintain stability.
Care and Cleaning
The TV board features a high-quality ceramic surface. While heat-resistant, it is recommended to avoid placing hot objects (like pans) directly on the surface to prevent damage from spontaneous heat effects. Use coasters or pads to prevent stains and scratches. Clean the surface using a soft, clean cloth and commercially available glass cleaner. For stubborn stains, a mild scouring agent or eraser sponge may be used.
Safety Information
The furniture is not a toy and should only be used for its intended purpose. Do not climb or stand on the furniture. Ensure the unit is not overloaded and avoid one-sided loads that could cause tipping. Keep plastic packaging away from children to prevent choking hazards. If the product is damaged, contact the dealer with photos of the damage, the packaging, and the order number.
Manufacturer information
Invicta Interior GmbH & Co. KG
Practical help
Common problems
Damaged parts upon delivery
Document damage with photos of the item and packaging, and contact the dealer with the order number.
Drawer front misalignment
Loosen the screws on the slide rails and shift the rails upward or downward as needed.
Before use
- Check packaging for transport damage
- Verify all parts are present according to the parts list
- Ensure two people are available for assembly
- Use a blanket or cardboard as a protective base
- Check wall condition before mounting
Specs in practice
- Ceramic Surface
- Heat-resistant material fired at 800°C; avoid direct contact with very hot objects.
Images and diagrams
- Page 2: Overview of all construction parts and hardware.
- Page 11: Detailed view of hinge installation (I1, I3, V2).
- Page 15: Instructions for aligning drawer fronts using slide rail screws.
- Page 18: Wall mounting procedure using brackets (Y-1) and wall plugs (W).
Model compatibility
- Ensure wall type is suitable for mounting.
- Use appropriate fixing materials for your specific wall type.

Manual page author
Michael Turner
Technical manual editor
Reviews PDF manuals for structure, safety notes, and practical product details so readers can find the right information quickly.