Lighting / Fixtures
Assembly Instruction for Invicta Interior AI_46014 Pendant Lamp
A complete assembly and installation guide for the Invicta Interior pendant lamp (models 46014, 46015, 46016). Includes step-by-step mounting instructions, wiring diagrams, and bulb specifications.
Quick answers from the manual
Quick answer
- This document provides assembly instructions for the Invicta Interior pendant lamp (models 46014, 46015, 46016), including wiring and bulb installation. p. 1
Key actions
- Connect the electrical wires matching L to L and N to N. p. 1
- Install a G9 LED bulb (max 3W). p. 1
Technical specifications
| Parameter | Value | Meaning | Pages |
|---|---|---|---|
| Bulb Type | G9 LED | Required bulb base | p. 1 |
| Max Wattage | 3W | Maximum power for the bulb | p. 1 |
Where to find it in the PDF
- Assembly Instructions p. 1
Table of contents
Important Information
This document provides assembly instructions for the Invicta Interior pendant lamp (models 46014, 46015, and 46016). Please ensure the power supply is disconnected before beginning the installation process. If you have any questions regarding this article, please contact your dealer.
Parts List
Ensure all components are present before starting:
- A: Lamp base with cable
- B: Glass shade
- F: Wall plugs (x2)
- D: Screws (x2)
Installation Steps
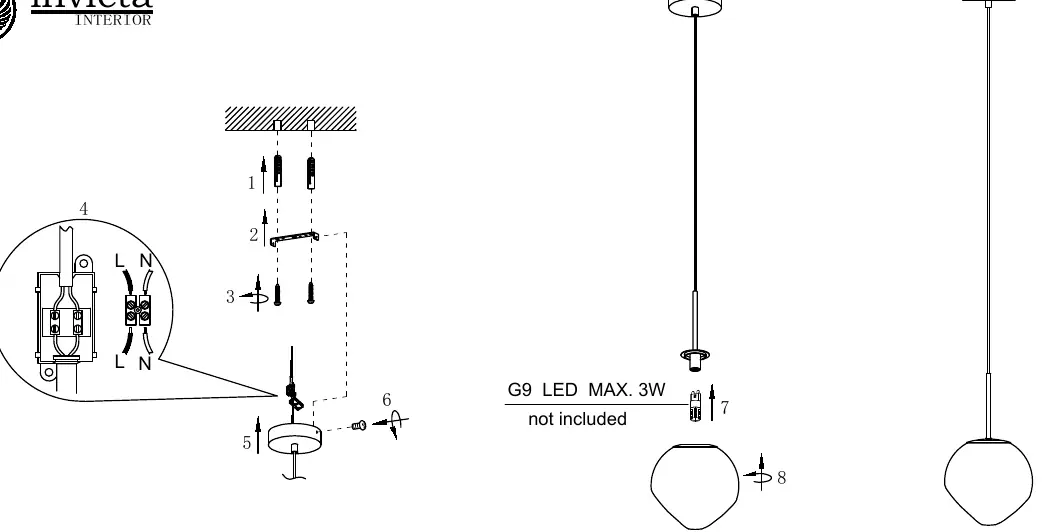
- Drill the necessary holes in the ceiling according to the bracket spacing.
- Position the ceiling bracket over the holes.
- Secure the bracket to the ceiling using the provided screws (D) and wall plugs (F).
- Connect the electrical wires: Ensure the Live (L) wire is connected to the L terminal and the Neutral (N) wire is connected to the N terminal.
- Attach the lamp canopy to the ceiling bracket.
- Secure the canopy in place using the side screw.
- Insert the light bulb (see requirements below).
- Attach the glass shade (B) to the lamp fixture.
Bulb Requirements
This lamp requires a G9 LED bulb with a maximum power of 3W. Please note that the bulb is not included with the product.
Contact Information
For further assistance, you may contact the manufacturer:
Invicta Interior GmbH & Co KGKirchenweg 8, 24568 NützenEmail: [email protected]: 04101 - 80 40 615
Manufacturer information
Invicta Interior GmbH & Co. KG
Practical help
Common problems
Lamp does not turn on
Check if the bulb is properly seated and that the electrical connections (L and N) are secure and correct.
Bulb is too bright or flickering
Ensure you are using a G9 LED bulb with a maximum of 3W. Using a higher wattage bulb may damage the fixture.
Before use
- Ensure the main power supply is switched off at the circuit breaker.
- Verify that the ceiling structure is capable of supporting the weight of the lamp.
- Check that all parts (A, B, D, F) are included in the package.
- Purchase a compatible G9 LED bulb (max 3W) as it is not included.
Images and diagrams
- The wiring diagram illustrates the connection of the Live (L) and Neutral (N) wires to the terminal block.
- Steps 1-3 demonstrate the ceiling mounting process using the bracket, screws, and wall plugs.
- Steps 5-6 show the attachment of the canopy to the ceiling bracket.
- Steps 7-8 detail the final assembly of the bulb and the glass shade.
Model compatibility
- Compatible with models 46014, 46015, and 46016.

Manual page author
David Miller
Documentation analyst
Organizes user manual content into clear summaries, with attention to model details, product context, and everyday usability.