Lighting / Emergency Lighting
Owner's Manual for IOTA DLS Series Power Converter/Battery Charger
Quick guide for the IOTA DLS Series Power Converter/Battery Charger. Includes installation instructions, battery connection steps, LED indicator codes, and technical specifications.
Quick answers from the manual
Quick answer
- The IOTA DLS Series is a power converter and battery charger that converts 220-240V AC to 13.6V DC. It features automatic charging stages and protection features for safe battery maintenance. p. 2
Key actions
- Mounting the unit p. 2
- Connecting the battery p. 2
First start
- Connect the AC input cord to the power source before connecting the battery to minimize arcing. p. 2
Show 4 more answers Show less
Problems and fixes
Reverse Polarity
Fuses will blow; replace with the same size and style fuse.
p. 2Maintenance and reset
- Replace blown fuses by loosening screws, inserting new fuse of same type/rating, and tightening to 5 inch-pound max torque. p. 2
Technical specifications
| Parameter | Value | Meaning | Pages |
|---|---|---|---|
| Output Voltage | 13.6V DC | Nominal output voltage | p. 4 |
| Input Voltage | 200-240V AC | Input voltage range | p. 4 |
Where to find it in the PDF
- Safety Warnings p. 1
- Installation and Operation p. 2
- Connections and Charge Control p. 3
- Technical Specifications p. 4
Table of contents
Manual images
Click an image to enlargeQuick guide from the manual
The IOTA DLS Series is a power converter and battery charger designed to convert 220-240V AC to 13.6V DC. It is intended for indoor use only. Proper installation and adherence to safety guidelines are critical to prevent electrical shock, fire, or explosion hazards.
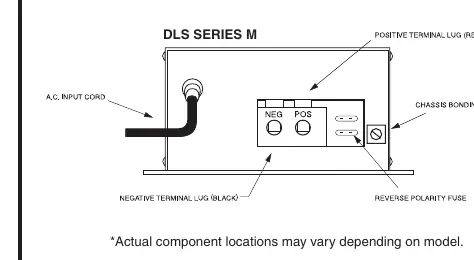
Product Description
The DLS series provides a tightly controlled DC output. It functions as a power supply for DC loads and as a battery charger. It features automatic charging stages (Bulk, Absorption, Float) and protection features including Reverse Battery Polarity Protection, Brown-Out Input Protection, Over-Current Protection, and Over-Temperature Protection.
Installation Guidelines
Mounting Location
- Mount in an enclosed or interior compartment.
- Provide at least 4 inches of air space around the fan for proper intake.
- Do not mount in zero clearance compartments or near flammable items like gasoline or batteries.
- Do not mount directly above a battery to avoid corrosion from gases.
240 Volt A.C. Input
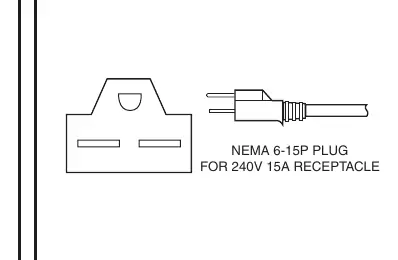
Plug the unit into an appropriate 220-240 volt 3-wire grounded source. Do not use extension cords. Connect the AC input before connecting the battery to minimize arcing.
Battery Connection
Disconnect the positive side of the battery before installation. Connect the positive (red) and negative (black) terminal lugs to the battery or load. Use the proper wire gauge based on amperage (4-6 AWG at 45 in.-lbs or 8 AWG at 40 in.-lbs). Connect the Chassis Bonding Lug to the vehicle chassis or grounding source.
Charge Control
Two-Step Voltage Jack
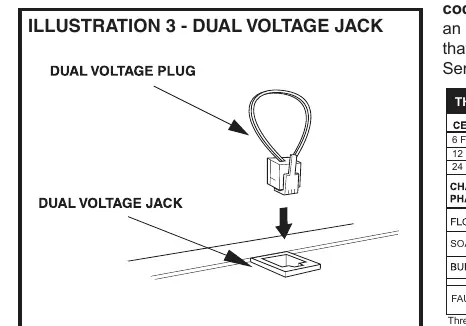
The two-step voltage jack allows switching from float voltage to high-stage bulk voltage for fast charging. Remove the Dual Voltage Plug when quick-charging is complete to avoid battery damage. If the unit has an internal IQ4 smart charger, this jack is disabled.
IQ4 LED Indicator
Models with an internal IQ4 smart charger feature an LED on the fan end. It indicates the charging phase (Bulk, Absorption, Float). Refer to the LED code tables in the manual to identify the charging status based on flash patterns.
Maintenance and Troubleshooting
The unit is protected against reverse polarity on the DC output. If the unit is connected incorrectly, the fuses will blow. Replace fuses with the same size and style. Use a screwdriver to loosen screws, replace the fuse, and tighten firmly (5 inch-pound maximum torque). Do not overtighten.
Technical Specifications
The DLS series is available in 30A, 45A, and 55A models. All models operate on 200-240V AC input and provide 13.6V DC output. Operating temperature range is 0 to 40 degrees Celsius.
Practical help
Common problems
Small spark or arc at power outlet when plugging in
This is a common occurrence due to internal capacitors drawing power.
Fuses blowing
Indicates incorrect connection or reverse polarity. Replace with the same size and style fuse.
Before use
- Ensure the installation area is indoors and well-ventilated.
- Provide at least 4 inches of clearance around the fan.
- Verify the power source is a 220-240V 3-wire grounded outlet.
- Disconnect the positive battery terminal before starting installation.
- Ensure correct wire gauge (4-6 AWG or 8 AWG) is used for connections.
Show more Show less
Specs in practice
- Output Voltage
- 13.6V DC nominal output.
- Input Voltage
- 200-240V AC input range.
Images and diagrams
- Illustration 1: Shows the location of the positive/negative terminals, chassis bonding lug, and reverse polarity fuse.
- Illustration 2: Shows the NEMA 6-15P plug configuration for 240V 15A receptacles.
- Illustration 3: Shows the Dual Voltage Jack and the Dual Voltage Plug.
Model compatibility
- Designed for indoor use only.
- Not compatible with extension cords.
- Requires 220-240V grounded AC source.
- IQ4 smart charger functionality is internal on some models; external IQ4 can be added to the Dual Voltage Jack on others.

Manual page author
Emily Carter
User documentation editor