Electronics / Speakers & Soundbars
JBL STAGE 200P / STAGE 220P Powered Subwoofer User Manual
Quick guide for the JBL STAGE 200P and 220P powered subwoofers. Learn about placement, rear-panel controls, connection methods, and technical specifications.
Quick answers from the manual
Quick answer
- The JBL STAGE 200P/220P is a powered subwoofer. To set it up, verify the voltage selector, connect it to your receiver's LFE or Preamp output using an RCA cable, and adjust the crossover, phase, and volume controls for optimal sound. p. 2, 3, 4
Key actions
- Set the voltage selector switch p. 3
- Connect to receiver p. 4
- Install carpet spikes p. 5
First start
- Set voltage, connect audio cable, plug into power, set Power Mode to 'Auto'. p. 3, 4, 5
Show 3 more answers Show less
Problems and fixes
Bass cancellation
Adjust the Phase switch.
p. 3, 5Technical specifications
| Parameter | Value | Meaning | Pages |
|---|---|---|---|
| STAGE 200P Power | 150W RMS (300W Dynamic) | Amplifier power output | p. 5 |
| STAGE 220P Power | 250W RMS (500W Dynamic) | Amplifier power output | p. 5 |
Where to find it in the PDF
- Rear-Panel Controls p. 3
- Placement and Connection p. 4
- Specifications p. 5
Table of contents
Manual images
Click an image to enlargeQuick Guide from the Manual
The JBL STAGE 200P and 220P are powered subwoofers designed to enhance low-frequency performance in your audio system. This guide covers setup, connection, and adjustment. Before use, ensure the voltage selector switch on the rear panel is set to the correct voltage for your region (100-120V or 220-240V). The package includes the subwoofer, a power cord, and four carpet spikes.
Rear-Panel Controls and Connection
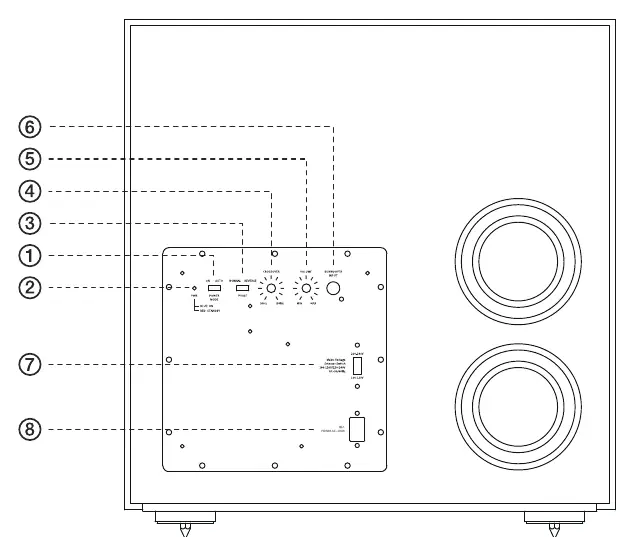
- Power Mode: Set to 'Auto' for standby mode (turns on when signal is detected, off after 15 minutes of no signal) or 'On' for continuous power.
- Power Mode Indicator: Glows blue when On, red when in Standby.
- Phase Switch: Adjusts the subwoofer's movement relative to main speakers to prevent sound cancellation.
- Crossover Control: Sets the highest frequency the subwoofer reproduces.
- Volume: Adjusts the subwoofer output level.
- Subwoofer (LFE) Input: Connects to the dedicated LFE output of your receiver.
- Main Voltage Selector Switch: Selects between 220-240V (up) and 100-120V (down).
- Power Input: Connects to an unswitched electrical outlet.
Placing the Subwoofer
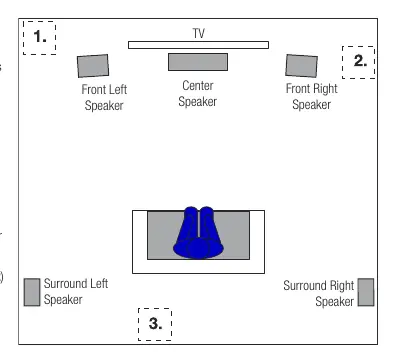
Placement significantly impacts bass performance. Placing the subwoofer in a corner generally maximizes bass output. Placing it along the same plane as the left and right speakers can improve integration. Experiment with placement by temporarily putting the subwoofer in your listening position and moving around the room to find the spot with the best bass response.
Connecting the Subwoofer
To a Receiver with LFE Output: Connect the receiver's Subwoofer/LFE output to the subwoofer's LFE input using an RCA cable. Turn the Crossover control fully clockwise on the subwoofer.
To a Receiver with Preamp Outputs: Connect the receiver's Preamp output to the subwoofer's LFE input. Adjust the Crossover setting based on your main speakers (00Hz for mid-sized, higher for smaller, lower for larger).
Operating the Subwoofer
Turning On/Off: Plug into an unswitched outlet. Use the 'Auto' setting for automatic operation. Remove the power cord if the unit will not be used for an extended period.
Adjustments: Use the Crossover and Volume controls to balance the subwoofer with your main speakers. If the bass sounds weak or too strong at certain frequencies, adjust the Crossover. Use the Phase switch to ensure the subwoofer is in phase with your main speakers for maximum impact.
Using Carpet Spikes: If placing the subwoofer on carpet, screw the four supplied metal spikes into the threaded inserts in each foot. Do not use spikes on non-carpeted surfaces. Never drag the subwoofer; always lift it to move.
Technical Specifications
STAGE 200P: 10" Powered Subwoofer, 150W RMS (300W Dynamic), 32Hz-150Hz frequency response.
STAGE 220P: 12" Powered Subwoofer, 250W RMS (500W Dynamic), 29Hz-150Hz frequency response.
Manufacturer information
JBL
Practical help
Common problems
No sound or weak bass
Check the Phase switch setting, ensure the Crossover is set correctly, and verify the subwoofer placement in the room.
Subwoofer is too loud or too quiet
Adjust the Volume knob. If the issue persists, change the subwoofer's location (corner placement increases bass, moving away from walls decreases it).
Subwoofer does not turn on
Ensure the power cord is connected to an active, unswitched outlet and the voltage selector switch is set correctly.
Before use
- Verify the Main Voltage Selector Switch is set to your region's voltage (100-120V or 220-240V).
- Ensure you have an RCA subwoofer/LFE cable (not included).
- Choose a location for the subwoofer (corner placement maximizes bass).
- Install the four metal spikes if placing the unit on a carpeted surface.
- Check receiver settings to ensure subwoofer output is enabled.
Show more Show less
Images and diagrams
- Rear Panel: Identifies all inputs, power switches, and adjustment knobs.
- Placement: Illustrates optimal speaker arrangement in a room.
- Connection: Shows how to wire the subwoofer to a receiver using LFE or Preamp outputs.
Model compatibility
- Requires a receiver or processor with a dedicated subwoofer/LFE output or preamp outputs.
- Voltage selector must be set correctly before plugging in the power cord.

Manual page author
David Miller
Documentation analyst