Electronics / Speakers & Soundbars
User Manual for JBL Stage XD-5 and XD-6 Indoor/Outdoor Speakers
Quick start guide for JBL Stage XD-5 and XD-6 indoor/outdoor speakers. Includes installation instructions for wall and tabletop mounting, wiring guidelines, and technical specifications.
Table of contents
Manual images
Click an image to enlargeQuick guide from the manual
This guide provides essential information for the installation and setup of JBL Stage XD-5 and XD-6 indoor/outdoor loudspeakers. Before beginning, ensure all wiring meets local fire codes for hidden installations. Do not connect speakers to an amplifier exceeding the recommended power rating to prevent overheating and potential injury. Always ensure the amplifier is turned off until all speaker connections are complete.
Box Contents
- 2x Stage XD-5 or XD-6 Loudspeakers
- 2x Zero Bezel Grilles
- 4x Rubber Feet
- 1x Grille Removal Tool
- 2x Wall Installation Kit (Mounting Bracket)
- 1x Quick Start Guide
Installation Precautions
Proper installation is critical for safety and performance. Ensure all wire runs inside walls and ceilings comply with local fire codes. Select the appropriate speaker wire gauge based on the distance from the amplifier to the speaker to maintain signal integrity.
Wiring Guidelines
Use the following wire gauge recommendations based on the distance from the amplifier:
- Less than 50ft (15m): 16AWG
- 50ft (15m) to 100ft (30m): 12AWG
- Greater than 100ft (30m): 10AWG
Wall Installation
The speakers include hardware for wall mounting. Follow these steps:
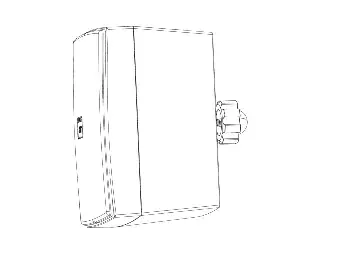
- Install lock nut [A] onto the threaded knuckle [C], positioning it away from the end.
- Slide the lock ring [B] over the threaded knuckle [C].
- Secure the lock nut [A] onto the speaker.
- Locate the mounting position on the wall, ensuring enough clearance for the speaker. Secure the knuckle joint [D] to the wall using the included security cable [E] on one of the bottom screws.
- Install the knuckle [C] into the joint [D] and secure it with the lock ring [B].
Adjusting Angle and Orientation
Once mounted, you can adjust the speaker angle and orientation. Loosen the lock ring slightly, move the speaker to the desired position, and retighten. For horizontal orientation, the logo can be rotated.
Tabletop Installation
For use on a flat surface like a table or desktop, install the included rubber feet onto the bottom of each speaker at the rear outer corners.
Connecting Speakers
- Ensure the correct wire gauge has been used based on the distance chart.
- Verify wires are marked for polarity to prevent out-of-phase connections.
- Connect the positive wire to the (+) terminal and the negative wire to the (-) terminal.
- Continue connecting until all speakers are wired.
Specifications
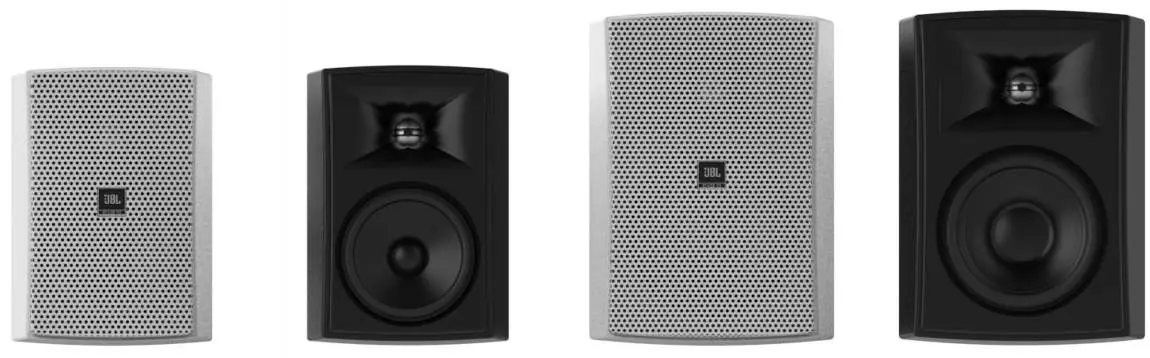
The Stage XD-5 and XD-6 feature aluminum dome tweeters with High-Definition Imaging (HDI) waveguides and Polycellulose cone woofers. Both models have a nominal impedance of 6 ohms and a recommended amplifier power of 20-100W RMS. The Stage XD-5 has a sensitivity of 86dB and frequency response of 75Hz-25kHz, while the Stage XD-6 has a sensitivity of 88dB and frequency response of 55Hz-25kHz.
Manufacturer information
JBL
Practical help
Common problems
Overheating or risk of injury
Do not connect the speakers to an amplifier rated above the recommended power (20-100W RMS).
Sound quality issues (out of phase)
Ensure wires are marked for polarity and connected to the correct (+) and (-) terminals.
Before use
- Check local fire codes for in-wall/ceiling wiring.
- Determine wire length and select the correct gauge (16AWG, 12AWG, or 10AWG).
- Ensure the amplifier is powered off before connecting wires.
- Verify mounting location allows for clearance from ceiling or obstacles.
- Ensure all speakers are wired and installed before connecting the amplifier end.
Specs in practice
- Nominal Impedance
- The electrical resistance of the speaker, rated at 6 ohms for these models.
- Recommended Amplifier Power
- The safe power range for the amplifier to drive the speakers (20-100W RMS).
Images and diagrams
- Wall Installation: Shows the assembly sequence of the knuckle joint, lock nut, and security cable.
- Tabletop Installation: Indicates the specific rear corner locations for attaching the rubber feet.
Model compatibility
- Compatible with amplifiers rated 20-100W RMS.
- Wire gauge requirements: 16AWG (100ft).

Manual page author
Emily Carter
User documentation editor
Prepares concise manual descriptions and highlights the most useful setup, operation, and maintenance information for readers.