Tools / Drills
User Manual for KIMO 5001 12V Power Polisher
Quick guide for the KIMO 5001 12V Power Polisher. Includes setup, battery installation, speed control, accessory attachment, and maintenance instructions.
Table of contents
Manual images
Click an image to enlargeQuick guide from the manual
This manual provides essential instructions for the safe and effective operation of the KIMO 5001 12V Power Polisher. Users should read all safety warnings before operation to prevent electric shock, fire, or personal injury. The tool is designed for polishing tasks and requires specific care regarding battery handling and accessory usage.
Safety Rules
- Work Area: Keep the area clean and well-lit. Do not operate in explosive atmospheres (flammable liquids, gases, or dust). Keep bystanders and children away.
- Electrical Safety: Do not expose the tool to rain or wet conditions.
- Personal Safety: Stay alert, use common sense, and do not operate while tired or under the influence of substances. Wear appropriate safety equipment, including eye protection, dust masks, and non-skid safety shoes.
- Tool Care: Secure workpieces with clamps. Do not force the tool. Ensure the switch functions correctly before use.
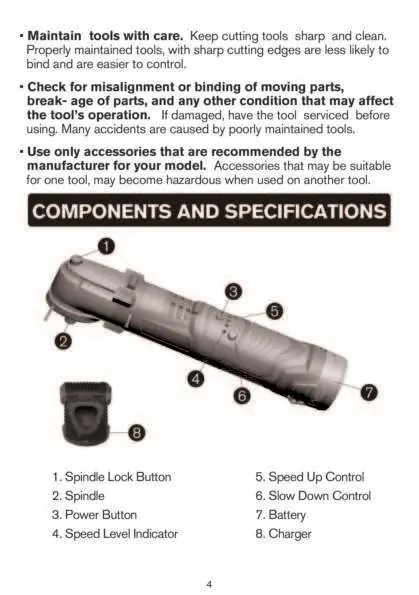
Components and Specifications
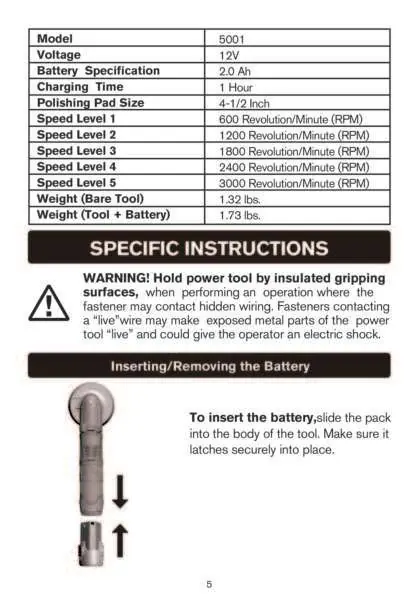
The KIMO 5001 features a spindle lock, power button, speed controls, and battery system. Key specifications include:
- Voltage: 12V
- Battery: 2.0 Ah
- Charging Time: 1 Hour
- Polishing Pad Size: 4-1/2 inch
- Speed Levels: 5 levels (600 to 3000 RPM)
- Weight (Tool + Battery): 1.73 lbs
Battery Operation
Inserting the Battery: Slide the battery pack into the body of the tool until it latches securely into place.
Removing the Battery: Depress the release buttons and pull the battery pack out of the tool.
Starting and Speed Control
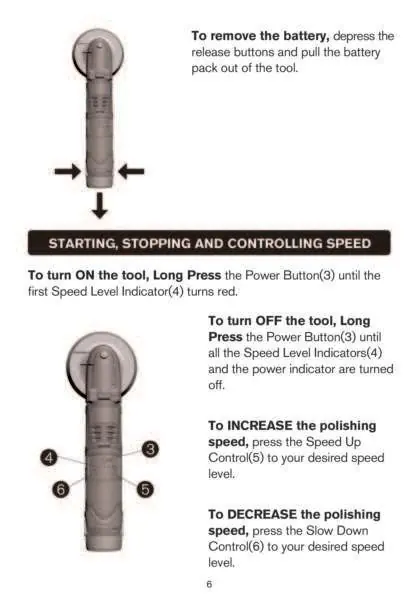
- Turn ON: Long press the Power Button until the first Speed Level Indicator turns red.
- Turn OFF: Long press the Power Button until all indicators turn off.
- Increase Speed: Press the Speed Up Control to the desired level.
- Decrease Speed: Press the Slow Down Control to the desired level.
Attaching and Removing Accessories
Always remove the battery pack before changing accessories. Only use 4-1/2 inch (11.4 cm) polishing pads.
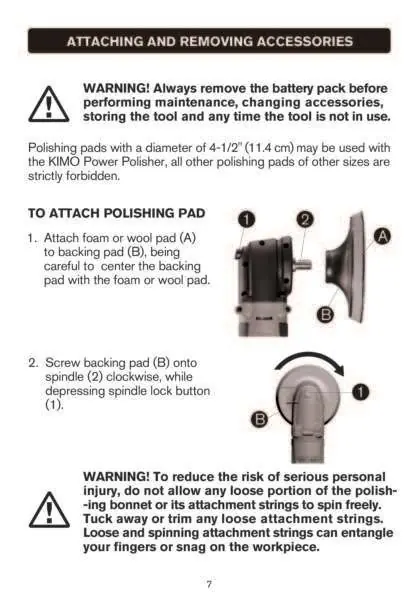
- To Attach: Attach the foam or wool pad to the backing pad, ensuring it is centered. Screw the backing pad onto the spindle clockwise while depressing the spindle lock button.
- To Remove: Depress the spindle lock button and unscrew the backing pad counter-clockwise.
Polishing Tips
Use lower speeds for applying liquid waxes and polishes, and higher speeds for removing dried liquid. Always test on a flat, inconspicuous section of the car first. Use caution around sharp objects and contours of the car body.
Cleaning and Maintenance
Blow dirt and dust out of air vents with dry air at least once a week. Use a cloth dampened with water and mild soap for non-metallic parts. Never use solvents or harsh chemicals, and never immerse the tool in liquid.
Charging Procedure
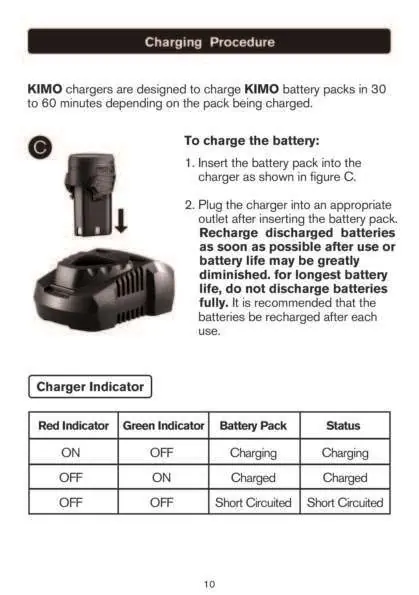
KIMO chargers typically charge battery packs in 30 to 60 minutes. Insert the battery into the charger and plug it into an outlet. Recharge discharged batteries as soon as possible; do not discharge them fully. The charger indicator shows charging status: Red ON (Charging), Green ON (Charged), Both OFF (Short Circuited).
Warranty
KIMO provides a 2-year warranty against defects in material and workmanship for the original purchaser. This warranty does not cover normal wear and tear, misuse, or unauthorized repairs. Warranty registration is not required for the standard warranty.
Manufacturer information
Zhejiang Kimo Power Tools Co., Ltd.
Practical help
Common problems
Tool does not turn on or off
Ensure the switch is functional. If the tool cannot be controlled with the switch, it is dangerous and must be repaired.
Battery life is short
Do not discharge batteries fully. Recharge after each use to maintain battery health.
Charger indicators are both OFF
This indicates a short circuit. Check the battery pack and charger connections.
Before use
- Ensure the work area is clean and well-lit.
- Wear eye protection, dust mask, and non-skid safety shoes.
- Check for misalignment or binding of moving parts.
- Ensure the battery is fully charged.
- Verify the polishing pad is securely attached.
Specs in practice
- Battery Specification
- 2.0 Ah capacity.
- Charging Time
- Approximately 1 hour.
- Polishing Pad Size
- 4-1/2 inch (11.4 cm) diameter.
- Speed Levels
- 5 settings ranging from 600 to 3000 RPM.
Images and diagrams
- 1: Spindle Lock Button
- 3: Power Button
- 4: Speed Level Indicator
- 5: Speed Up Control
- 6: Slow Down Control
Model compatibility
- Only use 4-1/2 inch (11.4 cm) polishing pads.
- Use only accessories recommended by the manufacturer.

Manual page author
David Miller
Documentation analyst
Organizes user manual content into clear summaries, with attention to model details, product context, and everyday usability.