Tools / Saws
Laguna 18BX Bandsaw User Manual
Comprehensive user guide for the Laguna 18BX Bandsaw. Includes assembly, setup, blade installation, tensioning, maintenance, and troubleshooting procedures.
Quick answers from the manual
Quick answer
- The Laguna 18BX is a professional bandsaw. Setup involves assembling the base, table, and fence, followed by installing and tensioning the blade. Regular maintenance includes cleaning tires, checking belt tension, and inspecting guides. p. 3, 4, 5, 9
Key actions
- Install blade p. 9, 10
- Tension blade p. 10
- Adjust blade guides p. 11
First start
- Close doors, check safety switch, ensure no blade is fitted, connect power, press start, check stop switch function. p. 9
Show 4 more answers Show less
Problems and fixes
Bandsaw will not start
Check start switch, safety plug, power, and breaker.
p. 17
Motor overheats
Wait for overload protector to reset. Check for dull blade or overfeeding.
p. 17Maintenance and reset
- Rotate back guide 15 degrees every 8 hours of use. p. 11
Technical specifications
| Parameter | Value | Meaning | Pages |
|---|---|---|---|
| Motor | 2.2 kW, 400V | Power rating | p. 5 |
| Blade Length | 3651 mm | Required blade length | p. 5 |
Where to find it in the PDF
- Specifications p. 5
- Assembly p. 6, 7, 8
- Maintenance p. 16
Table of contents
Manual images
Click an image to enlargeQuick guide from the manual
This manual provides essential instructions for the setup, operation, and maintenance of the Laguna 18BX Bandsaw. Before assembly or use, read the entire manual to ensure safe operation. Key procedures include proper blade selection, tracking, tensioning, and regular maintenance of the tires and guides.
Unpacking and Assembly
The bandsaw is shipped in heavy-duty packaging. Two or more people are required to lift the machine. Assembly steps include:
- Rubber feet: Install prior to removing from the pallet or by supporting the machine on wooden blocks.
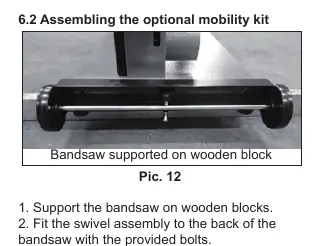
- Mobility kit: Attach the swivel assembly to the back and front wheels to the front, removing the rubber feet near the front wheels.
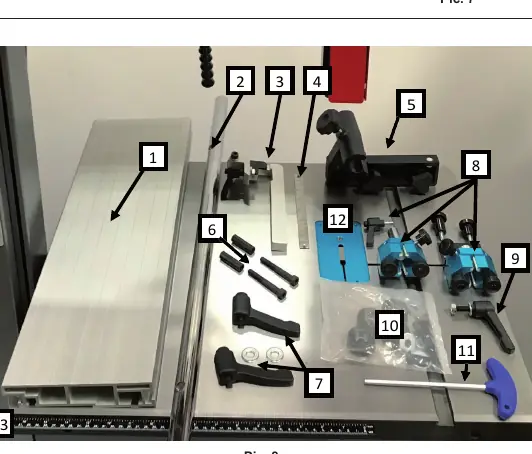
- Table: Fit the table to the trunions, ensuring the reference stop bolt is correctly positioned.
- Fence: Attach the fence bar, support, and rule to the table.
- Light: Install the optional light using the pre-drilled holes at the top of the machine.
Operation
Proper operation relies on using the correct blade for the task. The manual details blade selection based on width, pitch (TPI), and material hardness. Always ensure the blade teeth point downward toward the table.
Blade Installation and Tensioning
- Disconnect power and remove the throat plate and table split clamp.
- Slide the blade through the table slot and onto the flywheels.
- Use the quick-release tension lever to slacken the tension, then adjust the tension wheel to fit the blade.
- Activate the tension lever and apply light tension.
- Track the blade by rotating the wheels by hand and adjusting the tracking knob at the back of the machine.
Maintenance
Regular maintenance is critical for performance and safety:
- Cleanliness: Keep tires clean to prevent vibration and blade drift. Use a brush to prevent sawdust buildup.
- Guides: Inspect ceramic guides regularly for chips or cracks. Clean and lubricate with Teflon-based lubricant.
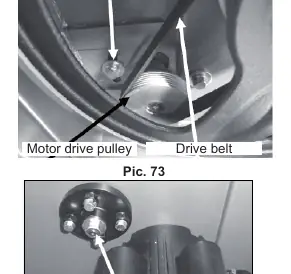
- Drive Belt: Inspect for cracks or wear. Replace if damaged by removing the lower flywheel.
- Rust Prevention: Coat non-painted surfaces with wax if the machine is not in constant use.
Troubleshooting
If the bandsaw fails to start, check the emergency stop button, safety plug, power cord, and circuit breaker. If the motor overheats, allow the internal overload protector to reset. For blade issues like kicking or clicking, check for bad welds or incorrect tracking.
Manufacturer information
Laguna Ponds
Practical help
Common problems
Bandsaw will not start
Check that the start switch is fully pulled out, the yellow safety plug is engaged, the power cord is connected, and the circuit breaker is reset.
Motor overheats
Wait for the internal overload protector to reset. Check for a dull blade, overfeeding, or clogged cooling fins.
Blade slows down during a cut
Re-tension the drive belt, replace or sharpen the blade, or reduce the feed rate.
Machine vibrates
Ensure the machine is level on the floor and check the drive belt for damage.
Before use
- Ensure all guards are in place and functional.
- Verify blade teeth point downward toward the table.
- Check that the blade is properly tensioned and tracked.
- Ensure all adjusting and locking handles are tight.
- Clear the work area of tools and loose objects.
- Wear appropriate safety gear (glasses, hearing protection, dust mask).
Show more Show less
Specs in practice
- Blade Length
- 3651 mm
Images and diagrams
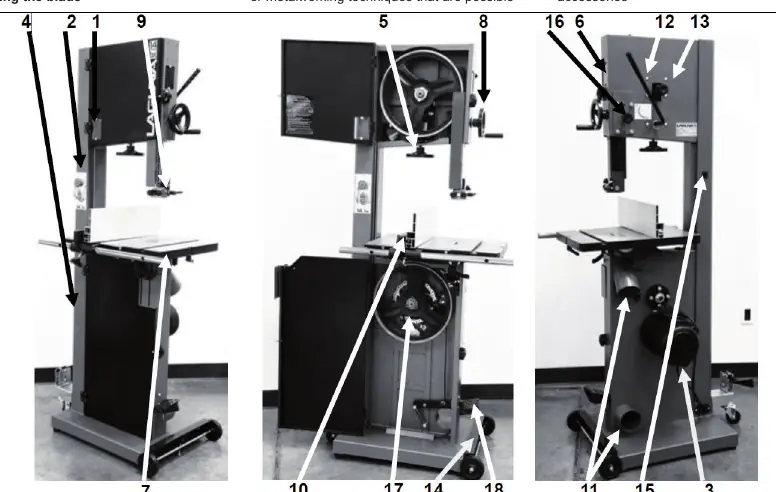
- Pic 1: Parts identification including tension indicator, switch, and motor.
- Pic 8a/8b: Assembly components for table and fence.
- Pic 46/47: Blade guide adjustment points.
- Pic 73: Drive belt adjustment bolt and motor pulley.
Model compatibility
- Designed for blade widths from 3mm to 31.75mm.
- Requires 400V power supply.
- Optional mobility kit and industrial work-light available.

Manual page author
David Miller
Documentation analyst