Tools / Saws
User Manual for Laguna 151-Fusion1 Table Saw
Quick guide for the Laguna 151-Fusion1 table saw. Includes setup, assembly, fence and blade adjustments, maintenance schedule, and troubleshooting.
Table of contents
Manual images
Click an image to enlargeQuick guide from the manual
This manual provides essential instructions for the setup, operation, and maintenance of the Laguna 151-Fusion1 table saw. Always ensure the machine is unplugged before performing any adjustments, maintenance, or changing accessories. The machine is designed for cutting wood and wood-based materials; do not use it for other materials or in explosive atmospheres.
Safety warnings
- Always wear eye, ear, and respiratory protection.
- Keep guards, riving knife, and blade guard in place during operation.
- Never reach over or behind the blade while it is spinning.
- Use a push stick or push block when the distance between the fence and blade is less than 150 mm.
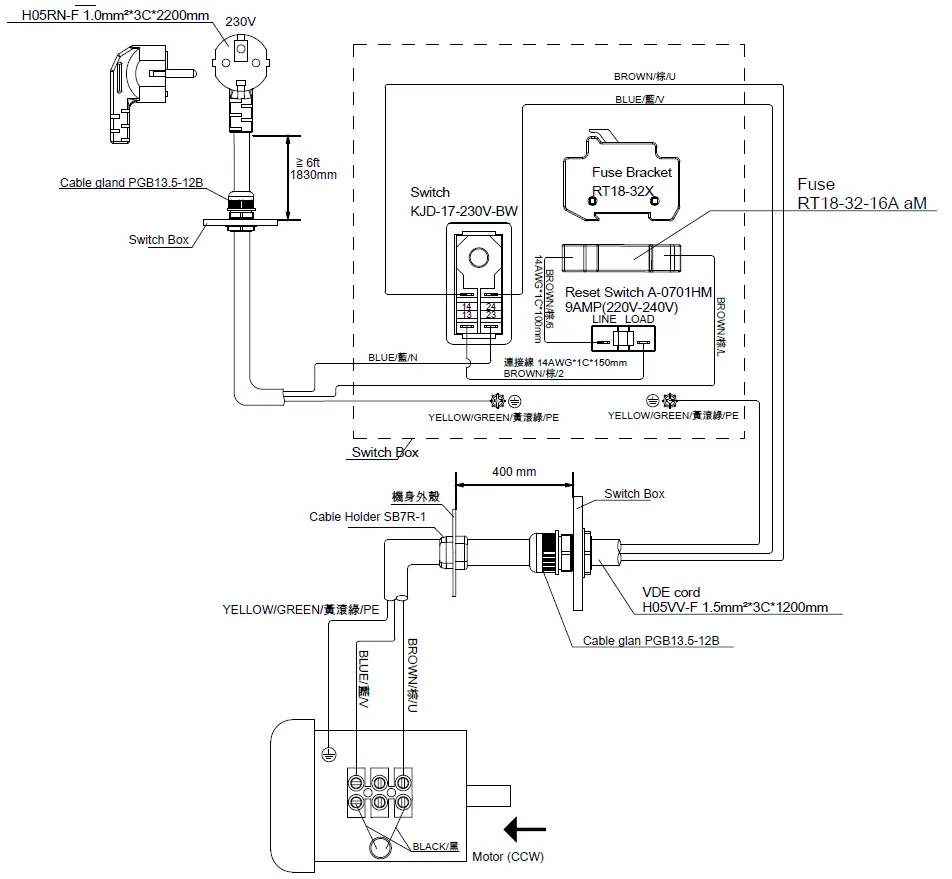
- Ensure the machine is properly grounded and connected to a circuit with overvoltage protection.
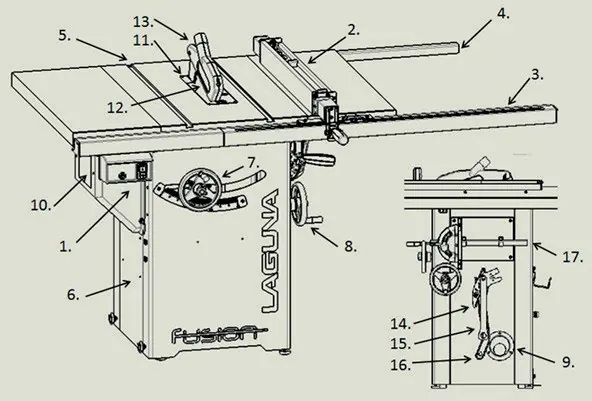
Machine overview
The machine features a magnetic switch with overload protection, an arbor height control, and an arbor tilt control. The dust extraction outlet is located on the lower side of the cabinet and requires a connection to an external dust collection system (min. 934 m3/h).
Setup and assembly
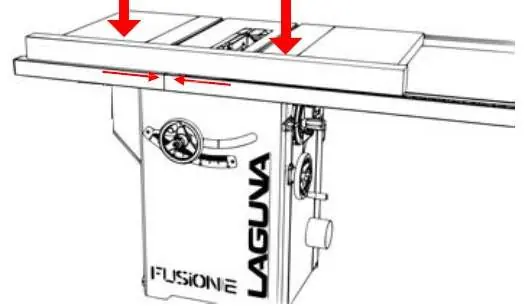
The machine is heavy; use at least two people for lifting. Assembly involves attaching the base, extension wings, and rail system. Ensure the rails are level with the table top using a straight edge before tightening bolts. The fence must be aligned parallel to the blade for safe operation.
Adjustments
- Rip Fence: Can be adjusted for parallelism with the blade. The scale should be zeroed whenever the fence is removed or adjusted.
- Blade Tilt: Limits are pre-set to 0 and 45 degrees. Adjustments can be made by accessing the tilt limit screws inside the motor housing.
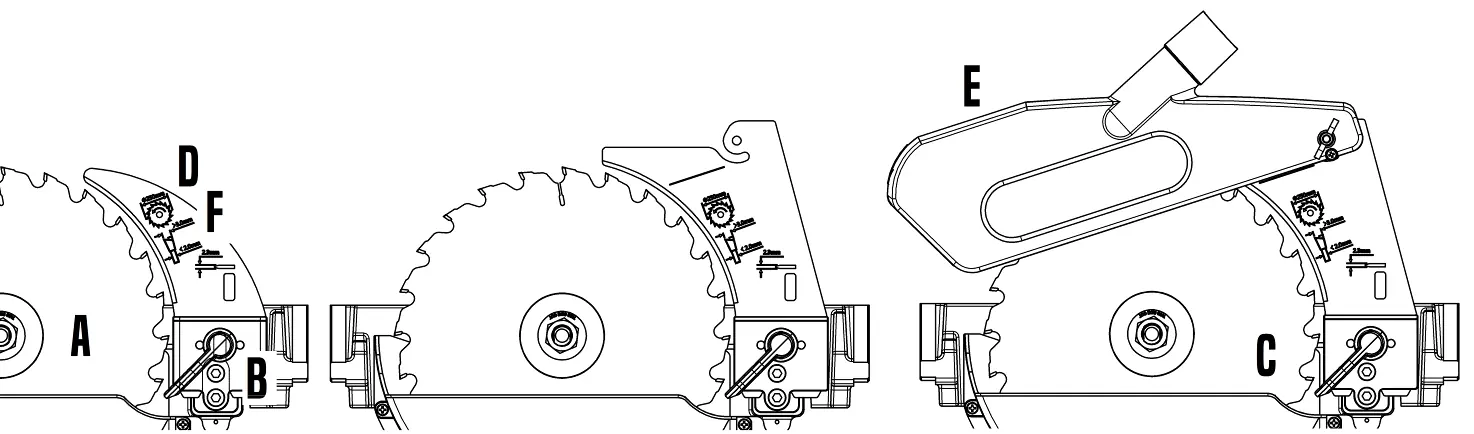
- Riving Knife: Must be aligned with the blade. The distance from the gear rim must be between 3 mm and 8 mm.
Maintenance
Regular maintenance is required to keep the machine in top performance:
- Daily: Check for loose bolts, damaged blade, riving knife, or blade guard.
- Weekly: Clean table surface, mitre slot, cast-iron parts, and rip fence.
- Monthly: Remove dust buildup from inside the cabinet and motor; check belt tension.
- Every 6-12 Months: Lubricate trunnion slides, worm gear, leadscrew, and gearboxes.
Troubleshooting
If the machine fails to start, check the start capacitor, wiring, switch, or circuit breaker. If the machine is excessively loud or vibrates, inspect for loose components, warped blades, or worn belts. If the machine trips the overload, check the feed rate, workpiece material, or belt tension.
Manufacturer information
Laguna Ponds
Practical help
Common problems
Machine will not start or trips the breaker
Check start capacitor, motor wiring, switch, or circuit breaker.
Excessive noise or vibration
Inspect for loose motor/components, warped blade, or loose/worn belts.
Machine trips overload or feels underpowered
Reduce feed rate, ensure workpiece is wood, check belt tension, or allow motor to cool.
Before use
- Ensure the machine is properly grounded.
- Verify the blade guard and riving knife are correctly installed.
- Check that the fence is parallel to the blade.
- Ensure the throat plate is level with the table.
- Check that the blade is sharp and clean.
- Connect the dust extraction system.
Specs in practice
- Blade Diameter
- 250 mm
- Max. Rip Capacity
- 765 mm (1320.8 mm with extension)
- Dust Collection
- 100 mm outlet, min. 934 m3/h
Images and diagrams
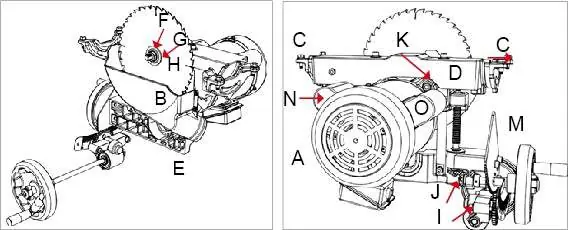
- Internal Components Map: Identifies motor, trunnion slides, arbor, and gearing locations.
- Wiring Diagram: Details the 230V electrical connections.
Model compatibility
- Only use circular blades with 250 mm diameter and 30 mm arbor.
- Do not use HSS or chrome blades.

Manual page author
Michael Turner
Technical manual editor
Reviews PDF manuals for structure, safety notes, and practical product details so readers can find the right information quickly.