Garden / Pond Equipment
Operating Instructions for Laguna 14BX Bandsaw
Quick guide for the Laguna 14BX Bandsaw. Includes assembly, blade installation, tracking, tensioning, maintenance, and troubleshooting steps.
Table of contents
Manual images
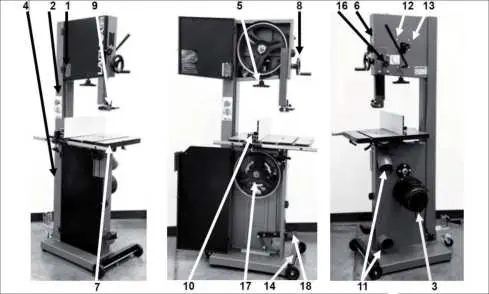
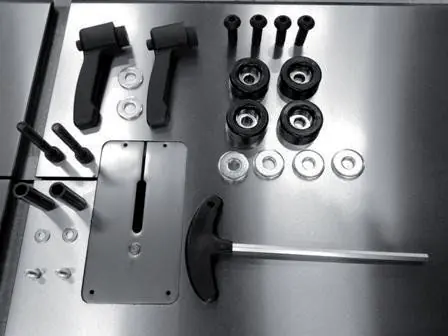
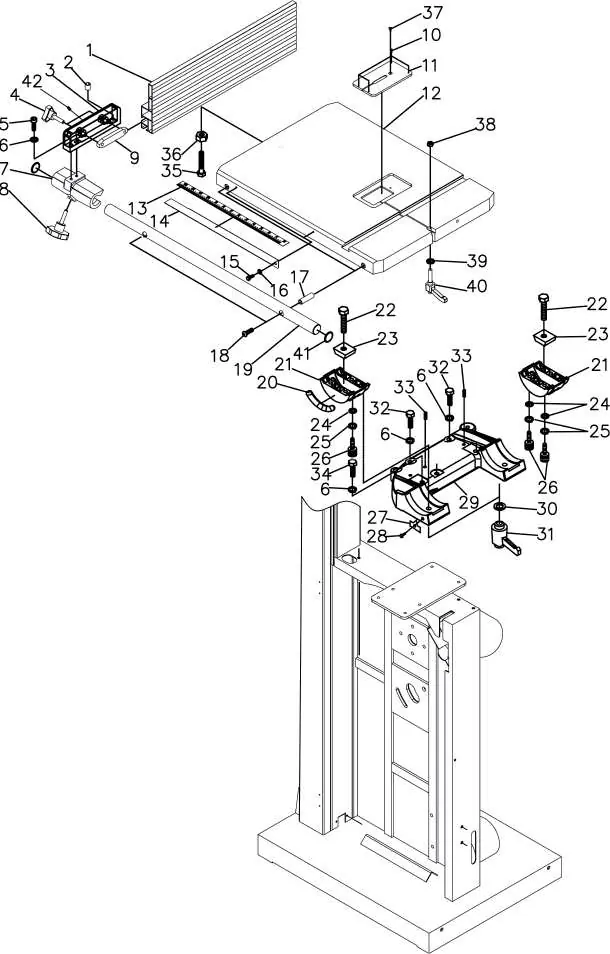
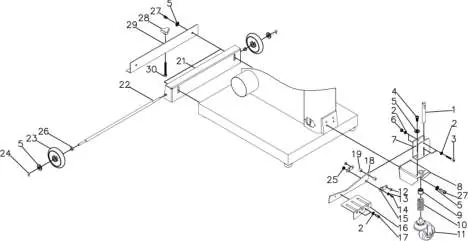
Click an image to enlargeQuick guide from the manual
This manual provides essential instructions for the safe operation, assembly, and maintenance of the Laguna 14BX Bandsaw. Before using the machine, ensure it is properly grounded, guards are in place, and you are wearing appropriate safety gear, including eye and hearing protection. Always verify that the blade teeth point downward toward the table and that the machine is clear of loose objects before starting.
Assembly and set up
The bandsaw requires careful assembly to ensure safe and accurate operation:
- Rubber feet: Assemble the rubber feet to the base of the machine.
- Mobility kit: If using the optional mobility kit, support the bandsaw on wooden blocks and attach the swivel assembly to the back and front wheels to the front.
- Table: Fit the table to the trunions, ensuring the reference stop bolt is correctly positioned.
- Fence: Attach the fence bar to the table, then slide the fence support onto the bar.
- Electrical: The machine is pre-wired with a 230V plug. It is recommended to connect to a 16-amp breaker with class C tripping characteristic.
Testing the bandsaw
Before operation, perform these tests:
- Close all doors and ensure the red safety switch is in the 'out' position.
- Check that all adjusting and locking handles are tight.
- Start the machine without a blade to verify that the start/stop switches, emergency stop, and foot brake function correctly.
Using the bandsaw
Proper blade selection and setup are critical for performance:
- Blade fitting: Disconnect power, remove the throat plate, and slide the blade through the table split. Ensure teeth point downward.
- Tracking: Rotate the wheels by hand and adjust the tracking knob at the back of the machine until the blade runs consistently on the center of the tires.
- Tensioning: Use the blade tension handle to compress the spring. The blade should have 3/16" to 1/4" deflection when pressed with moderate pressure.
- Blade guides: Adjust the ceramic guides so they are just behind the gullet of the blade teeth, ensuring minimal clearance.
Maintenance
Regular maintenance extends the life of your bandsaw:

- Cleanliness: Regularly inspect tires for sawdust buildup and clean them. Redress tires with 100-grit sandpaper if they become glazed or concave.
- Guides: Inspect ceramic guides for cracks or chips. Clean regularly and lubricate with a Teflon-based lubricant.
- Drive belt: Inspect for cracks or wear and replace if necessary.
- Rust prevention: Coat non-painted surfaces with wax if the machine is not in constant use.
Troubleshooting
If the bandsaw fails to start, check the start switch, yellow safety plug, power cord, and electrical supply. If the motor tries to start but does not turn, check for jams in the wheels or guides. If the blade slows down during a cut, check for a loose drive belt, dull blade, or excessive feed rate.
Technical data
The Laguna 14BX features a 1.9 kW, 230V motor. The table tilts from -7° to +45°. The machine supports blades from 3 mm to 19 mm in width. Dust extraction requires a 100mm port with a minimum capacity of 1699 m3/h.
Manufacturer information
Laguna Ponds
Practical help
Common problems
Bandsaw will not start
Check that the start switch is fully pulled out, the yellow safety plug is engaged, the power cord is plugged in, and the breaker is reset.
Motor tries to start but will not turn
Disconnect power, open doors, and check for jams (guides too tight or wood jammed in the wheel). Check capacitor and motor.
Blade slows down during a cut
Re-tension the drive belt, replace or resharpen the blade, reduce feed rate, or check fence alignment.
Machine vibrates
Ensure the machine is level on the floor and check for a damaged drive belt.
Before use
- Ensure the machine is properly grounded.
- Wear eye protection, safety glasses, and hearing protection.
- Wear a dust mask.
- Ensure all guards are in place and in working order.
- Verify that the saw blade teeth point downward toward the table.
- Check that all adjusting and locking handles are tight.
- Ensure the machine is clear of all tools and loose objects.
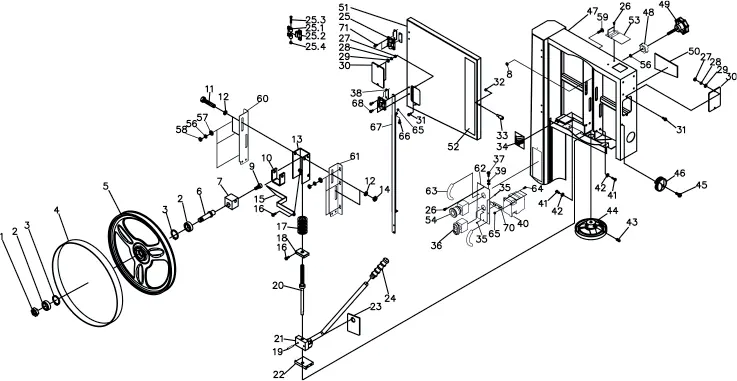
Images and diagrams
- Wiring diagram shows electrical connections for motor, switch, and safety components.
- Exploded views detail the assembly of the upper wheel, lower wheel, motor, table, and fence.
Model compatibility
- Requires 16-amp breaker with class C tripping characteristic.
- Dust extraction: 100mm port, minimum 1699 m3/h capacity.

Manual page author
Michael Turner
Technical manual editor
Reviews PDF manuals for structure, safety notes, and practical product details so readers can find the right information quickly.