Lighting / LED Lamps
Installation Guide for LEDone LOC Tri-Proof Vapor Tight Series
A comprehensive installation and configuration guide for the LEDone LOC Tri-Proof Vapor Tight Series. This manual covers surface mounting procedures, 0-10V dimming wiring, and instructions for adjusting selectable wattage and color...
Quick answers from the manual
Quick answer
- The LEDone Tri-Proof Vapor Tight fixture is installed via surface mounting brackets. Wiring requires connecting Line, Common, Ground, and 0-10V dimming leads. Wattage and color temperature are adjustable via internal switches accessed by removing the end cap. p. 1, 2, 3
Key actions
- Install surface mounting brackets and attach the fixture. p. 2
- Connect 0-10V dimming wires. p. 1
- Adjust wattage and color temperature. p. 3
First start
- Ensure power is off, perform wiring, mount the fixture, and set desired wattage/CCT before turning power on. p. 1, 2, 3
Show 4 more answers Show less
Problems and fixes
Fixture not working
Check line voltage and ensure proper grounding.
p. 1Maintenance and reset
- Clean lens with non-abrasive solution; do not open fixture to clean LED. p. 1
Technical specifications
| Parameter | Value | Meaning | Pages |
|---|---|---|---|
| Voltage | 120V-277V | Universal voltage driver | p. 1 |
Where to find it in the PDF
- Safety, Wiring, and Troubleshooting p. 1
- Installation Options p. 2
- Wattage and Color Temperature Settings p. 3
Table of contents
Manual images
Click an image to enlargeQuick guide from the manual
This document provides essential installation and configuration instructions for the LEDone LOC Tri-Proof Vapor Tight Series. Before beginning, ensure all power is disconnected at the fuse or circuit breaker box. All wiring must be performed by a qualified electrician in accordance with the National Electrical Code and local ordinances.
Safety instructions
- Power Off: Always disconnect power before installing or servicing the fixture.
- Handling: Do not handle the fixture when hands are wet or when standing on wet/damp surfaces.
- Support: The fixture must be independently supported by the building structure.
- Maintenance: Ensure the fixture is cool to the touch before cleaning. Do not clean while energized.
Surface mount installation
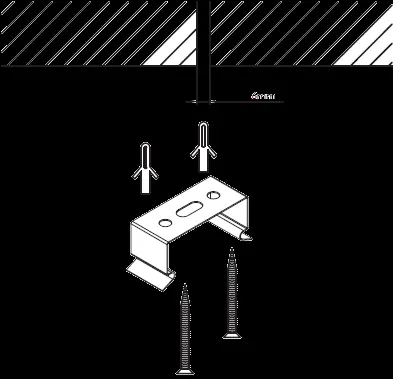
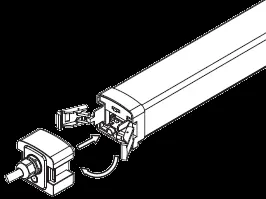
- Open the clips on the end of the fixture.
- Pull off the end cap.
- Install the waterproof connector to the fixture.
- Connect the wires according to the wiring diagram.
- Re-attach the end cap to the housing.
- Fasten the clips on the fixture.
- Install the mounting brackets to the installation surface.
- Install the fixture to the mounting brackets.
0-10V dimmable wiring
The fixture supports universal voltage (120V-277V, 50/60Hz). Follow these connections:
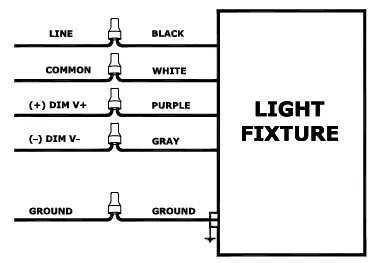
- Black: Connect to (+) LINE supply lead.
- White: Connect to (-) COMMON supply lead.
- Ground: Connect fixture ground to supply ground. Do not connect the dimming fixture ground to the output.
- Violet: Connect to (V+) DIM lead.
- Gray: Connect to (V-) DIM lead.
Selectable wattage and color temperature
The fixture allows for field-adjustable settings located inside the fixture.
Selecting wattage
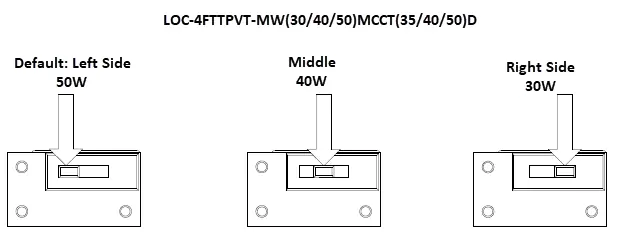
- Remove the end cap opposite the wiring side.
- Locate the black toggle switch inside the fixture.
- Adjust the switch to the desired position (Left: Default/Highest, Middle, Right: Lowest).
Selecting color temperature
- Remove the end cap opposite the wiring side.
- Locate the black toggle switch labeled for color temperature.
- Slide the switch to the desired setting (Left: 5,000K, Middle: 4,000K, Right: 3,500K).
Cleaning and maintenance
- Clean the lens using a non-abrasive cleaning solution.
- Do not open the fixture to clean the LED components.
- Do not touch the LED directly.
Practical help
Common problems
Fixture does not light up
Check that the line voltage at the fixture is correct and verify that the fixture is grounded properly.
Risk of fire or electrical shock
Ensure power is OFF before installation. Do not handle the fixture with wet hands or while standing in water.
Before use
- Verify power is disconnected at the circuit breaker.
- Ensure a qualified electrician is performing the installation.
- Confirm the mounting surface can support the fixture independently.
- Check that the line voltage matches the fixture requirements (120V-277V).
- Ensure non-abrasive cleaning supplies are available for future maintenance.
Show more Show less
Specs in practice
- 0-10V Dimming
- Allows for external dimming control using specific V+ and V- leads.
- Selectable Wattage
- Allows adjustment of power consumption and light output via an internal switch.
- Selectable CCT
- Allows adjustment of color temperature (3,500K, 4,000K, 5,000K) via an internal switch.
Images and diagrams
- Wiring diagram shows the connection points for Line, Common, Dimming (V+/V-), and Ground.
- Surface mount diagrams illustrate the clip removal, end cap removal, and bracket installation process.
- Switch diagrams show the physical positions for adjusting wattage and color temperature.
Model compatibility
- Compatible with 120V through 277V, 50/60Hz power supplies.
- Requires independent support from the building structure.

Manual page author
David Miller
Documentation analyst