Lighting / Emergency Lighting
User Manual for LEDVANCE EMERGENCY SPOT E Emergency Light
Quick guide for the LEDVANCE EMERGENCY SPOT E emergency light. Includes installation instructions, wiring diagrams, and automatic testing procedures.
Table of contents
Manual images
Click an image to enlargeQuick guide from the manual
The LEDVANCE EMERGENCY SPOT E is an emergency lighting fixture designed for recessed mounting. It features automatic testing capabilities to ensure reliability. Before use, the device requires a 48-hour initialization period to fully charge the battery. The unit performs automatic functional tests every 7 days and duration tests every 26 weeks. Users can also trigger manual tests using the integrated test switch.
Installation
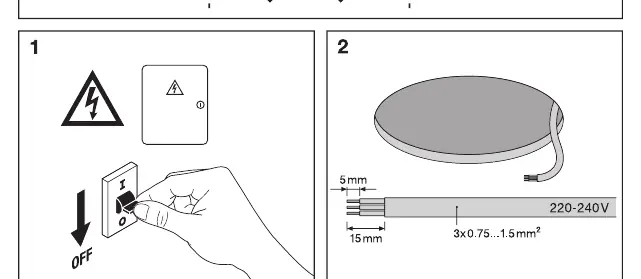
Ensure the power supply is disconnected before starting installation. The device is designed for recessed ceiling mounting.
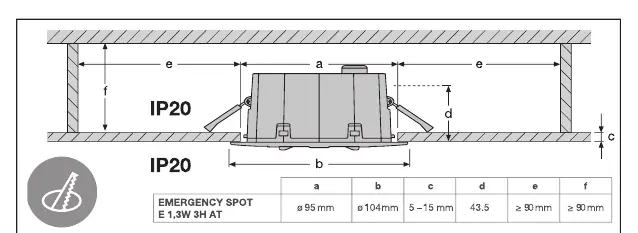
- Ceiling Cutout: Prepare a circular opening with a diameter of 95mm.
- Ceiling Thickness: The fixture is compatible with ceiling thicknesses between 5mm and 15mm.
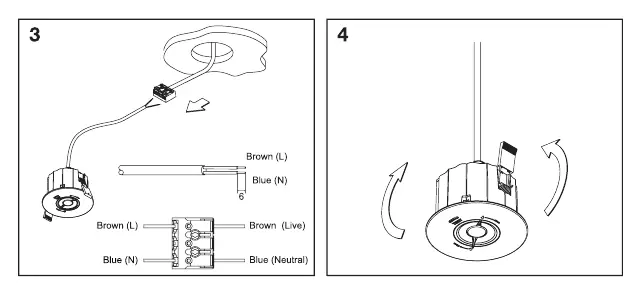
- Wiring: Connect the power supply to the terminal block. Ensure the Brown wire is connected to Live (L) and the Blue wire to Neutral (N).
- Mounting: Insert the fixture into the ceiling cutout. Secure it using the spring clips.
- Power On: Once installed, switch on the power supply.
Testing and Maintenance
The device includes an LED indicator to show the status of the system.
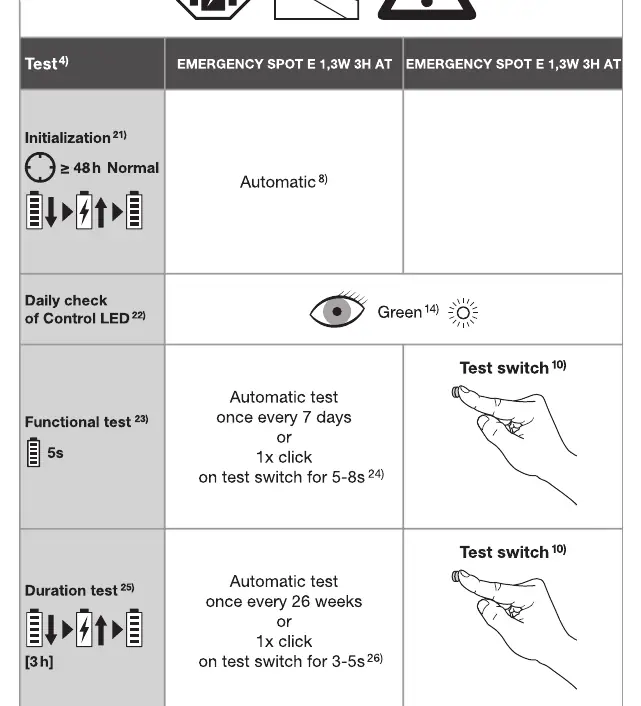
- Initialization: After the first power-on, the device requires at least 48 hours to charge the battery.
- Daily Check: A green LED indicates normal operation.
- Functional Test: Performed automatically every 7 days. Can be triggered manually by clicking the test switch for 5-8 seconds.
- Duration Test: Performed automatically every 26 weeks. Can be triggered manually by clicking the test switch for 3-5 seconds.
Safety and Disposal
This product contains a battery and electronic components. Do not dispose of it with household waste. Follow local regulations for the disposal of electronic equipment and batteries. Ensure the device is installed by a qualified professional.
Manufacturer information
Ledvance GmbH
Practical help
Common problems
LED indicator is not green
Check the power supply connection and ensure the battery has completed the 48-hour initialization period.
Device fails functional test
Verify wiring connections and ensure the battery is properly connected.
Before use
- Ensure the main power supply is switched off.
- Verify the ceiling cutout diameter is 95mm.
- Check that the ceiling thickness is between 5mm and 15mm.
- Confirm wiring: Brown to Live (L), Blue to Neutral (N).
- Allow 48 hours for initial battery charging.
Images and diagrams
- The wiring diagram shows the connection of the Brown (L) and Blue (N) wires to the terminal block.
- The installation diagram illustrates the spring-clip mechanism for securing the light into the ceiling.
Model compatibility
- Designed for recessed ceiling installation only.
- Compatible with standard 220-240V AC power grids.

Manual page author
David Miller
Documentation analyst
Organizes user manual content into clear summaries, with attention to model details, product context, and everyday usability.