Home / Electrical Timers
User Manual for Lexman 08-V04 Digital Indoor Timer
Quick guide for the Lexman 08-V04 Digital Indoor Timer. Learn how to set the time, program ON/OFF events, use the random and countdown functions, and understand safety requirements.
Table of contents
Manual images
Click an image to enlargeQuick guide from the manual
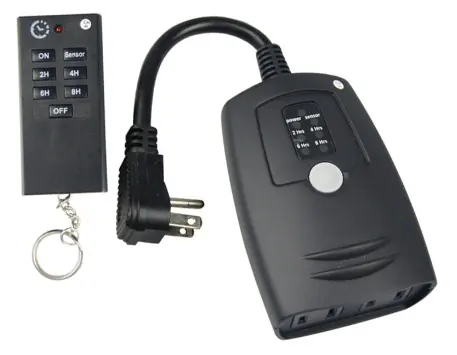
The Lexman 08-V04 is a digital indoor timer designed to control electrical devices such as lamps, lighting chains, aquariums, small heaters, and coffee machines. It features 10 programmable ON/OFF settings, a random function, a countdown function, and a 12/24-hour display mode.
Initial operation
Before using the timer for the first time, follow these steps:
- Plug the timer into a wall outlet to charge the internal memory backup battery.
- Use a pen or pencil to press the MASTER CLEAR button to reset the device.
- The timer is now ready for setup.
Setting the current time
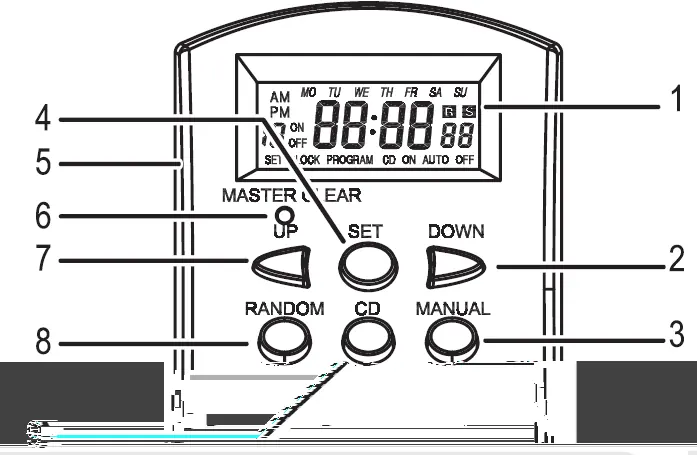
- Press and hold the SET button for at least 2 seconds until "SET" and "MO" (Monday) flash on the screen.
- Use the UP or DOWN buttons to select the day of the week.
- Press SET to advance to the hour setting. Use UP or DOWN to select the current hour.
- Press SET to advance to the minute setting. Use UP or DOWN to select the current minute.
- Press SET one more time to complete the setup.
- To reset the clock, repeat these steps.
Setting ON/OFF events
- While in CLOCK mode, press the UP button once to enter event setting mode.
- The screen will show the first ON event.
- Press SET, then use UP/DOWN to select the desired days of the week.
- Press SET to advance to the hour setting, then use UP/DOWN to select the hour.
- Press SET to advance to the minute setting, then use UP/DOWN to select the minute.
- Press SET to complete the setting for the first ON event.
Note: To activate programmed events, ensure the timer is in "AUTO" mode.
Operating modes
Press the MANUAL button to cycle through the following modes:
- ON: The plugged-in device remains ON.
- OFF: The plugged-in device remains OFF.
- AUTO: The plugged-in device follows your programmed timer settings.
Special functions
- Random Function: Press the RANDOM button. "R" will appear on the screen. When active, the device will turn ON/OFF randomly for 10-31 minutes between 6:00 PM and 6:00 AM.
- Countdown (CD) Function: While in CLOCK mode, press the DOWN button to enter countdown mode. Set the desired duration (hours, minutes, seconds) using the SET, UP, and DOWN buttons. Press the CD button to activate or stop the countdown.
- Summertime Function: Press MANUAL and SET simultaneously to advance the clock by 1 hour. Repeat to revert.
- 12/24 Hour Mode: Press CD and SET simultaneously to toggle between 12 and 24-hour formats.
Safety and maintenance
- For indoor use only.
- Do not plug the device into a multi-socket or in series with other timers.
- Ensure the wall socket has an earth connection.
- Keep out of reach of children.
- Do not attempt to open or repair the device yourself.
- If the battery needs to be removed for disposal, disconnect the device from the mains.
Technical specifications
- Power: 230V~50Hz
- Max Load: 3600W, 16(2)A
- Working Temperature: -10°C to +40°C
- Working Humidity: +5% to +95% RH (non-condensing)
- Min. Setting: 1 minute
- Plug Type: E-TYPE
Practical help
Common problems
Timer not following programmed events
Ensure the timer is set to 'AUTO' mode. Programs will not run in 'ON' or 'OFF' modes.
Random or Countdown functions not working
These functions are canceled if ON/OFF events are active or if the timer is not in 'AUTO' mode.
Display is blank or unresponsive
Plug the timer into a wall outlet to charge the internal memory backup battery.
Before use
- Charge the internal battery by plugging the timer into a wall outlet.
- Press the MASTER CLEAR button with a pen or pencil to reset the device.
- Ensure the device is plugged into a wall socket with an earth connection.
- Verify the device is intended for indoor use only.
Specs in practice
- Max Load: 3600W, 16(2)A
- Do not exceed this power limit to prevent damage or fire hazard.
- Working temperature: -10°C to +40°C
- The device is designed for standard indoor environments; avoid extreme temperatures.
- Min. Setting: 1 minute
- The smallest time interval you can program for events.
Images and diagrams
- The device features an LCD display and buttons for UP, DOWN, SET, RANDOM, CD, and MANUAL control.
- The plug is located on the back, and the output socket is on the front.
Model compatibility
- Suitable for lamps, lighting chains, automatic watering systems, aquariums, small heaters, and coffee machines.

Manual page author
Michael Turner
Technical manual editor
Reviews PDF manuals for structure, safety notes, and practical product details so readers can find the right information quickly.