Industrial / Electrical
User Manual for ELKO Countdown Timer 16A with Display
Quick guide for the ELKO Countdown Timer 16A. Learn how to install, wire, set countdown times, configure external push-buttons, and troubleshoot common errors.
Table of contents
Manual images
Click an image to enlargeQuick Guide
The ELKO Countdown Timer 16A is designed to switch electrical loads on for an adjustable duration (from 1 minute to 8 hours). The device automatically switches the load off once the set time has elapsed. It features a 2-pole switch for manual control and supports an optional external push-button for remote operation.
Installation
Warning: Electrical installation must be performed by a qualified professional. Always disconnect the power supply via the upstream circuit breaker before working on the device.
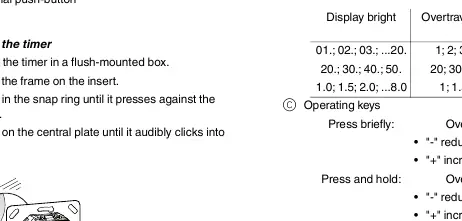
- Install the timer in a flush-mounted box.
- Place the frame on the insert.
- Press the snap ring until it is flush against the frame.
- Press the central plate until it clicks into place.
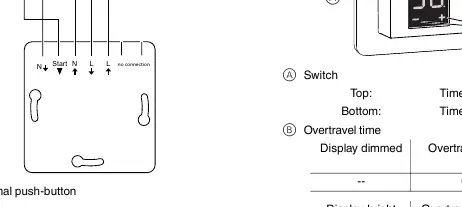
Wiring: Connect the Line (L) and Neutral (N) wires according to the wiring diagram. An external push-button can be connected to the 'Start' terminal to allow remote activation.
Operation
Activating the display: Press any operating key to wake the display. It will show the most recently set time.
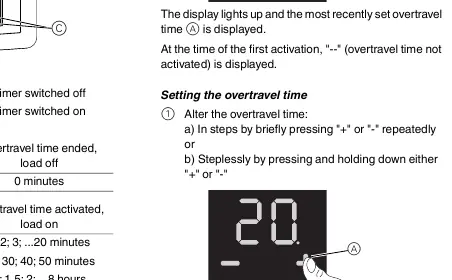
Setting the countdown time:
- Step-by-step: Briefly press '+' or '-' repeatedly.
- Stepless: Press and hold '+' or '-' to adjust the time continuously.
- The timer starts automatically if no input is made for three seconds.
Ending the countdown: The load switches off automatically when the time expires. To switch off manually, set the time to '--'.
Advanced Settings
You can configure the minimum/maximum time and the function of the external push-button:
- Hold '+' and '-' simultaneously for three seconds to enter the settings menu.
- Use '+' or '-' to change the setting.
- Press '+' and '-' simultaneously to confirm and move to the next setting.
External push-button functions:
- Trigger (ON): Starts the last set time.
- Toggle (OFF): Starts the timer on the first press; stops the timer on the second press.
Troubleshooting
If the connected load does not switch on:
- Error HEAt: Indicates internal overheating. Switch the timer off and back on. If the error persists, contact a specialist.
- No display: Check the power supply and ensure the timer is switched on.
- General: Check the load and the wiring of the external push-button.
Technical Data
- Nominal voltage: 230 V AC, 50 Hz
- Nominal load (ohmic): 16 A
- Nominal load (inductive): 1 A, cos φ = 0.6
- Switching capacity: 3600 W (ohmic), 1000 VA (LV halogen), 500 VA (motor), 100 W (LED)
- Operating temperature: -10°C to +35°C
- Protection: IP 20
Manufacturer information
ELKO AS
Practical help
Common problems
Display shows 'Error HEAt'
The device is overheating. Switch the timer off and back on. If the error recurs, contact a specialist.
Connected load does not switch on
Check the power supply, verify the load is functional, and check the wiring of the external push-button.
Before use
- Ensure installation is performed by a qualified professional.
- Disconnect power supply before working on the device.
- Verify the load type is within the specified limits (e.g., 16A ohmic, 100W LED).
- Ensure the flush-mounted box is ready for installation.
Specs in practice
- Nominal load (ohmic)
- Maximum resistive load capacity is 16A or 3600W.
- Adjustable overtravel time
- The countdown duration can be set between 1 minute and 8 hours.
Images and diagrams
- The wiring diagram illustrates the connection of Line (L) and Neutral (N) to the timer and the load.
- The diagram shows the connection point for an optional external push-button.
Model compatibility
- Compatible with 230V AC, 50Hz power systems.
- Supports external mechanical push-buttons for remote control.

Manual page author
Emily Carter
User documentation editor
Prepares concise manual descriptions and highlights the most useful setup, operation, and maintenance information for readers.