Electronics / Monitors
Owner's Manual for LG CLOUD Monitor 24CK550Z
Comprehensive user guide for the LG CLOUD Monitor 24CK550Z. Includes assembly instructions, stand adjustments, OSD menu navigation, connection guides, troubleshooting steps, and technical specifications.
Quick answers from the manual
Quick answer
- The LG CLOUD Monitor 24CK550Z is a computer monitor supporting 1920x1080 resolution. It features adjustable stand height, tilt, swivel, and pivot capabilities. Setup involves connecting the power and signal cables (D-SUB or DisplayPort) and installing the recommended drivers from the LG website. p. 1, 3, 5, 6
Key actions
- Adjusting stand height p. 5
- Using the Pivot feature p. 6
- Locking/Unlocking OSD p. 11
First start
- Connect the power cord to a grounded outlet. p. 5, 9
- Connect the signal cable (D-SUB or DisplayPort). p. 9
- Power on the monitor. p. 4, 12
Show 4 more answers Show less
Problems and fixes
No image appears
Check power connection, press Power button, or check signal cable.
p. 17
OSD Locked
Hold the MENU button for several seconds.
p. 17Maintenance and reset
- Reset to factory settings p. 13
Technical specifications
| Parameter | Value | Meaning | Pages |
|---|---|---|---|
| Resolution | 1920 x 1080 @ 60 Hz | Optimal display resolution. | p. 19 |
| Power Rating | 19V 3.3A | Power input requirement. | p. 19 |
| Wall Mount | 100 x 100 mm | VESA mounting standard. | p. 8 |
Where to find it in the PDF
- Assembling and Preparing p. 3, 4, 5, 6
- Using the Monitor p. 9, 10
- User Settings p. 11, 12, 13, 14
- Troubleshooting p. 17, 18
- Product Specification p. 19, 20, 21
Table of contents
Manual images
Click an image to enlargeQuick Guide from the Manual
This manual provides essential information for setting up and operating your LG CLOUD Monitor 24CK550Z. Key procedures include proper assembly, stand adjustments (height, angle, swivel, pivot), and OSD menu configuration. Always ensure the monitor is placed on a stable surface with at least 100 mm of ventilation space on all sides.
Assembling and Preparing
- Stand Assembly: Use genuine LG components. Do not apply foreign substances to screws.
- Ventilation: Maintain at least 100 mm of space from walls to ensure sufficient airflow.
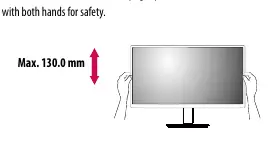
- Height Adjustment: The stand height can be adjusted up to 130 mm. Handle with both hands.
- Angle Adjustment: The screen can be tilted forward or backward from -5° to 35°.
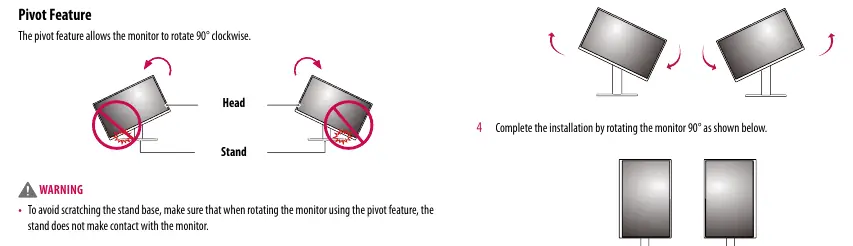
- Pivot Feature: The monitor can rotate 90° clockwise. Raise to maximum height before rotating to avoid contact with the stand base.
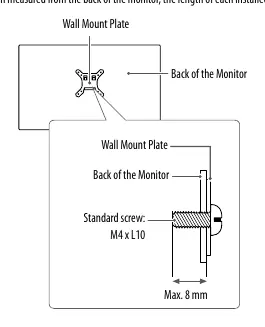
- Wall Mounting: Compatible with VESA 100x100 mm mounts. Use M4 x L10 screws. The wall mount plate is sold separately.
Using the Monitor
- PC Connection: Supports Plug and Play. Use D-SUB or DisplayPort cables.
- LAN Connection: Connect router or switch via standard IEEE 802.3 Ethernet cable.
- USB Hub: The USB port functions as a hub. Connect peripherals like keyboards or mice.
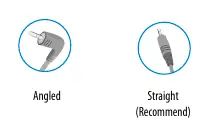
- Headphones: Connect via the headphones port. Straight earphones are recommended over angled ones to avoid connection issues.
User Settings
The OSD (On Screen Display) menu allows you to customize your viewing experience:
- Activating Menu: Press the MENU button on the front panel.
- OSD Lock: Press and hold the MENU button for several seconds to lock or unlock control settings.
- Auto Adjustment: Press the AUTO button to automatically adjust display settings (only supported for analog/D-SUB signals).
- Reader Mode: Adjusts screen settings for reading (Reader 1 for newspaper, Reader 2 for cartoon).
- Reset: Restores all factory default settings.
Troubleshooting
- No Image: Check power cord connection, press the Power button, or adjust brightness/contrast. If "OUT OF RANGE" appears, check PC video card frequency settings.
- OSD Locked: Hold the MENU button for several seconds to unlock.
- Incorrect Image: Press the AUTO button to automatically adjust display settings.
- Abnormal Color: Ensure color settings in Windows are set to 24-bit (true color) or higher.
Technical Specifications
- Resolution: 1920 x 1080 @ 60 Hz (Recommended).
- Power Rating: 19V 3.3A.
- Dimensions (with stand): Max 553.8 x 512.9 x 240 mm.
- Weight (with stand): 6.1 kg.
- Operating Conditions: 0°C to 40°C, Humidity < 80%.
Manufacturer information
LG Electronics
Practical help
Common problems
No image appears on screen
Check if the power cord is connected, press the Power button, or ensure the signal cable is properly connected to the PC.
OSD Locked message
Press and hold the MENU button for several seconds until the message 'OSD UNLOCKED' appears.
Incorrect display position or noise
Press the AUTO button to automatically adjust the display settings (only for analog/D-SUB).
Display color is abnormal or discolored
Set the color depth in Windows to 24-bit (true color) or higher.
Before use
- Ensure the monitor is placed on a stable, flat surface.
- Maintain at least 100 mm of clearance around the monitor for ventilation.
- Use genuine LG components and supplied cables.
- Connect the power cord to a grounded power outlet.
- Install the latest monitor drivers from the LG website.
Show more Show less
Specs in practice
- 1920 x 1080 @ 60 Hz
- The optimal resolution and refresh rate for the best image quality.
- VESA 100x100
- Standard mounting pattern for wall brackets.
Images and diagrams
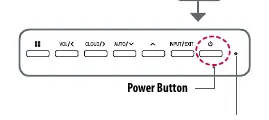
- The front panel buttons include Menu, Volume/Left, Cloud/Right, Auto/Down, Up, Input/Exit, and Power.
- The pivot feature requires raising the monitor to maximum height before rotating 90 degrees clockwise.
- Wall mounting requires M4 x L10 screws; ensure the screw length does not exceed 8mm inside the monitor.
Model compatibility
- Wall mount plate is sold separately.
- D-SUB connection may require a Mac adapter for Apple Macintosh computers.
- USB devices with automatic recognition programs may not be supported.

Manual page author
Michael Turner
Technical manual editor