Electronics / Monitors
User Manual for LG 24BK550Y and 27BK550Y LED LCD Monitor
Quick setup guide and user manual for LG 24BK550Y and 27BK550Y LED LCD monitors. Includes assembly instructions, port layout, technical specifications, and safety guidelines.
Quick answers from the manual
Quick answer
- This guide covers the assembly, port connections, and technical specifications for the LG 24BK550Y and 27BK550Y monitors. p. 1, 3, 4, 6
Key actions
- Assemble the stand by attaching the base to the monitor arm while the screen is face down on a soft surface. p. 3
- Connect the power cable and necessary video cables (HDMI, DP, DVI, or D-Sub) to the rear ports. p. 4, 5
Problems and fixes
Compatibility issues with video cables
Do not use DVI to HDMI or DP to HDMI cables.
p. 4Show 2 more answers Show less
Technical specifications
| Parameter | Value | Meaning | Pages |
|---|---|---|---|
| Resolution | 1920 x 1080 @ 60 Hz | Recommended resolution for both models. | p. 6 |
| Power (24BK550Y) | 100-240 V~ 50/60 Hz 1.2 A | Power input requirements. | p. 6 |
| Power (27BK550Y) | 100-240 V~ 50/60 Hz 1.5 A | Power input requirements. | p. 6 |
Where to find it in the PDF
- Assembly Instructions p. 3
- Port Layout p. 4
- Technical Specifications p. 6
Table of contents
Manual images
Click an image to enlargeQuick guide from the manual
This document provides essential setup and configuration information for the LG 24BK550Y and 27BK550Y LED LCD monitors. Users are advised to read the manual carefully before operation and retain it for future reference. It is recommended to use only the supplied components to ensure proper functionality.
Assembly and installation
To assemble the monitor, follow these steps:
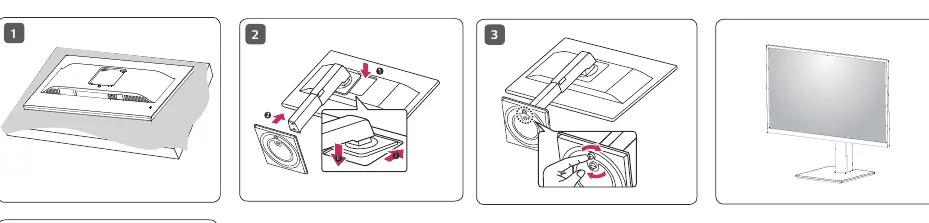
- Place the monitor face down on a soft cloth or cushion to prevent damage to the screen.
- Attach the stand base to the monitor arm.
- Secure the stand to the monitor body.
- Ensure the stand is firmly attached before standing the monitor upright.
Safety Warning: Do not apply excessive force when handling the monitor or attaching the stand to avoid damaging the screen or the stand mechanism.
Connecting the monitor
The rear panel of the monitor features various input ports. Ensure all cables are securely connected:
- AC-IN: Connect the power cable here.
- H/P: Headphone output.
- AUDIO IN (PC): Audio input for PC.
- D-SUB IN: Analog video input.
- DVI-D IN: Digital video input.
- HDMI IN: High-definition multimedia interface.
- DP IN: DisplayPort input.
- USB UP / USB IN 1 / USB IN 2: USB hub functionality.
Important Compatibility Notes: Using DVI to HDMI or DisplayPort to HDMI cables may cause compatibility issues. Always use the supplied cables to prevent device malfunction.
Powering on
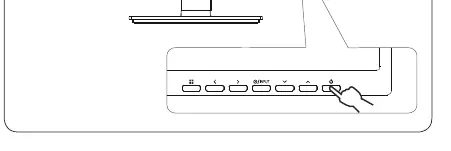
Connect the power cable to the AC-IN port on the back of the monitor and plug it into a wall outlet. The power button is located on the bottom right of the front bezel. Press this button to turn the monitor on or off.
Technical specifications
The monitors support a recommended resolution of 1920 x 1080 @ 60 Hz. Power requirements are 100-240 V~ 50/60 Hz. The 24BK550Y model requires 1.2 A, while the 27BK550Y model requires 1.5 A.
Manufacturer information
LG Electronics
Practical help
Common problems
Compatibility issues
Avoid using DVI to HDMI or DisplayPort to HDMI cables as they may cause compatibility issues.
Device malfunction
Ensure you are using the supplied cables provided with the product.
Before use
- Place the monitor face down on a soft cloth to protect the screen during assembly.
- Verify that all supplied components are present.
- Ensure the power source matches the 100-240 V~ 50/60 Hz requirement.
- Check that the stand is securely attached before placing the monitor upright.
Show more Show less
Specs in practice
- Recommended Resolution
- 1920 x 1080 @ 60 Hz for optimal display quality.
Images and diagrams
- The assembly diagram illustrates placing the monitor face down, attaching the stand arm, and securing the base.
- The port layout diagram identifies the location of AC-IN, Audio, D-Sub, DVI-D, HDMI, DP, and USB ports.
Model compatibility
- The USB port functions as a USB hub.
- Using non-supplied cables may cause device malfunction.

Manual page author
David Miller
Documentation analyst