Lighting / Outdoor Lighting
User Manual for Lightpro Led Strip Connector 220L
Quick guide for the Lightpro Led Strip Connector 220L. Includes installation steps, cutting instructions, safety warnings, and technical specifications for the 12V outdoor lighting system.
Quick answers from the manual
Quick answer
- The Lightpro 220L is a connector for 12V LED strips. It requires careful cutting and gluing to ensure a waterproof connection. p. 1, 3
Key actions
- Cutting the strip p. 2, 3
- Assembling the connector p. 2, 3
First start
- Test the strip before gluing p. 3
Show 3 more answers Show less
Problems and fixes
Strip does not light
Check pin contact and ensure the cut section has a marking.
p. 3Technical specifications
| Parameter | Value | Meaning | Pages |
|---|---|---|---|
| Max Power | 36W | Maximum power capacity of the connector. | p. 3 |
| Protection Class | IP44 - IP67 | Water and dust protection rating. | p. 3 |
Where to find it in the PDF
- Product Overview and Specs p. 3
- Assembly Instructions p. 2, 3
Table of contents
Manual images
Click an image to enlargeQuick guide from the manual
The Lightpro 220L Led Strip Connector is designed for use with the Lightpro 12V outdoor lighting system. Important: Do not cut the LED strip in areas marked 'DO NOT CUT HERE'. Ensure the ambient temperature is above 10°C when applying the adhesive for the best results. Always test the connection before applying glue.
Product Description
The Lightpro Led Strip is a lighting chain for outdoor use. The strip can be cut to the desired length before installation. This product is intended for use with the Lightpro 12V system. Improper use may affect safety, warranty, and product functionality.
Cutting the LED Strip
The LED strip can be cut to any desired length. Follow these guidelines:
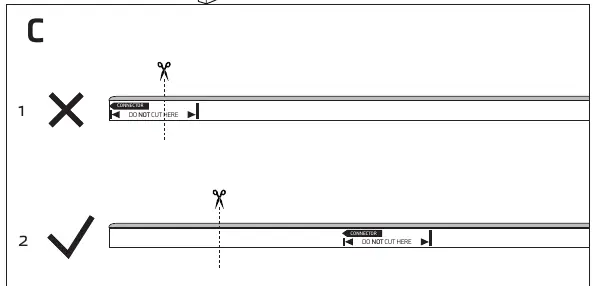
- Cut through the strip in one movement from the transparent side.
- Never cut in the section marked 'DO NOT CUT HERE'.
- The part of the strip connected to the connector must contain at least one marking.
- Short remaining parts without markings will not light up.
Installation and Assembly
Follow these steps to assemble the connector:
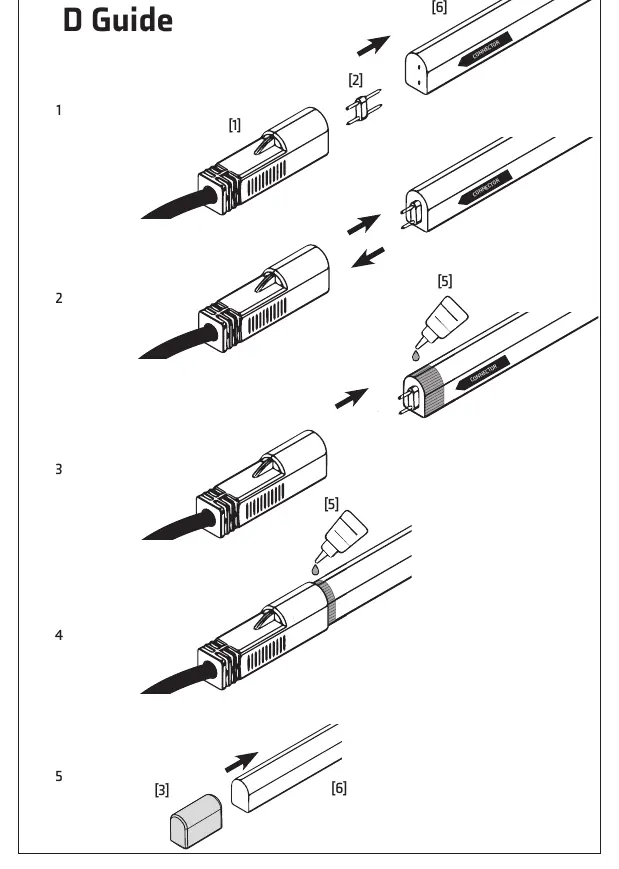
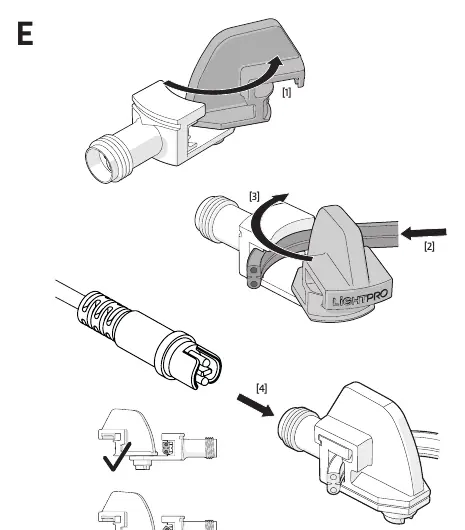
- Pin Insertion: Insert the pin into the LED strip, ensuring it makes proper contact with the conductors.
- Testing: Before gluing, insert the strip into the plastic holder and connect it to the 12V system to verify it lights up. Disconnect after testing.
- Gluing: Read the adhesive instructions carefully. Apply glue around the LED strip and insert it into the plastic holder.
- Finishing: Apply a final layer of glue around the connector and the strip, then wipe clean with a dry cloth.
- End Cap: Place the end cap at the end of the LED strip.
Safety and Maintenance
Warning: The adhesive contains cyanoacrylate, which bonds skin and eyelids in seconds. Keep out of reach of children. If contact occurs, do not force the glue off; soak in warm soapy water.
- Maintenance: Clean the product regularly with a soft, clean cloth. Avoid abrasives.
- Cleaning: Do not use high-pressure washers or aggressive chemicals.
- Environment: Suitable for ambient temperatures between -20°C and 50°C.
- Safety Class: Protection class III (12V safety extra-low voltage).
Practical help
Common problems
Strip does not light up
Ensure the pin is making proper contact with the conductors and the strip is connected to the 12V system.
Strip does not light after cutting
Ensure the cut section contains at least one 'DO NOT CUT HERE' marking.
Before use
- Check all parts are present in the packaging.
- Verify the 12V system is compatible.
- Read adhesive instructions before application.
- Ensure ambient temperature is above 10°C for gluing.
- Test the strip connection before applying glue.
Show more Show less
Specs in practice
- Max Power (Connector)
- 36W maximum load.
Images and diagrams
- Figure C illustrates the correct cutting method.
- Figure D shows the step-by-step assembly process including pin insertion and gluing.
- Figure E details the connection to the plastic holder.
Model compatibility
- Compatible with Lightpro 12V system.
- Requires 220L Connector for 175L LED Strip.

Manual page author
Emily Carter
User documentation editor