Lighting / Outdoor Lighting
User Manual for Lightpro Alon 221P Outdoor LED Light
Quick guide for the Lightpro Alon 221P outdoor LED light. Includes installation steps, dimmer adjustment, technical specifications, and safety instructions for the 12V system.
Quick answers from the manual
Quick answer
- The Lightpro Alon 221P is a 12V outdoor LED light. Installation involves attaching the ground spike to the base and connecting it to the Lightpro 12V system. It features a built-in dimmer with 6 levels. p. 6, 8
Key actions
- Adjusting the dimmer p. 6, 8
First start
- Attach the ground spike to the base using the provided screws and hex key, then connect to the 12V system. p. 6, 8
Show 4 more answers Show less
Problems and fixes
Dimmer settings
The dimmer has a memory function and retains the setting when switched off.
p. 6, 8Maintenance and reset
- Clean regularly with a soft, clean cloth. Do not use high-pressure washers. p. 10, 11
Technical specifications
| Parameter | Value | Meaning | Pages |
|---|---|---|---|
| Power | 3.3W | Maximum power consumption | p. 6, 8 |
Where to find it in the PDF
- Parts Diagram p. 2
- Installation p. 3, 5
- Dimmer Adjustment p. 4
Table of contents
Manual images
Click an image to enlargeQuick Guide
The Lightpro Alon 221P is a 12V outdoor LED light. It must be used in combination with the Lightpro 12V system. The fixture includes a built-in dimmer with 6 pre-programmed levels. Ensure the product is accessible for maintenance and not permanently embedded in concrete or brick.
Product Description
The Lightpro Alon is a standing LED lamp designed for outdoor use. It features an IP44 protection rating and is suitable for ambient temperatures between -20°C and 50°C. The light source is non-replaceable.
Packaging Content
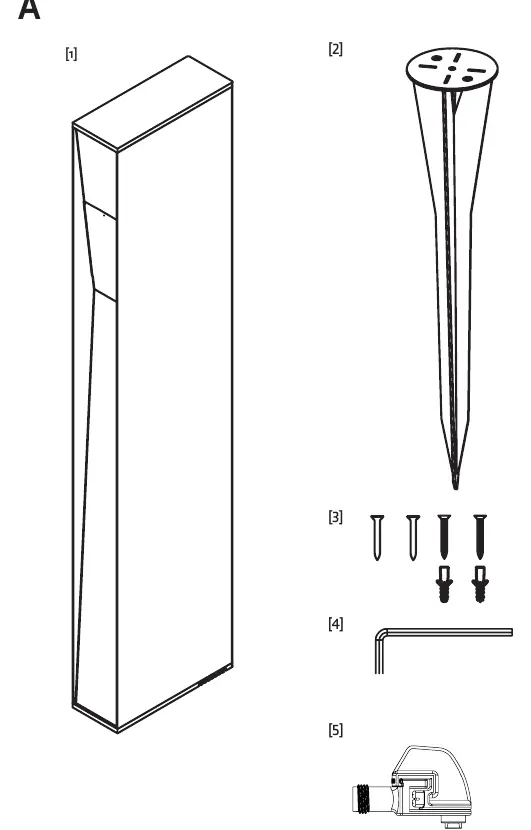
- Alon fixture
- Ground spike
- Screws and plugs
- Hex key
- Lightpro F-connector
Installation
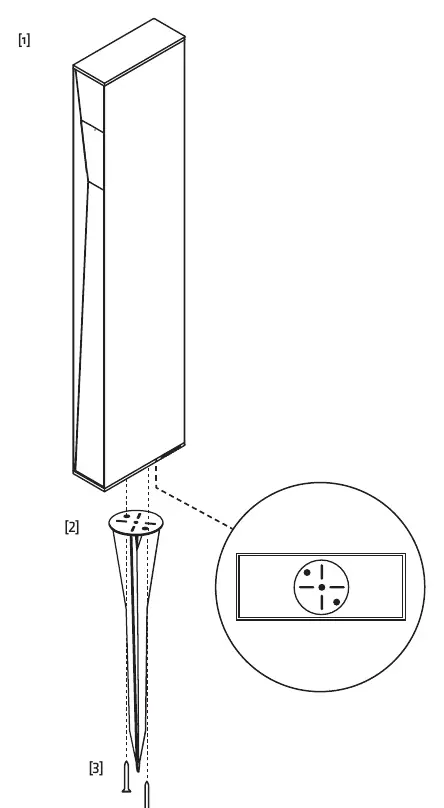
Mounting: Secure the ground spike to the base of the fixture using the supplied screws and the provided hex key.
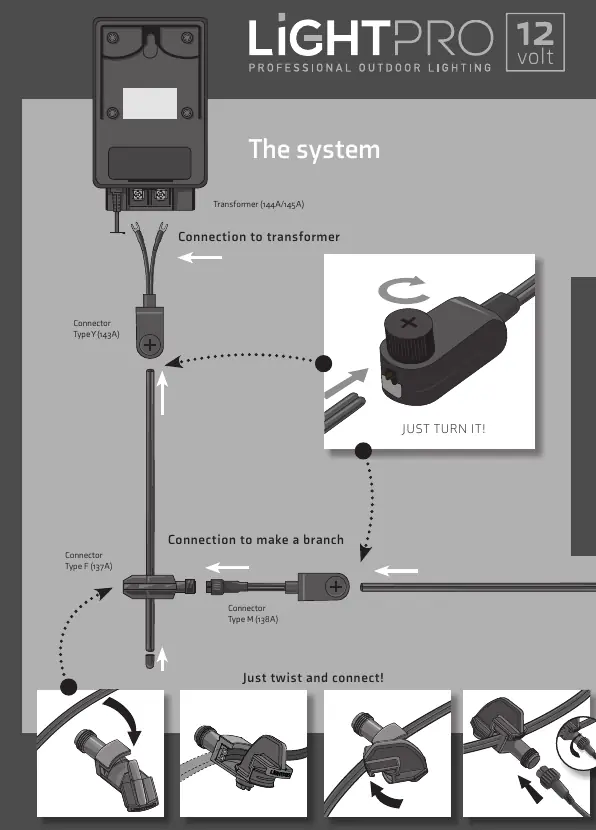
Connection: Connect the light to the main cable using the Lightpro connector system. If the product has a drain hole, ensure it is pointing downwards.
Setting the Dimmer
The Alon features a dimmer with 6 pre-programmed levels:
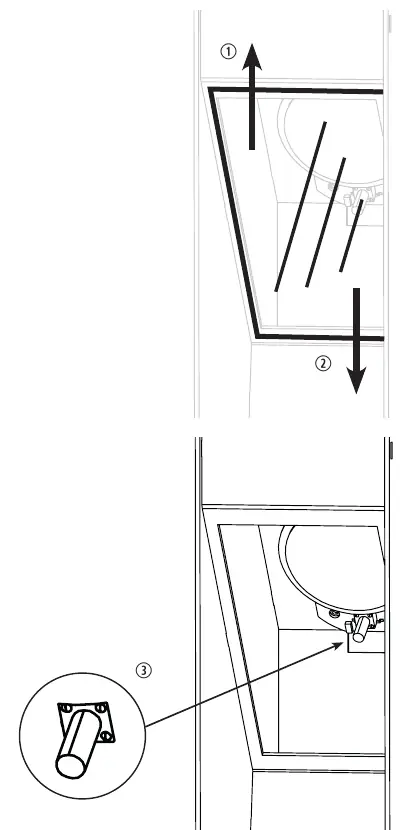
- Remove the glass from the fixture by sliding it upwards and then downwards.
- Adjust the desired brightness using the push-button located under the light source.
- Slide the glass back onto the luminaire, inserting the top first, then pushing the glass back into the housing.
Note: The dimmer has a memory function and will retain the set level when the light is switched off.
Safety and Maintenance
- Cleaning: Clean regularly with a soft, clean cloth. Do not use abrasives, high-pressure washers, or aggressive chemical cleaning agents.
- Stainless Steel: Clean parts with stainless steel cleaning agent once every 6 months.
- Maintenance: Always turn off the system by unplugging the transformer before performing maintenance.
- Restrictions: Do not use in areas where combustible gases, fumes, or liquids are stored.
Technical Specifications
- Power: 3.3W (max)
- Light Source: LED 3.3W AC/DC 12V
- Luminous Flux: 30 - 310 lm
- Color Temperature: 3000K
- Protection Class: IP44
- Cable Length: 1m
Practical help
Common problems
Light does not turn on
Check the connection to the transformer and ensure the 12V system is powered.
Dimmer setting lost
The dimmer has a memory function; ensure the power was not completely disconnected from the transformer, though it should retain settings when switched off.
Before use
- Verify all parts are present in the packaging
- Ensure the installation location is not permanently embedded or bricked in
- Confirm the 12V transformer system is ready for connection
- Check that the drain hole (if present) points downwards
Show more Show less
Images and diagrams
- Figure A: Identification of parts including fixture, spike, and tools
- Figure B: Assembly of the spike to the fixture base
- Figure C: Steps to remove the glass and access the dimmer button
- Page 5: Wiring diagram for connecting to the 12V transformer system
Model compatibility
- Must be used with Lightpro 12V system
- Not compatible with high-pressure washers

Manual page author
Michael Turner
Technical manual editor