Lighting / Outdoor Lighting
User Manual for Lightpro Tiga Corner 208S LED Spot
Quick guide for the Lightpro Tiga Corner 208S 12V LED outdoor spot. Includes installation steps, dimmer operation, safety guidelines, and technical specifications.
Quick answers from the manual
Quick answer
- The Lightpro Tiga Corner 208S is a 12V outdoor LED spot. It is installed by mounting the bracket in a corner and clicking the fixture into place. It features a built-in dimmer with 6 brightness levels. p. 4, 5, 6
Key actions
- Mount the bracket in the corner using provided plugs and screws. p. 2, 4
- Click the fixture into the bracket. p. 2, 4
- Adjust brightness using the button on the device. p. 3, 4
Problems and fixes
General maintenance
Clean with a soft cloth; use stainless steel cleaner every 6 months for stainless parts.
p. 6Maintenance and reset
- Turn off the system by pulling the plug of the transformer from the socket for maintenance. p. 6
Technical specifications
| Parameter | Value | Meaning | Pages |
|---|---|---|---|
| Power | 3.5W | Power consumption | p. 4 |
| Protection class | IP44 | Water resistance rating | p. 4 |
| Luminous flux | 10 - 100 lm | Brightness range | p. 4 |
Where to find it in the PDF
- Product Overview & Parts p. 2
- Installation p. 2, 4
- Dimmer & System Connection p. 3
Table of contents
Manual images
Click an image to enlargeQuick guide from the manual
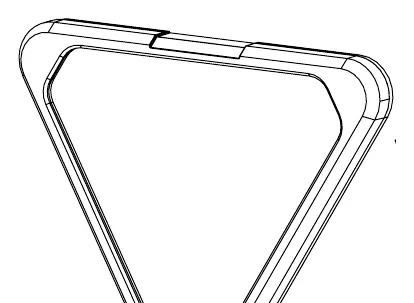
The Lightpro Tiga Corner 208S is a 12V LED spot designed for outdoor use. It is intended for installation in corners of canopies, carports, or on walls/fences. The device features a built-in dimmer with 6 brightness levels and must be used in conjunction with the Lightpro 12V system.
Product Description
The Tiga Corner is a compact LED luminaire. It is designed exclusively for outdoor lighting and requires a 12V power supply. Any modifications to the product may void the warranty and affect safety.
Packaging Content
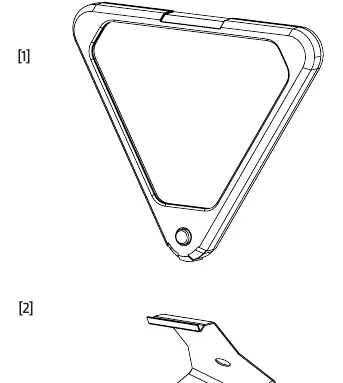
- 1x Tiga Corner Fixture
- 1x Bracket
- Screws
- Plugs
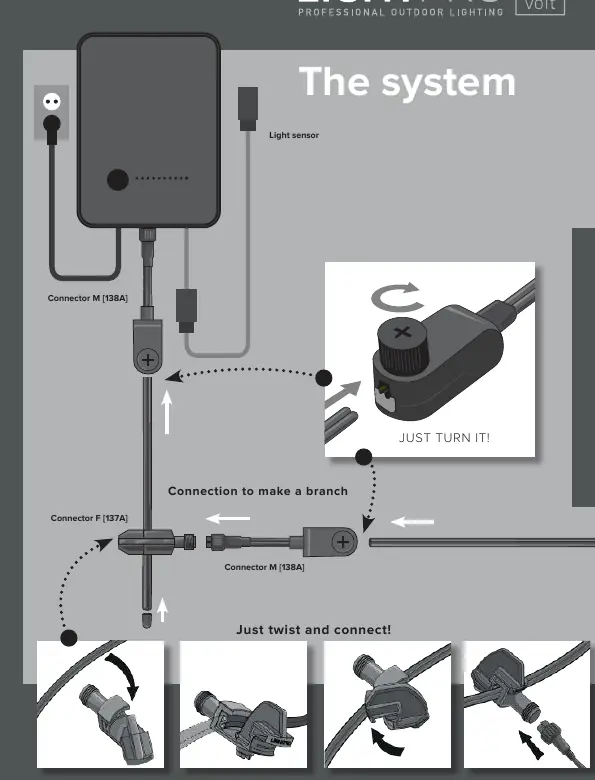
- Lightpro F connector
Installation
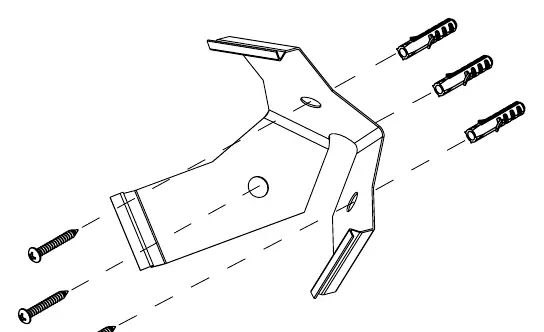
- Mounting: Secure the bracket in the desired corner using the provided plugs and screws.
- Attaching: Click the Tiga Corner fixture into the mounted bracket.
- Connection: Connect the fixture to the main cable using the provided Lightpro F connector. Ensure the cable layout allows for comfortable connection to the transformer.
Dimmer Operation
The Tiga Corner features a built-in dimmer. Press the button located on the device to cycle through the 6 available brightness settings.
Safety and Maintenance
- Accessibility: Always install the product so it remains accessible for maintenance. Do not embed or brick the product in permanently.
- Cleaning: Clean regularly with a soft, clean cloth. Avoid abrasive cleaners.
- Stainless Steel: Clean parts with stainless steel components using a stainless steel cleaning agent every 6 months.
- Restrictions: Do not use high-pressure washers or aggressive chemical cleaners. Do not use in areas where combustible gases, fumes, or liquids are stored.
- Power: Ensure the system is powered off (unplug the transformer) before performing maintenance.
Technical Specifications
- Product: Tiga Corner (208S)
- Light Source: LED 3.5W AC/DC 12V
- Luminous Flux: 10 - 100 lm
- Color Temperature: 2700K
- Protection Class: IP44
- Ambient Temperature: -20 °C to 50 °C
- Cable Length: 3m
- Dimmable: Yes (6 steps)
Practical help
Common problems
Light does not turn on
Check the connection to the main cable and ensure the transformer is plugged into a power source.
Dimmer not working
Ensure the button on the device is pressed firmly; there are 6 distinct brightness levels.
Before use
- Verify all parts are present (Fixture, bracket, screw, plug, connector).
- Ensure the mounting surface is suitable for the bracket.
- Plan the cable layout before installation.
- Confirm the transformer is compatible with the Lightpro 12V system.
Images and diagrams
- Figure A: Identification of parts included in the package.
- Figure B: Step-by-step mounting of the bracket and fixture.
- Figure C: Location and operation of the dimmer button.
- System Diagram: How to connect the fixture to the main cable using the F connector.
Model compatibility
- Must be used with the Lightpro 12V system.
- Not suitable for areas with combustible gases or liquids.

Manual page author
Michael Turner
Technical manual editor
Reviews PDF manuals for structure, safety notes, and practical product details so readers can find the right information quickly.