Lighting / Outdoor Landscape
Installation Guide for WAC Lighting Mini In-Ground Series
Comprehensive installation guide for WAC Lighting Mini In-Ground fixtures. Includes step-by-step instructions for softscape, hardscape, wall, fountain, and concrete pour installations, along with safety warnings and technical requirements.
Table of contents
Manual images
Click an image to enlargeImportant Safety and Preparation
Before beginning any installation, ensure the main power is turned off at the fuse box or circuit breaker. These fixtures are designed for outdoor use and require a transformer (sold separately) to operate. Always read the full instructions before starting. Do not substitute parts, leave parts out, or use damaged components, as this may void the ETL/cETL listing.
Softscape Installation
This method is for installing the fixture directly into the ground.
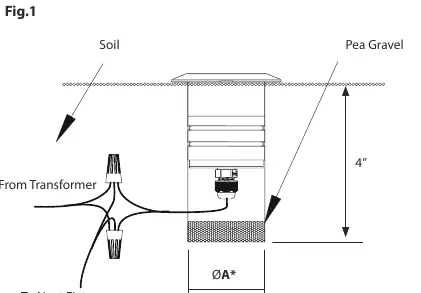
- Turn off the main power.
- Dig a hole at the application site. Ensure the hole is approximately 4 inches deep and matches the required diameter (A*) for your specific model.
- Place a layer of pea gravel at the base of the hole to facilitate drainage.
- Connect the fixture wires to the landscape wires coming from the transformer using the provided outdoor-rated direct burial wire nuts.
- Place the fixture in the hole and repack the soil to secure it, ensuring the trim is flush with the ground.
Hardscape Installation
This method is for installing the fixture into a hard surface using a pipe.
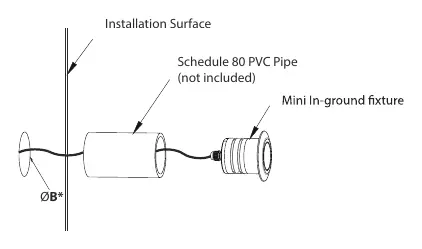
- Turn off the main power.
- Prepare a hole large enough to fit a Schedule 80 PVC pipe (not included).
- Install the pipe into the hole.
- Connect the fixture wires to the transformer wires using the provided outdoor-rated direct burial wire nuts.
- Apply plumbers' silicone (not included) to the O-rings to prevent moisture ingress.
- Insert the fixture into the pipe, ensuring the trim is flush with the mounting surface.
Outdoor Wall Installation
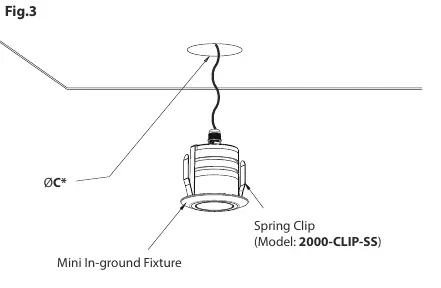
- Turn off the main power.
- Attach the spring clip to the fixture using the provided clip screws.
- Cut a hole at the installation location.
- Connect the fixture wires to the transformer wires using the provided outdoor-rated direct burial wire nuts.
- Apply plumbers' silicone to the O-rings.
- Insert the fixture into the hole, ensuring the trim is flush with the mounting surface.
Fountain Installation
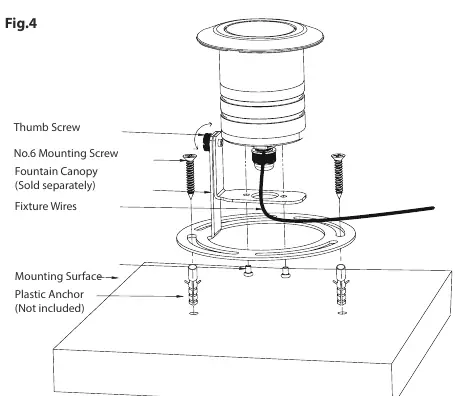
- Turn off the main power.
- Mount the fixture onto the fountain canopy using the provided screws.
- Drill two holes for the plastic anchors using a hammer drill and masonry bit. The hole depth should be slightly longer than the anchor length.
- Insert the plastic anchors into the holes.
- Position the fixture and line up the slots with the anchors.
- Secure the fixture using the No. 6 screws.
- Connect the fixture wires to the transformer wires using the provided wire nuts.
- Loosen the thumbscrew to rotate the fixture to the desired direction, then retighten to secure.
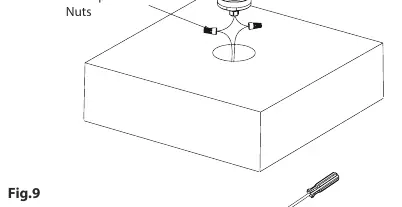
Concrete Pour Installation
- Turn off the main power.
- Install wiring and conduit (1/2 inch NPT) at the desired position, plugging all unused holes.
- Secure a 4-inch weatherproof junction box to the ground, preferably over sand or pea gravel.
- Cut the Schedule 80 PVC pipe to the required length for the concrete thickness. Ensure the cut end is inserted into the concrete pour kit.
- Insert the PVC pipe into the mounting flange and lock it with screws.
- Secure the concrete pour kit onto the junction box.
- Pour the concrete, ensuring no concrete enters the junction box.
- After the concrete cures, cut off any excess PVC pipe protruding from the ground.
- Connect the fixture wires to the box wires using the provided wire nuts.
- Apply plumbers' silicone to the O-rings.
- Insert the LED fixture into the flange with a twisting motion, ensuring the trim is flush with the concrete.
Practical help
Common problems
Moisture inside the fixture
Ensure O-rings are properly seated and lubricated with plumbers' silicone before installation.
Fixture not turning on
Verify the transformer is connected and powered, and check that all wire nut connections are secure.
Before use
- Turn off main power at the circuit breaker.
- Ensure a compatible transformer is available (sold separately).
- Verify hole dimensions (A*, B*, C*, D*) based on your specific model.
- Have plumbers' silicone ready for O-ring lubrication.
- Ensure you have the correct mounting hardware (e.g., Schedule 80 PVC pipe for hardscape/concrete).
Specs in practice
- Schedule 80 PVC Pipe
- Required for hardscape and concrete installations to house the fixture.
Images and diagrams
- Fig 1 & 2: Show hole dimensions and pipe installation for softscape and hardscape.
- Fig 3: Shows spring clip installation for wall mounting.
- Fig 4: Shows fountain canopy installation.
- Fig 5-9: Show concrete pour installation steps.
Model compatibility
- Transformer is required for all installations.
- UL listed for outdoor use only.
- Concrete pour kit is sold separately.

Manual page author
Michael Turner
Technical manual editor
Reviews PDF manuals for structure, safety notes, and practical product details so readers can find the right information quickly.