Lighting / Outdoor Lighting
User Manual for Maxax 2464-2W Outdoor Wall Lantern
Quick guide for the Maxax 2464-2W outdoor wall lantern. Includes installation steps, wiring instructions, safety warnings, and component list.
Quick answers from the manual
Quick answer
- The Maxax 2464-2W is a hardwired outdoor wall lantern with a built-in dusk-to-dawn sensor. It requires a T10 bulb and must be installed by a qualified electrician with the power turned off at the main breaker. p. 2
Key actions
- Turn off power at the main circuit breaker before starting installation. p. 2
- Connect wires according to the provided wire connection diagram. p. 2
First start
- Install the T10 bulb, secure the glass shade with the clamps, and ensure the photocell is exposed to natural light. p. 2
Show 3 more answers Show less
Problems and fixes
Light does not turn on
Check bulb installation and circuit breaker status.
p. 2Technical specifications
| Parameter | Value | Meaning | Pages |
|---|---|---|---|
| Bulb Type | T10 | Required bulb type | p. 2 |
Where to find it in the PDF
- Installation Instructions p. 2
Table of contents
Quick guide from the manual
The Maxax 2464-2W is an outdoor wall lantern equipped with an automatic dusk-to-dawn sensor. The light automatically turns OFF at sunrise/daytime and ON at sunset/night. This fixture requires a T10 bulb (not included) and must be hardwired into your electrical circuit.
Safety warnings
- Electrical Safety: It is highly recommended to have a qualified electrician install this light. Always turn off the electricity at the main circuit breaker before beginning any installation work.
- Fragile Components: All glass parts are fragile. Handle the glass components and the lamp with care.
- California Proposition 65: This product contains lead, a chemical known to the state of California to cause cancer and birth defects or other reproductive harm. Do not place the product in your mouth and wash your hands after handling.
- Control Devices: If using special control devices with this fixture, follow instructions carefully to ensure compliance with N.E.C. requirements.
Parts included
- T10 light bulb (Not included) - Qty: 1
- Glass lampshade - Qty: 1
- Lampshade clamp - Qty: 3
- Phillips flat head screw - Qty: 2
- Wire caps - Qty: 2
- Green ground screw - Qty: 1
- Cover nuts - Qty: 2
Installation & Wiring
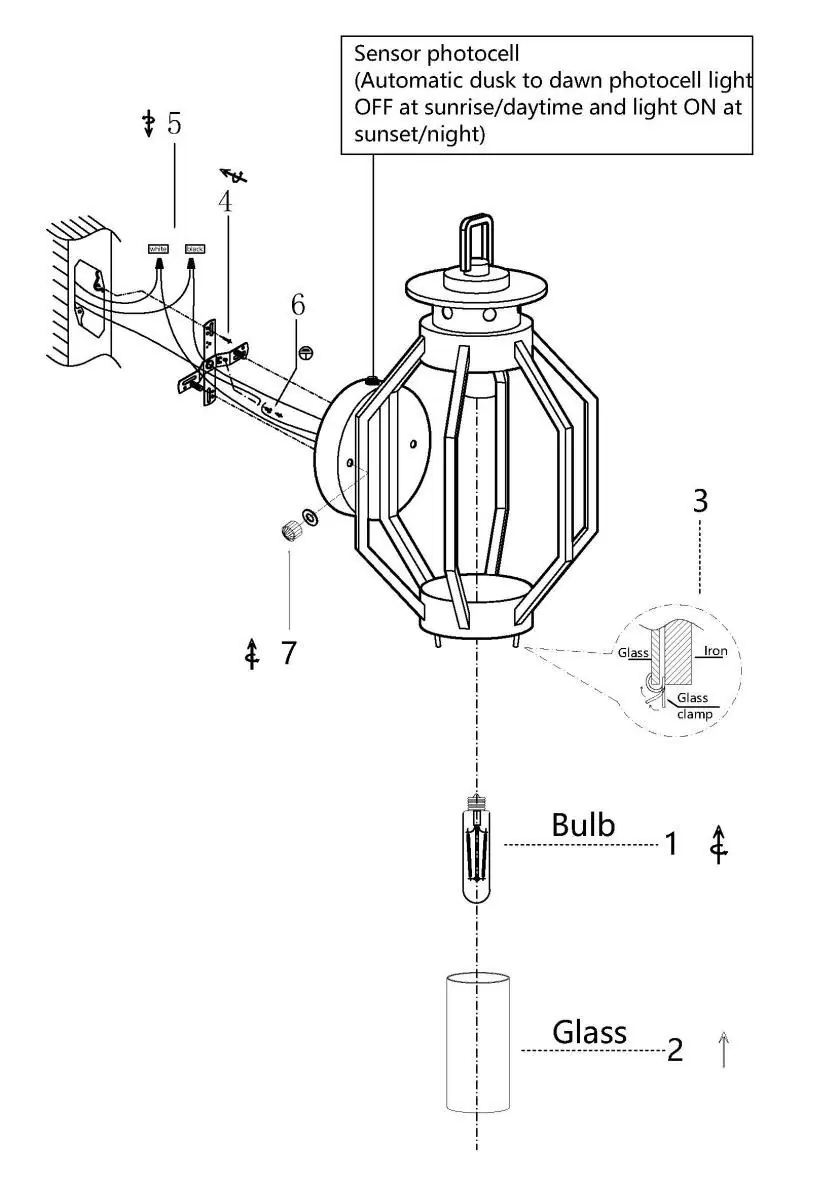
Before proceeding, ensure the power supply is turned off at the main circuit breaker. Follow the wire connection diagram to connect the electrical circuit, ensuring wires meet safety standards. The fixture mounts to the wall using the provided screws and bracket. Ensure the glass lampshade is securely fastened using the lampshade clamps.
Customer support
If you have any questions or problems, you can contact the support team via email at [email protected] or by phone at 870-949-8466.
Practical help
Common problems
Light does not turn on
Ensure the power supply is turned on at the circuit breaker and the T10 bulb is correctly installed.
Light stays on during the day
The sensor may be obstructed or in a shaded area; ensure the photocell is exposed to natural light.
Before use
- Turn off electricity at the main circuit breaker
- Verify all parts are present according to the parts list
- Purchase a compatible T10 bulb (not included)
- Ensure you have the necessary tools for installation
- Check wiring compatibility with local safety standards
Show more Show less
Images and diagrams
- The diagram illustrates the mounting bracket installation, the wire connection points (L/N), and the assembly sequence for the glass shade and bulb.
Model compatibility
- Requires hardwired electrical connection.
- Compatible with standard outdoor wall mounting.

Manual page author
David Miller
Documentation analyst