Lighting / Wireless Control
Installation Guide for American Lighting 72486-143C/72486-66-C Post Light
Step-by-step installation instructions for American Lighting 72486-143C and 72486-66-C post lights. Includes wiring diagrams, bulb installation steps, and safety warnings.
Quick answers from the manual
Quick answer
- This document provides installation instructions for American Lighting models 72486-143C and 72486-66-C, including wiring and assembly steps. p. 1
Key actions
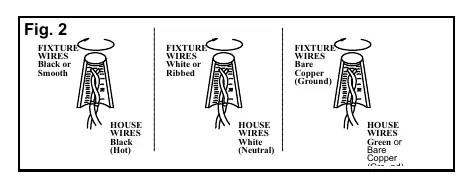
- Connect wires: Black to Black (Hot), White to White (Neutral), Bare Copper to Green/Bare Copper (Ground). p. 1
- Install E12-Candelabra bulb. p. 1
Problems and fixes
No ground wire on post
Consult your electrician for proper grounding.
p. 1Show 2 more answers Show less
Technical specifications
| Parameter | Value | Meaning | Pages |
|---|---|---|---|
| Bulb Base | E12-Candelabra | Required bulb type | p. 1 |
Where to find it in the PDF
- Installation Instructions p. 1
Table of contents
Quick guide from the manual
This document provides essential installation instructions for the American Lighting 72486-143C and 72486-66-C post lights. Warning: Always shut off power at the circuit breaker before beginning any electrical work.
Installation steps
- Preparation: Shut off the power at the circuit breaker and remove the old fixture and mounting hardware. Unpack the new fixture and lay out all parts in a clear area to ensure no small components are lost.
- Wiring: While supporting the fixture, connect the electrical wires as shown in the wiring diagram. If your post has a ground wire (green or bare copper), connect the fixture's ground wire to it. If not, consult an electrician for proper grounding.
- Securing wires: After connections are made, carefully tuck the wires inside the post cup (A).
- Bulb installation: Install an E12-Candelabra bulb (not included) according to the fixture's specifications.
- Final assembly: Attach the top cover (E) to the cage (C) and secure it with screws (D). Place the fixture onto the post cup (A) and secure it with screws (B).
- Testing: Once installation is complete, return power to the junction box and test the fixture.
Important safety and maintenance
- Wattage: Do not exceed the maximum wattage rating specified for the fixture.
- Grounding: Ensure proper grounding. If the post lacks a ground wire, consult a professional electrician.
Manufacturer information
American Lighting Inc.
Practical help
Common problems
Fixture does not light up
Check the circuit breaker to ensure power is on, verify that the bulb is correctly installed, and ensure all wire connections are secure.
No ground wire on post
Consult a professional electrician to ensure proper grounding before proceeding with installation.
Before use
- Shut off power at the circuit breaker
- Verify you have an E12-Candelabra bulb (not included)
- Ensure a clear workspace for assembly
- Check for a ground wire on the post
Show more Show less
Specs in practice
- E12-Candelabra
- The required bulb base type for this fixture.
Images and diagrams
- Fig 1: Assembly diagram showing the fixture components (A, B, C, D, E).
- Fig 2: Wiring diagram illustrating the connection of Black (Hot), White (Neutral), and Bare Copper (Ground) wires.
Model compatibility
- Requires E12-Candelabra bulb (not included).

Manual page author
Michael Turner
Technical manual editor