Lighting / Outdoor Lighting
Installation and Maintenance Manual for Acuity Brands 247L Series LED Post Top Lanterns
Quick guide for the Acuity Brands 247L Series LED Post Top Lanterns, covering safety instructions and the Lens to FCO conversion procedure.
Quick answers from the manual
Quick answer
- This manual provides safety instructions and a step-by-step procedure for converting the 247L fixture from a lens fixture to a full cutoff (FCO) fixture. p. 3, 4
Key actions
- Convert Lens to FCO p. 3, 4
Maintenance and reset
- Clean the outside of the refractor/lens using a solution of warm water and mild, non-abrasive household detergent. p. 1
Show 1 more answers Show less
Where to find it in the PDF
- Safety Instructions p. 1, 2
- Conversion Procedure p. 3, 4
Table of contents
Manual images
Click an image to enlargeImportant Safety Information
Before installing, servicing, or performing routine maintenance on the 247L Series LED Post Top Lanterns, read all safety instructions carefully. Installation and service must be performed by a qualified licensed electrician.
- Electrical Safety: Disconnect or turn off power before installation or servicing. Verify supply voltage matches the luminaire label. Ensure all wiring connections are capped with UL-approved wire connectors.
- Handling: Allow the lamp/fixture to cool before handling. Do not touch the enclosure or light source. Wear gloves and safety glasses when removing the luminaire from the carton, installing, or servicing.
- Operational Warnings: Do not exceed the maximum wattage marked on the luminaire label. Avoid direct eye exposure to the light source. Keep combustible materials away from the lamp/lens.
- Product Protection: LED products are polarity sensitive; ensure proper polarity before installation. Electrostatic Discharge (ESD) can damage LED fixtures; wear personal grounding equipment during installation or servicing. Do not restrict fixture ventilation.
Conversion Procedure (Lens to FCO)
The 247L fixture with the CNV option can be converted from a lens fixture to a full cutoff (FCO) fixture in the field. Required tools: 5/16" nut driver or slotted screwdriver, and a Philips head screwdriver.
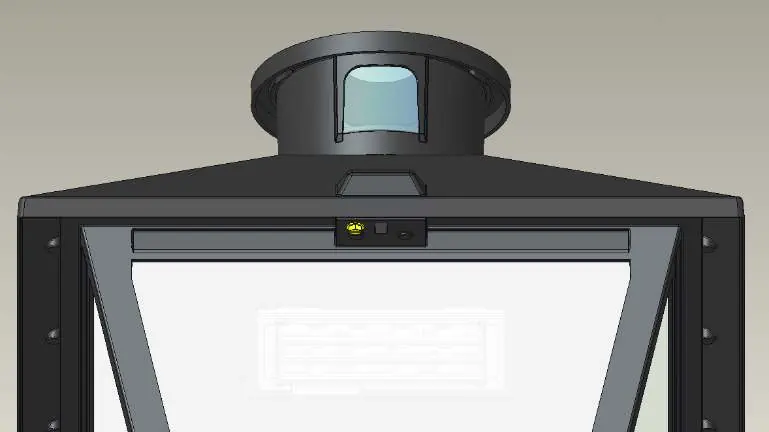
- Open Fixture: Unscrew the latch screw (or use the trigger latch, if applicable) and swing the lid open.
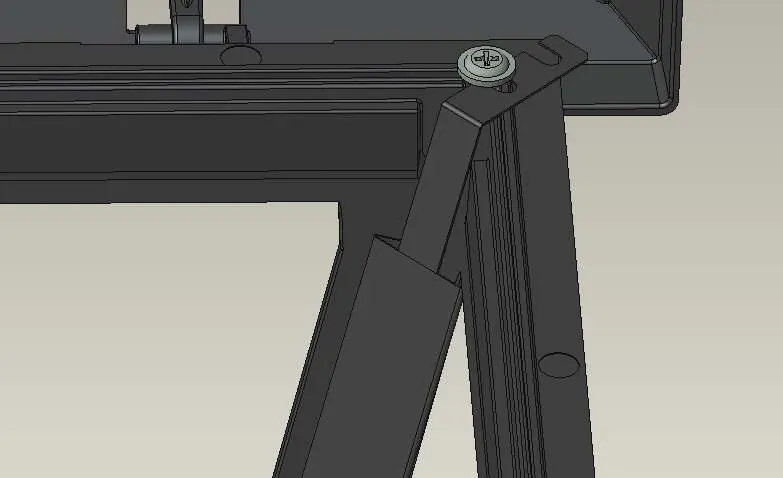
- Loosen Wireway Screw: Locate the screw at the top of the wireway. Loosen it by turning counterclockwise for 2-3 full rotations. It is not required to remove the screw completely.
- Remove Wireway: Slide the top of the wireway to the right, then lift the metal wireway up and out from around the wire harness. Ensure the wire harness remains in place.
- Remove Lens Panels: Lift the 4 lens panels out of the fixture.
- Re-install Wireway: Insert the bottom of the wireway into the hole closest to the edge of the housing.
- Secure Wireway: Slide the wire harness back into the wireway. Re-secure the wireway by sliding the lower slot between the screw and the housing. Rotate the screw clockwise until hand-tight.
- Close Fixture: Close the lid and tighten the latch screw (or trigger latch).
Maintenance
Regular fixture maintenance programs are recommended. Clean the outside of the refractor/lens using a solution of warm water and mild, non-abrasive household detergent. Rinse with clean water and wipe dry. If the optical assembly becomes dirty on the inside, clean the refractor/lens in the same manner and replace damaged gaskets as necessary.
Practical help
Common problems
Fixture damaged upon arrival
Do not install. Inspect the product to confirm damage and replace any broken or damaged parts.
ESD damage to LED components
Wear personal grounding equipment during all installation or servicing of the unit.
Overheating or reduced performance
Do not restrict fixture ventilation. Allow airspace around the fixture and do not cover with insulation or foam.
Before use
- Disconnect power before installation or servicing
- Verify supply voltage matches luminaire label
- Wear gloves and safety glasses
- Ensure proper polarity before installation
- Check that the fixture is not damaged
Show more Show less
Images and diagrams
- Figure 1: Location of the 247L Latch Screw
- Figure 2: Location of the Wireway Screw
- Figure 3: Wireway removal process
- Figure 4: Lens panel removal process
- Figure 5: Wireway re-insertion
Model compatibility
- LED fixtures must be powered directly off a switched circuit unless specified otherwise.
- Do not connect LED products directly to dimmer packs, occupancy sensors, or timing devices unless specified.

Manual page author
Emily Carter
User documentation editor