Lighting / Fixtures
Installation Manual for 4ModernHome MX19176-4CH-P Chandelier
Comprehensive installation and assembly guide for the 4ModernHome MX19176-4CH-P chandelier. Includes wiring diagrams, parts list, safety precautions, and technical specifications.
Quick answers from the manual
Quick answer
- The 4ModernHome MX19176-4CH-P is a chandelier that requires assembly and hard-wired installation. It operates on 110-130V/60Hz and uses E12 bulbs (max 60W). p. 2
Key actions
- Turn off the electricity at the main circuit breaker before beginning installation. p. 2
First start
- Install the mounting bracket, connect the electrical wires (L/N/Ground), attach the canopy, and hang the crystal strings. p. 2
Show 2 more answers Show less
Technical specifications
| Parameter | Value | Meaning | Pages |
|---|---|---|---|
| Voltage | 110-130V/60Hz | Operating voltage | p. 2 |
| Max Bulb Wattage | 60W | Maximum power per bulb | p. 2 |
Where to find it in the PDF
- Cover Page p. 1
- Installation Instructions p. 2
Table of contents
Quick Guide
This document provides instructions for the assembly and installation of the 4ModernHome MX19176-4CH-P chandelier. Before beginning, ensure the power supply is turned off at the main circuit breaker. It is highly recommended to have a qualified electrician perform the installation.
Safety Information
- Risk of Fire: Ensure all wiring meets safety standards.
- Fragile Components: Handle all glass components and lamps with extreme care.
- Proposition 65 Warning: This product contains lead, a chemical known to cause cancer and birth defects. Do not place in mouth and wash hands after handling.
- Electrical Safety: If using special control devices, follow instructions carefully to ensure compliance with N.E.C. requirements.
Parts Included
- Mounting Bracket (A)
- Canopy (B)
- Sling Chain (C)
- Cover (D)
- Chandelier Body (E)
- Lamp Shade (F)
- Central Pipe (G)
- Crystal Strings (1, 2, 3)
Installation Steps
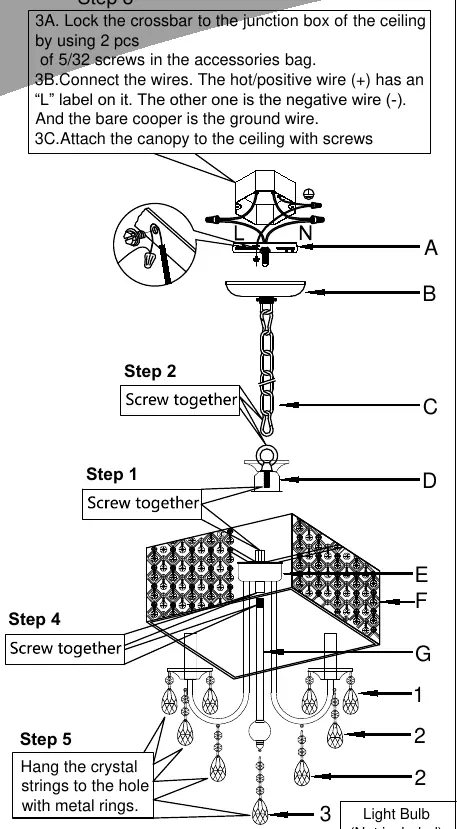
- Step 1: Screw the central pipe (G) to the chandelier body (E).
- Step 2: Screw the cover (D) to the chandelier body.
- Step 3: Lock the crossbar (Mounting Bracket A) to the junction box in the ceiling using the provided 5/32 screws.
- Step 4: Connect the wires. The hot/positive wire (+) is marked with an 'L'. The other wire is the negative/neutral wire (-). The bare copper wire is the ground wire.
- Step 5: Attach the canopy (B) to the ceiling with screws and hang the crystal strings (1, 2, 3) to the holes using the provided metal rings.
Technical Specifications
- Voltage: 110-130V/60Hz
- Bulb Type: E12 (not included)
- Max Wattage: 60W per bulb
Support
If you have questions or problems, contact support at [email protected] or call 469-312-6428.
Practical help
Common problems
Glass breakage
Handle all glass components and lamp shades with extreme care during assembly and installation.
Wiring confusion
The hot/positive wire (+) is marked with an 'L'. The bare copper wire is the ground wire.
Before use
- Turn off electricity at the main circuit breaker
- Verify all parts (A-G, 1-3) are present
- Ensure you have E12 bulbs (not included)
- Consult a qualified electrician if you are unsure about the wiring process
Show more Show less
Images and diagrams
- The wiring diagram illustrates the connection of the hot (L) and neutral (N) wires to the ceiling junction box.
- The assembly diagram shows the sequence of connecting the chandelier body, central pipe, cover, and canopy.
Model compatibility
- Requires E12 bulbs (not included)
- Designed for standard 110-130V electrical circuits

Manual page author
David Miller
Documentation analyst