Lighting / Fixtures
Installation Guide for Maxax 19171-8BK-P Chandelier
Step-by-step installation and assembly guide for the Maxax 19171-8BK-P chandelier. Includes wiring diagrams, parts list, safety precautions, and technical specifications.
Quick answers from the manual
Quick answer
- This document provides assembly and installation instructions for the Maxax 19171-8BK-P chandelier, including wiring diagrams and safety warnings. p. 2
Key actions
- Turn off electricity at the main circuit breaker. p. 2
- Connect black wire to positive (+) and white wire to negative (-). p. 2
Technical specifications
| Parameter | Value | Meaning | Pages |
|---|---|---|---|
| Voltage | 110-130V/60Hz | Operating voltage | p. 2 |
| Bulb | 60W maximum | Maximum wattage per bulb | p. 2 |
Show 1 more answers Show less
Where to find it in the PDF
- Cover Page p. 1
- Assembly and Wiring Instructions p. 2
Table of contents
Manual images
Click an image to enlargeImportant Information
This manual provides instructions for the assembly and installation of the Maxax 19171-8BK-P chandelier. It is highly recommended to have a qualified electrician perform the installation to ensure safety and compliance with local electrical codes.
Safety Precautions
- Always turn off the electricity at the main circuit breaker before beginning installation.
- Handle all glass components with care as they are fragile.
- This product contains lead, a chemical known to the state of California to cause cancer and birth defects. Wash hands after handling.
- If using special control devices, follow instructions carefully to ensure compliance with N.E.C. requirements.
Parts Included
Ensure all parts are present before starting assembly:
- Mounting Bracket, Canopy, Sling Chain, Central Pipe
- Crystal (155 pcs), Crystal Ball
- Twigs 1 (8 pcs), Twigs 2 (8 pcs)
- Lamp Arm 1 (3 pcs), Lamp Arm 2 (3 pcs)
- Decorative Cover
Installation and Wiring
Follow these steps to assemble and install the fixture:
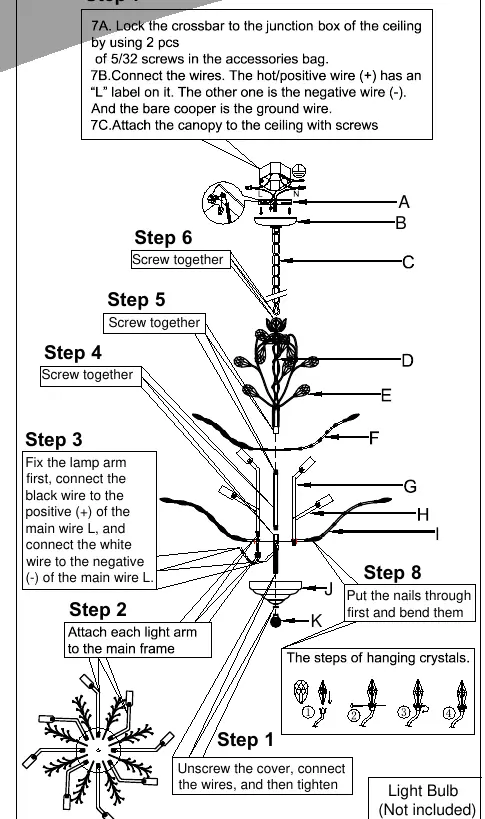
- Assembly: Screw together the lamp arms and central pipe components as shown in the diagram.
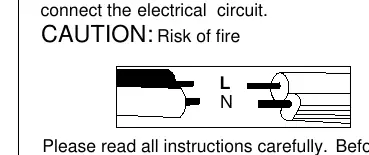
- Wiring: Connect the black wire to the positive (+) main wire and the white wire to the negative (-) main wire.
- Mounting: Lock the crossbar to the junction box using the provided screws.
- Finalizing: Attach the canopy to the ceiling with screws and hang the crystals.
Technical Specifications
- Voltage: 110-130V/60Hz
- Bulb Base: E12
- Maximum Wattage: 60W per bulb
Practical help
Common problems
Glass components are fragile
Handle with care during installation and assembly to prevent breakage.
Electrical safety concerns
Turn off power at the main circuit breaker before starting installation.
Before use
- Ensure power is turned off at the main circuit breaker.
- Verify all parts are present according to the parts list.
- Have a qualified electrician perform the installation.
- Check that the ceiling junction box can support the fixture.
Show more Show less
Images and diagrams
- The wiring diagram shows the connection of the black wire to the positive (+) main wire and the white wire to the negative (-) main wire.
- The assembly steps illustrate the sequence from attaching lamp arms to the main frame, connecting wires, and finally hanging crystals.
Model compatibility
- Requires standard 110-130V electrical circuit.
- Bulbs are not included.

Manual page author
Emily Carter
User documentation editor