Home Appliances / Cooktops Hobs
User Manual for Morphy Richards ELYSIA TC 2000W Induction Stove
Quick guide for the Morphy Richards ELYSIA TC 2000W induction stove. Learn about operation modes, compatible cookware, safety precautions, and troubleshooting error codes.
Quick answers from the manual
Quick answer
- The Morphy Richards ELYSIA TC 2000W is an induction stove. To use it, place compatible flat-bottomed cookware (12-26cm) on the glass plate, plug into a 10A socket, and select your desired cooking function (Manual, Deep Fry, Boil Water, Milk, or Pressure Cook). p. 3, 6, 7
Key actions
- Perform the magnet test to ensure cookware is induction-compatible. p. 7
- Use the Child Lock function by holding the lock button for 3 seconds. p. 7
First start
- Place the unit on a flat surface with 10cm clearance, plug into a 10A socket, and place compatible cookware on the glass plate before turning on. p. 3, 4
Show 5 more answers Show less
Problems and fixes
E0
No pot or unsuitable pot.
p. 8
E1
Voltage too low.
p. 8
E2
Voltage too high.
p. 8
E5
Glass plate overheated.
p. 8
E6
IGBT overheated.
p. 8Error codes
| Code | Meaning | Action | Pages |
|---|---|---|---|
| E0 | No pot or unsuitable pot | Place the pot/pan or change the suitable pot/pan. | p. 8 |
| E1 | Voltage too low | Check the power supply. | p. 8 |
| E2 | Voltage too high | Check the power supply. | p. 8 |
| E5 | Glass plate overheated | Wait for the unit to cool down. | p. 8 |
| E6 | IGBT overheated | Check if air vent/fan is stuck. | p. 8 |
Maintenance and reset
- Clean the glass plate with a soft cloth and neutral detergent. Clean air vents with a flexible brush. p. 7
Technical specifications
| Parameter | Value | Meaning | Pages |
|---|---|---|---|
| Voltage | 230V~50Hz | Operating voltage | p. 3 |
| Wattage | 2000W | Power consumption | p. 3 |
Where to find it in the PDF
- Product Overview p. 3
- Safety Notice p. 4, 5
- Cookware Selection p. 6
- Operation Instructions p. 6, 7
- Troubleshooting p. 8
Table of contents
Manual images
Click an image to enlargeQuick guide from the manual
The Morphy Richards ELYSIA TC 2000W is an induction stove designed for indoor household use. Before operating, ensure you have a compatible flat-bottomed pot (12-26cm diameter) and that the unit is placed on a flat surface with at least 10cm of clearance on all sides for ventilation. Do not use the unit on metal platforms, carpets, or near gas/kerosene stoves.
Product Overview
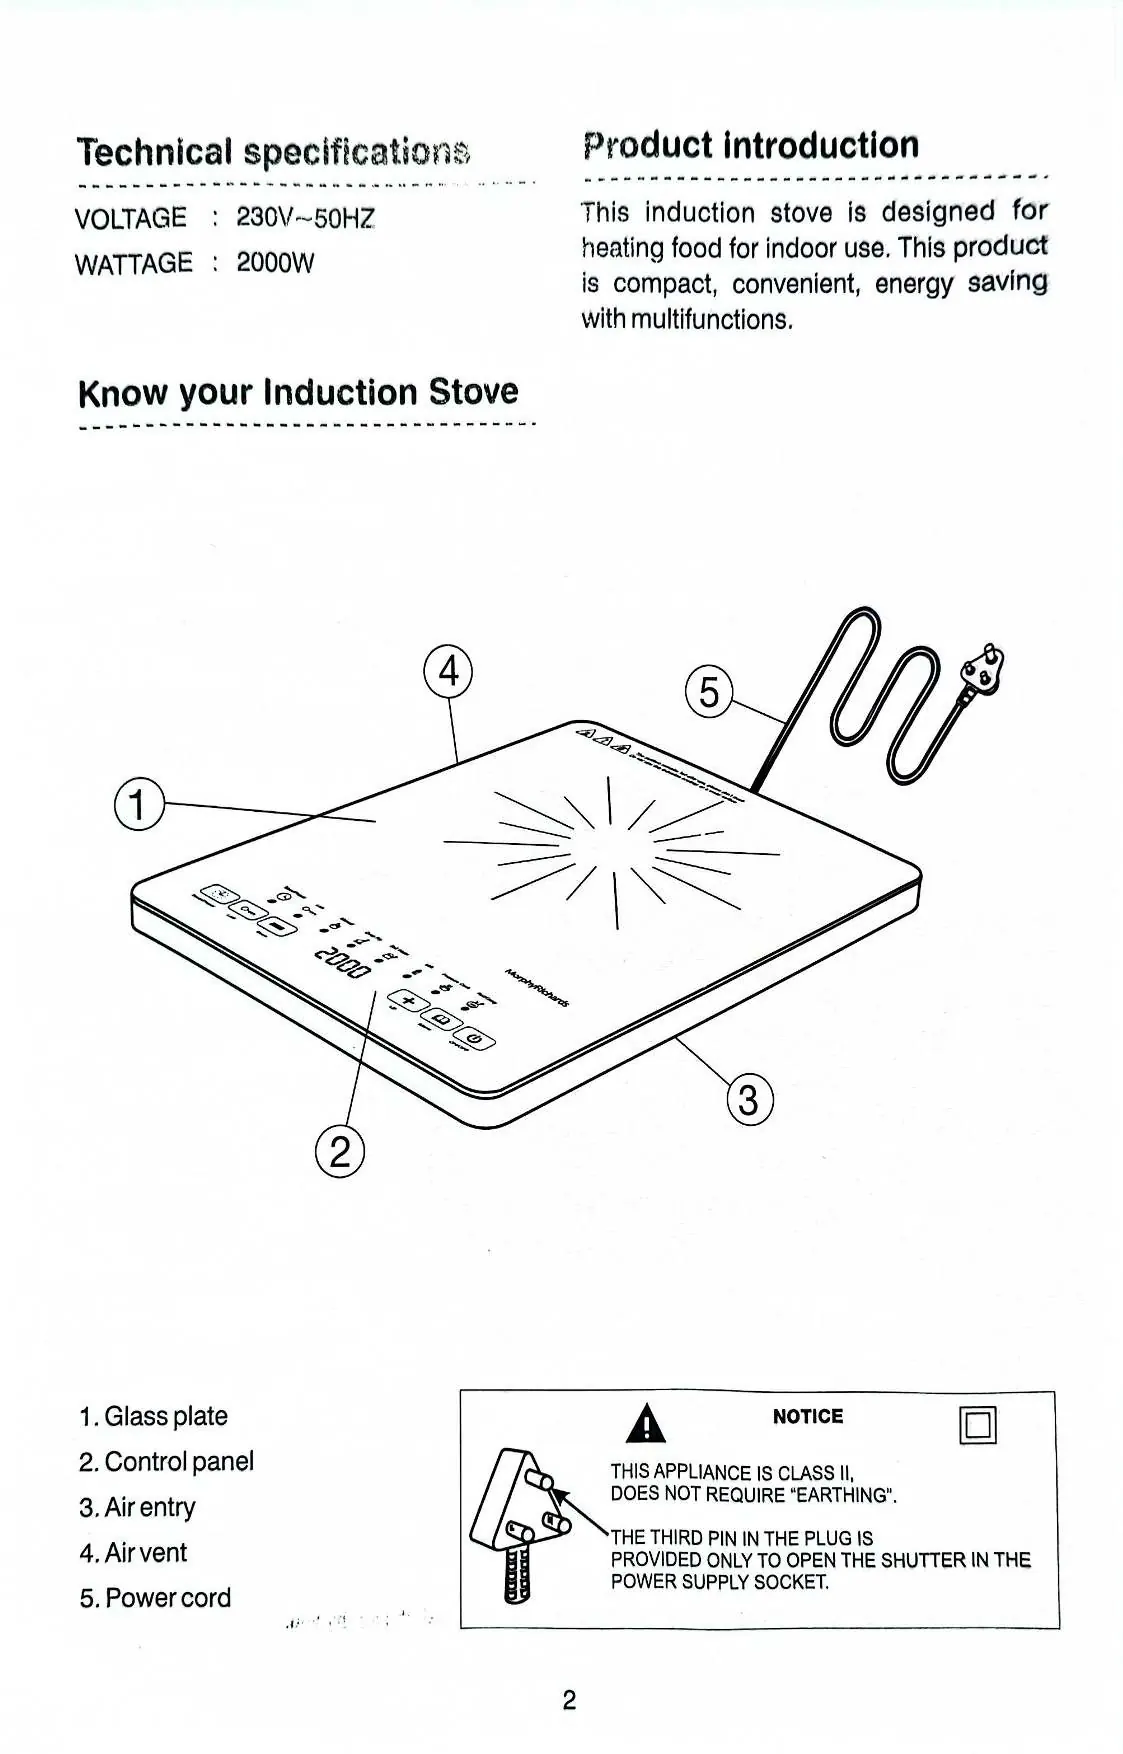
The induction stove consists of a glass plate, a control panel, air entry, and air vent. The power cord is provided with a plug that does not require earthing, as the appliance is Class II.
Safety Information
To ensure safe operation, follow these guidelines:
- Use an individual 10A socket; do not share with other high-power appliances.
- Never wash the unit directly with water.
- Do not block the air entry or air vent.
- Do not place metal objects like knives, forks, or aluminum foil on the ceramic panel during operation.
- If the glass surface is cracked, switch off the appliance immediately to avoid electric shock.
- Persons with heart pacemakers should consult a doctor before using this product.
- Keep the unit away from children.
Cookware Compatibility
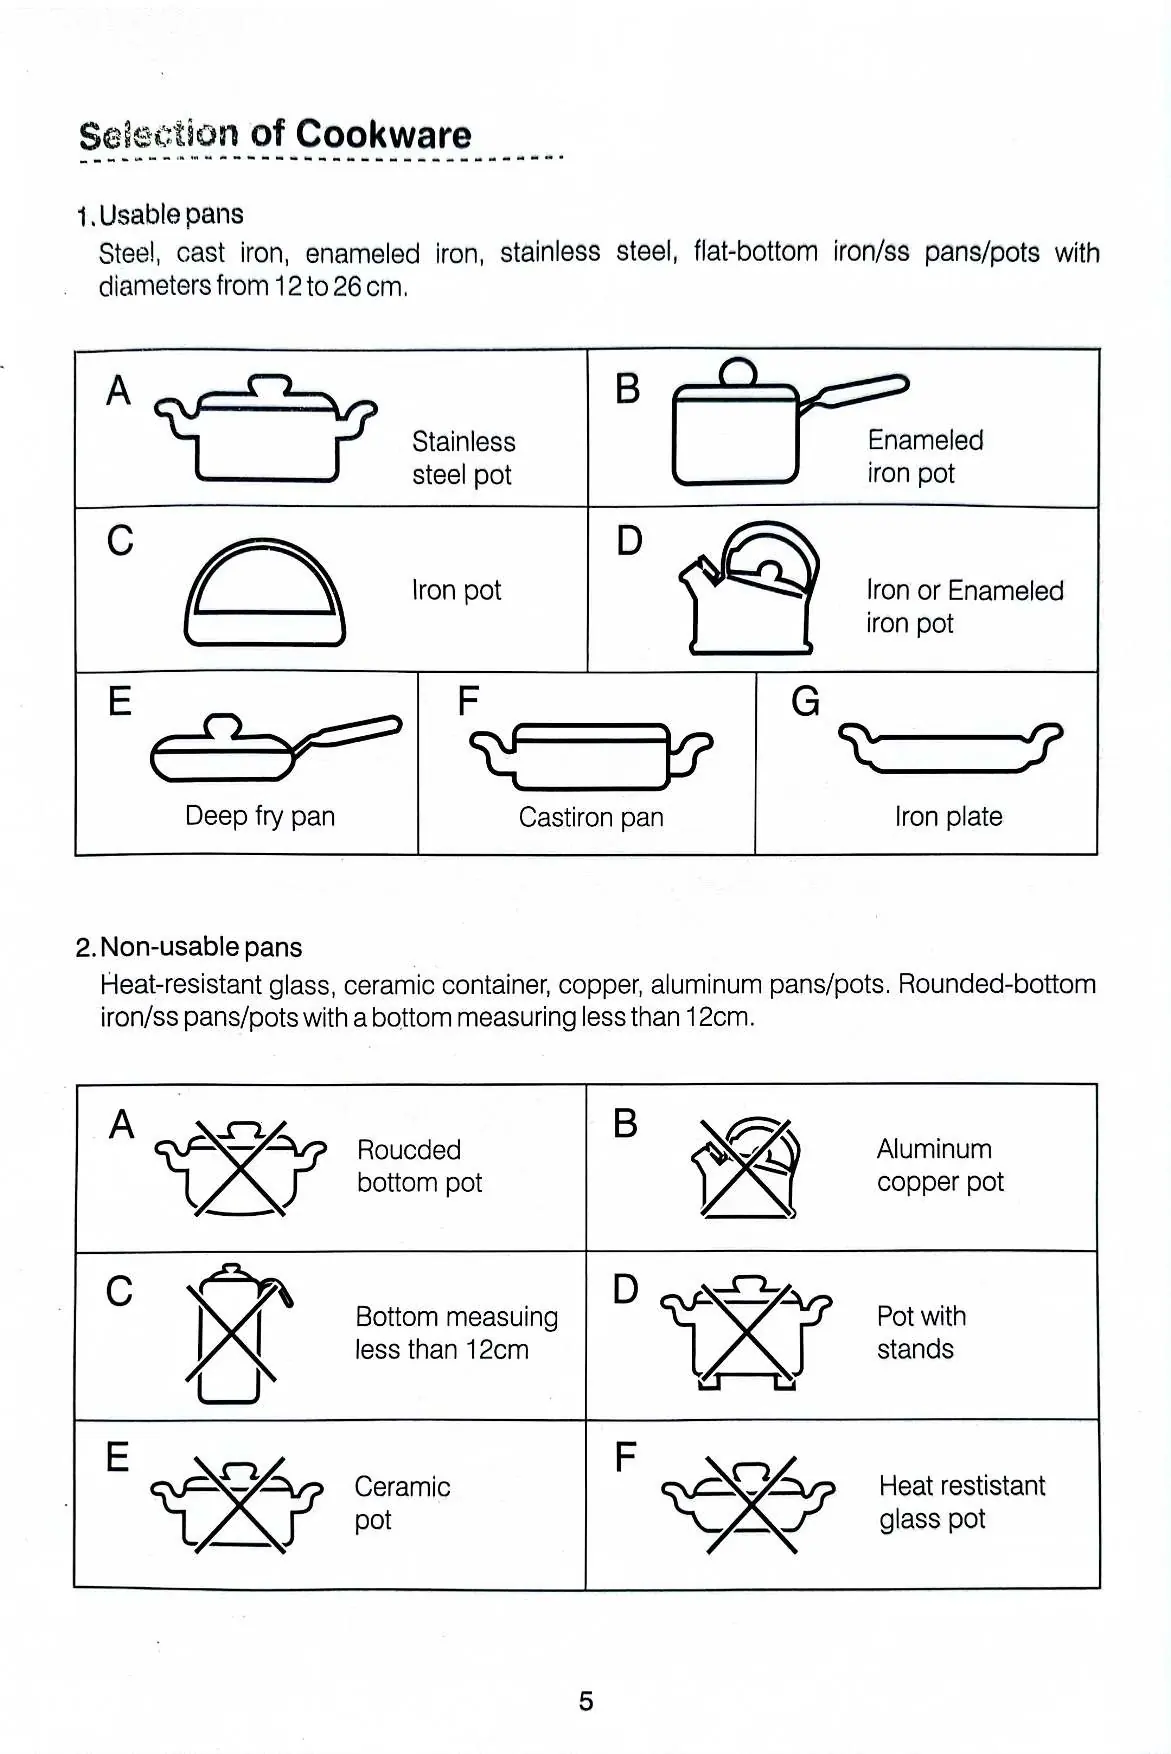
Induction cooking requires specific cookware. Use the 'magnet test': if a magnet sticks to the base, the cookware is compatible. Compatible cookware includes steel, cast iron, enameled iron, and stainless steel with a flat bottom diameter between 12cm and 26cm. Avoid using ceramic, glass, copper, or aluminum pots, as well as pots with rounded bottoms or bases smaller than 12cm.
Operation Instructions
To operate the stove, place compatible cookware in the center of the cooking zone and press the ON/OFF button. You can select from various cooking functions:
- Manual (Hotpot): Allows manual adjustment of power (200W-2000W) and cooking time (1 min to 3 hours).
- Deep Fry: Default temperature 180°C, adjustable.
- Boil Water: Default 2000W, 15-minute duration.
- Milk: Default 80°C, 60-minute duration.
- Pressure Cook: Default settings for pressure cooking.
The unit also features a Timer (1 min to 3 hours) and a Preset function (up to 24 hours delay) for specific modes. Use the Child Lock by pressing and holding the lock button for more than 3 seconds to prevent accidental changes.
Maintenance and Cleaning
Always unplug the unit and ensure it is cool before cleaning. Wipe the glass plate with a soft cloth and neutral detergent. Clean the air entry and vent with a flexible brush or dry cloth to remove dust. Never wash the unit with water. If the glass is stained, use a little toothpaste or neutral detergent.
Troubleshooting
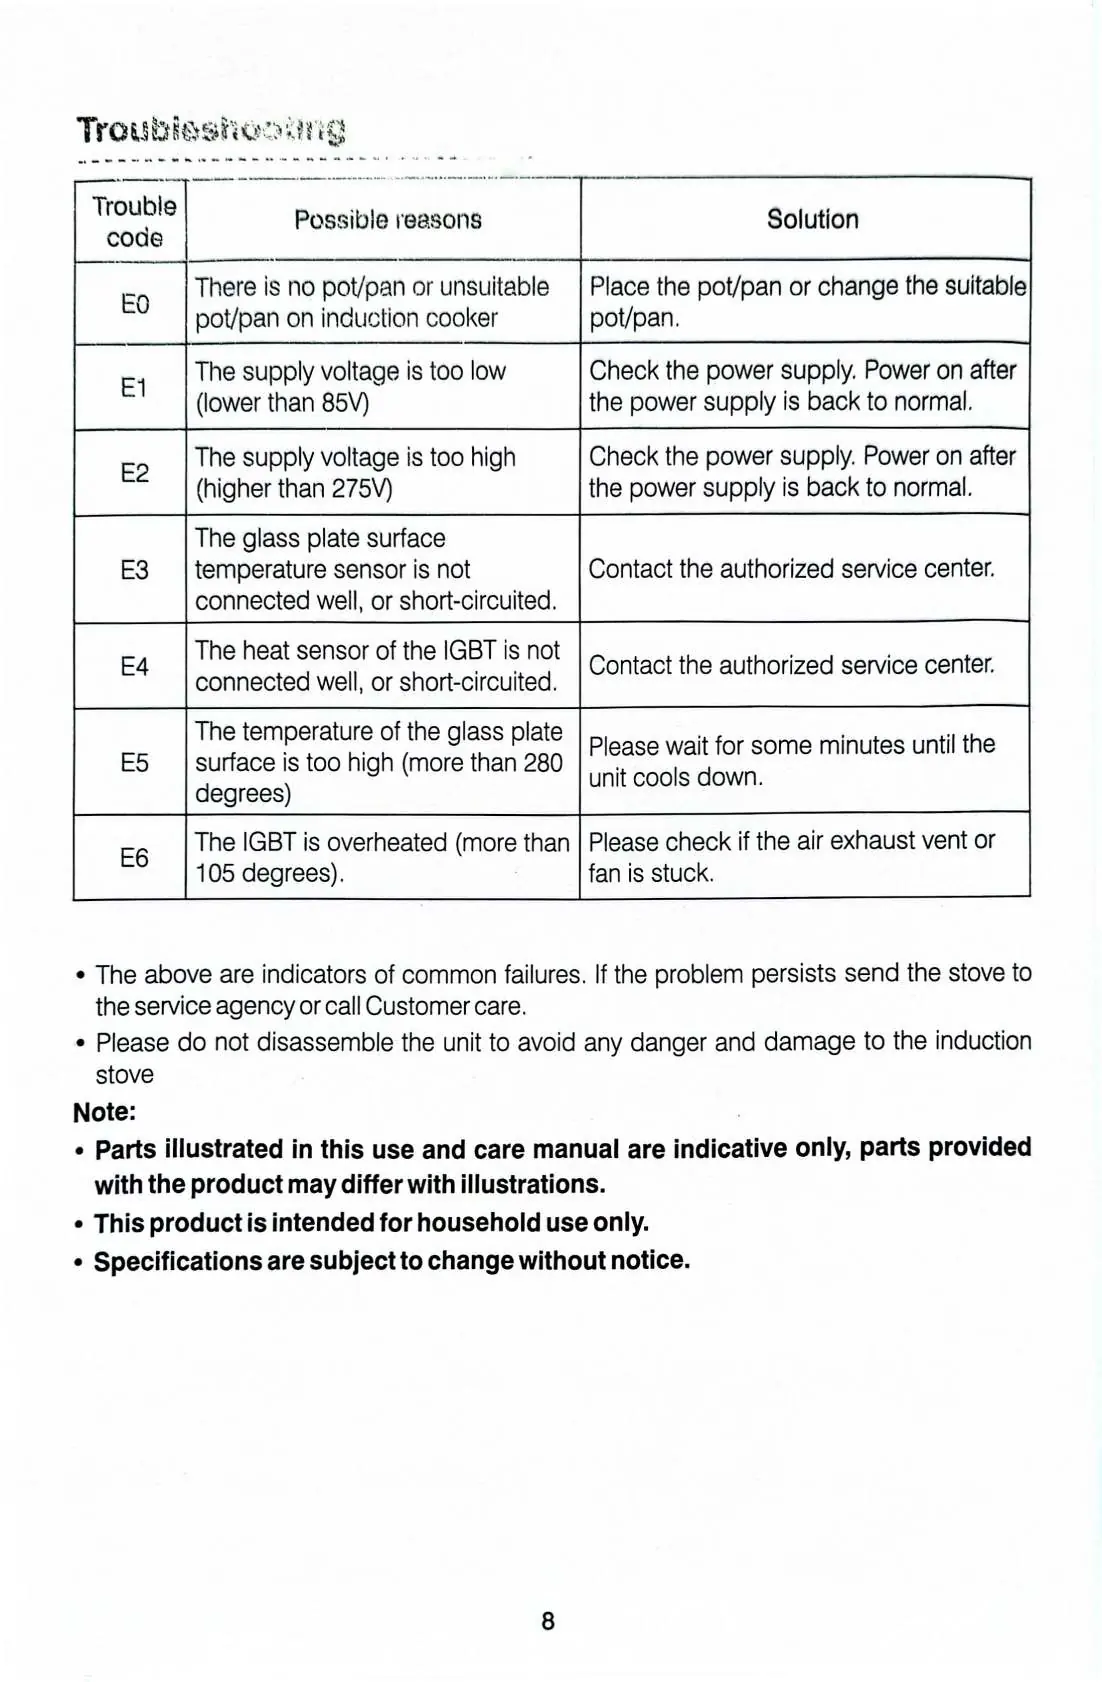
If the unit displays an error code, refer to the troubleshooting section. Common codes include E0 (no pot/unsuitable pot), E1/E2 (voltage issues), E3/E4 (sensor issues), and E5/E6 (overheating). If problems persist, contact the authorized service center.
Practical help
Common problems
E0 Error Code
No pot or unsuitable pot detected. Place a compatible induction-friendly pot on the stove.
E1 / E2 Error Code
Supply voltage is too low (E1) or too high (E2). Check your power supply.
E5 / E6 Error Code
Overheating detected. Wait for the unit to cool down or check if the air vent is blocked.
Before use
- Ensure the power supply is 230V~50Hz.
- Use an individual 10A socket.
- Maintain 10cm clearance around the unit.
- Verify cookware is induction-friendly using a magnet.
- Ensure cookware base is flat and between 12cm and 26cm in diameter.
Show more Show less
Images and diagrams
- 1. Glass plate: Cooking surface.
- 2. Control panel: Interface for settings.
- 3. Air entry: Intake for cooling.
- 4. Air vent: Exhaust for cooling.
- 5. Power cord: Connects to power supply.
Model compatibility
- Compatible: Steel, cast iron, enameled iron, stainless steel.
- Incompatible: Ceramic, glass, copper, aluminum, rounded-bottom pots.
- Size limit: 12cm to 26cm diameter.

Manual page author
David Miller
Documentation analyst