Lighting / LED Lamps
Installation Instructions for PQL LED High Wattage 180° Lamp
Official installation guide for the PQL LED High Wattage 180° Lamp retrofit kit. Includes essential wiring diagrams for ballast bypass, safety warnings, and step-by-step installation instructions for qualified electricians.
Table of contents
Manual images
Click an image to enlargeQuick Installation Guide
This LED retrofit kit is designed for Type B operation, meaning it requires direct wiring to the branch circuit. Installation must be performed by a qualified electrician. Before beginning, ensure the luminaire compartment meets the minimum dimensions of 11.8" (L) x 13.8" (W). The lamp is suitable for horizontal operation only and is not intended for emergency lighting.
Safety Warnings
- Disconnect Power: Always switch off the power supply before working on the fixture.
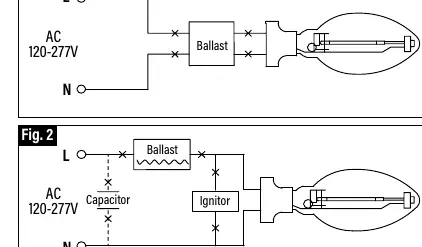
- Ballast Bypass: You must remove or bypass the existing ballast, capacitor, and ignitor.
- Wiring Protection: Do not expose wiring to sharp edges of sheet metal to prevent damage.
- Compliance: This kit is intended for use in luminaires where the input rating of the retrofit kit does not exceed the input rating of the luminaire.
Installation Steps
- Disconnect Power: Turn off the power supply to the fixture.
- Remove Components: Disconnect and remove the existing ballast, capacitor, and ignitor from the fixture. Refer to the wiring diagrams for proper bypass configuration.
- Install Lamp: Screw the new LED replacement lamp fully into the socket. Do not over-tighten.
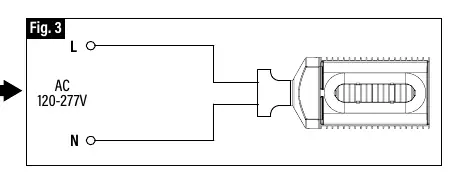
- Adjust Position: Once installed, rotate the lamp base until the LEDs are pointing directly out of the fixture.
- Labeling: Mark the luminaire as modified to operate LED lamps so it is visible during future maintenance.
Technical Specifications
The lamp is dimmable only when operating on 120V. It is suitable for damp locations. Ensure the luminaire is compatible with the retrofit kit before installation. For technical support or inquiries, contact P.Q.L., Inc. at 800-323-8107 or visit www.PQLighting.com.
Official resources from the manual
Practical help
Common problems
Lamp does not fit in the fixture
Verify that your luminaire compartment is at least 11.8" (L) x 13.8" (W).
Light is facing the wrong direction
After screwing the lamp into the socket, rotate the lamp base until the LEDs point directly out of the fixture.
Fixture does not turn on after installation
Ensure the ballast, capacitor, and ignitor were completely removed or bypassed, and that the wiring matches the Type B direct-wire configuration.
Before use
- Confirm you are a qualified electrician.
- Measure the luminaire compartment (min 11.8" x 13.8").
- Disconnect power supply.
- Remove existing ballast, capacitor, and ignitor.
- Verify the fixture is suitable for horizontal operation.
Specs in practice
- Horizontal Operation
- The lamp is designed to function only when installed horizontally.
Images and diagrams
- Fig 1 & 2: Illustrates the removal of the ballast, capacitor, and ignitor for direct wiring.
- Fig 3: Shows the final installation position with LEDs facing outward.
Model compatibility
- Suitable for damp locations.
- Not for emergency lighting.
- Dimmable on 120V only.

Manual page author
Emily Carter
User documentation editor
Prepares concise manual descriptions and highlights the most useful setup, operation, and maintenance information for readers.