Home Appliances / Vacuum Cleaners
User Manual for Vonroc Cordless Impact Wrench 20V
Quick guide for the Vonroc Cordless Impact Wrench 20V. Includes assembly, operation, torque settings, maintenance, and safety instructions.
Quick answers from the manual
Quick answer
- The Vonroc Cordless Impact Wrench 20V is designed for driving and loosening screws, bolts, and nuts. It features 4 torque settings (100-400 Nm) and is part of the VPOWER 20V battery platform. p. 7, 9
Key actions
- Adjusting torque p. 9
- Changing rotation direction p. 9
First start
- Charge the battery before first use. p. 8
Problems and fixes
Battery not charging
Check charger LED indicators. If red is off and green is on, it's in standby. If red is on, it's charging.
p. 8Maintenance and reset
- Clean machine casings regularly with a soft cloth, preferably after each use. Ensure ventilation openings are free of dust. p. 9
Technical specifications
| Parameter | Value | Meaning | Pages |
|---|---|---|---|
| Torque settings | 100, 200, 300, 400 Nm | Adjustable maximum torque. | p. 7 |
Where to find it in the PDF
- Safety Instructions p. 4, 5, 6
- Machine Information p. 7
- Assembly p. 8
- Operation p. 9
- Maintenance p. 9
Table of contents
Manual images
Click an image to enlargeQuick guide from the manual
This manual provides essential information for the safe and efficient operation of the Vonroc Cordless Impact Wrench 20V. Always read the safety instructions before use. The tool is designed for driving and loosening screws, bolts, and nuts, primarily in the automotive, metal construction, or roofing sectors.
Description
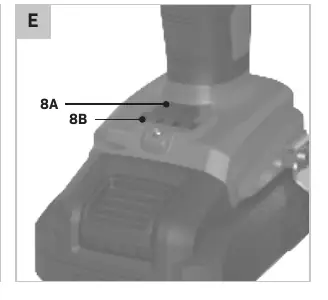
The impact wrench features a 1/2" (12.7 mm) square chuck, a work light for illumination, and four adjustable torque settings (100, 200, 300, and 400 Nm). The torque selection is controlled by a button and indicated by LEDs.
Assembly
- Battery: Ensure the battery is clean and dry before insertion. Slide the battery into the base of the machine until it clicks into place.
- Charging: Remove the battery from the machine. Turn it upside down and slide it onto the charger. Plug the charger into an electrical outlet. The charger has two LED indicators to show the charging status.
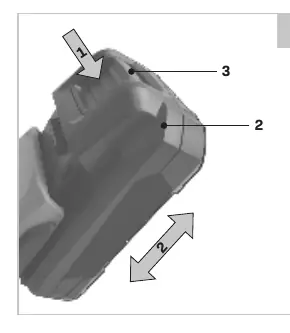
- Accessories: Use only 1/2" (12.7 mm) impact accessories. Non-impact accessories may break and cause hazardous conditions.
Operation
- On/Off: Press the on/off switch to activate the machine. The speed is variable based on how far the switch is pressed.
- Rotation Direction: Use the direction switch to select forward (driving) or reverse (removing) rotation.
- Torque Selection: Press the torque selection button to cycle through the four settings (100, 200, 300, 400 Nm). The current setting is indicated by the LEDs.
- Work Light: The work light automatically turns on when the on/off switch is pressed and turns off when released.
Maintenance
Before cleaning or maintenance, always switch off the machine and remove the battery. Clean the machine casings regularly with a soft cloth, preferably after each use. Ensure ventilation openings are free of dust and dirt. Do not use solvents like gasoline, alcohol, or ammonia, as these can damage synthetic components.
Practical help
Common problems
Tool does not start
Check if the battery is fully charged and correctly inserted into the machine.
Battery not charging
Ensure the charger is plugged into a working outlet and the battery is fully pushed into the charger slot.
Socket falls off during use
Ensure the socket is properly clicked onto the 1/2" square chuck.
Before use
- Ensure the battery is fully charged.
- Check that the impact socket is free of cracks, wear, or damage.
- Ensure the work area is clean and well-lit.
- Verify the direction switch is set correctly for the intended task.
- Check for hidden electrical cables or pipes in the work area.
Specs in practice
- Torque settings
- Four settings (100, 200, 300, 400 Nm) to match the bolt size and application.
- No-load speed
- 0-2300/min, allowing for controlled rotation speed.
Images and diagrams
- Figure A: Overview of machine parts including chuck, switch, and torque indicators.
- Figure B: Battery insertion and removal procedure.
- Figure C: Battery charging and LED status indicators.
- Figure E: Torque selection button and LED indicators.
Model compatibility
- Compatible with Vonroc VPOWER 20V battery platform.
- Use only 1/2" (12.7 mm) impact-rated accessories.

Manual page author
Michael Turner
Technical manual editor
Reviews PDF manuals for structure, safety notes, and practical product details so readers can find the right information quickly.