Electronics / Televisions
User Manual for Philips 21PV708-715-908/07 TV-VIDEO Combi
Comprehensive user guide for the Philips 21PV708-715-908/07 TV-VIDEO Combi. Includes setup, channel installation, recording instructions, playback features, and troubleshooting.
Quick answers from the manual
Quick answer
- This manual covers the operation of the Philips TV-VIDEO Combi, including channel installation, VCR playback and recording, and advanced features like VIDEO Plus+ and satellite recording. p. 1, 4, 21
Key actions
- Perform automatic channel search p. 8, 10
- Program a recording p. 22, 23
- Clean video heads p. 20
First start
- Connect aerial and power p. 6
- Initial installation p. 8
Show 4 more answers Show less
Problems and fixes
Cassette jammed
Switch off with power switch for 30 seconds.
p. 31Maintenance and reset
- Reset settings p. 31
Technical specifications
| Parameter | Value | Meaning | Pages |
|---|---|---|---|
| Power consumption (Standby) | 65W (less than 4W) | Power usage during operation and standby. | p. 4 |
Where to find it in the PDF
- Remote control p. 2
- Front and back panel p. 3
- Installation p. 8
Table of contents
Manual images
Click an image to enlargeQuick guide from the manual
This TV-VIDEO Combi allows you to watch television and record programs onto VHS cassettes. Before using the device, ensure it is connected to the mains and the aerial. After unpacking, allow the unit to acclimatize for at least three hours. Use the STANDBY button to switch the unit off; using the main power switch will cut power completely and prevent timer recordings.
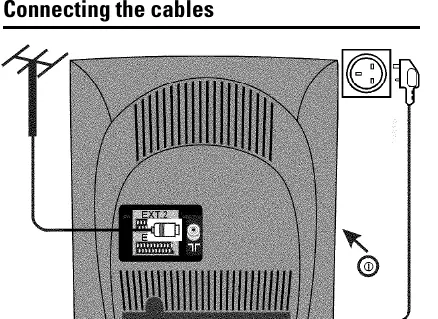
Connecting the device
Connect the aerial cable to the aerial input socket on the back of the set. You can connect additional equipment like a decoder, satellite receiver, or camcorder to the EXT. 1 or EXT. 2 SCART sockets. Audio output sockets are available for connecting to a HiFi system or Dolby Prologic decoder.
Installation and setup
Upon first use, the unit will prompt for an automatic channel search. To perform this manually:
- Press MENU on the remote control.
- Select Installation.
- Select Autoinstall to search for all channels.
- Use Manual store to fine-tune or add specific channels.
You can also set the language, time, and date via the Installation menu. The Smart Clock feature can automatically set the time if a channel transmitting Teletext is stored on program P01.
TV functions
The unit features SMART PICTURE and SMART SOUND presets for optimized viewing and listening. You can also enable Incredible Surround for a wider stereo effect and Automatic Volume Leveller (AVL) to prevent sudden volume spikes during commercials.
Playback functions
Insert a VHS cassette to begin playback. Use the PLAY, STOP, REWIND, and FORWARD buttons to control the tape. The unit supports NTSC playback. If the picture quality is poor, use the Tracking function in the Tape menu or clean the video heads using the Cleaning option in the same menu.
Recording
You can record programs manually or use the TIMER function for scheduled recordings. The unit supports VIDEO Plus+, which allows you to program recordings using codes found in TV guides. OTR (One Touch Recording) allows you to set recording duration in 15-minute intervals. For satellite users, the unit supports OTSR (One Touch Sat Recording) via a SCART connection.
Additional functions
- Parental control: Prevents unauthorized use by locking button functions.
- 16:9 mode: Adjusts the picture format for widescreen recordings.
- Remote control command: If you have two machines, you can switch the remote control command between VCR 1 and VCR 2.
Troubleshooting
If you encounter issues, check the following:
- Remote control not working: Point it at the unit, check batteries, or verify the remote control command setting.
- Cassette jammed: Do not use force. Switch off with the power switch for 30 seconds, then switch on again.
- No sound: Check if internal speakers are switched off in the Setup menu.
- Poor picture: Clean video heads or adjust tracking.
Manufacturer information
Philips
Practical help
Common problems
Remote control not working
Point the remote directly at the unit, replace batteries, or ensure the remote control command (VCR 1/2) matches the unit setting.
Cassette jammed
Do not use force. Switch off the unit using the main power switch for 30 seconds, then switch it back on.
No sound from speakers
Check if the internal speakers have been switched off in the 'Additional Functions' menu.
Poor picture quality
Clean the video heads using the 'Cleaning' function in the Tape menu or adjust the tracking.
Before use
- Connect the aerial cable to the unit.
- Insert batteries into the remote control.
- Connect the unit to the mains power supply.
- Allow the unit to acclimatize for at least 3 hours after transport.
- Ensure the unit is in standby mode (not switched off by the main power switch) for timer recordings.
Show more Show less
Images and diagrams
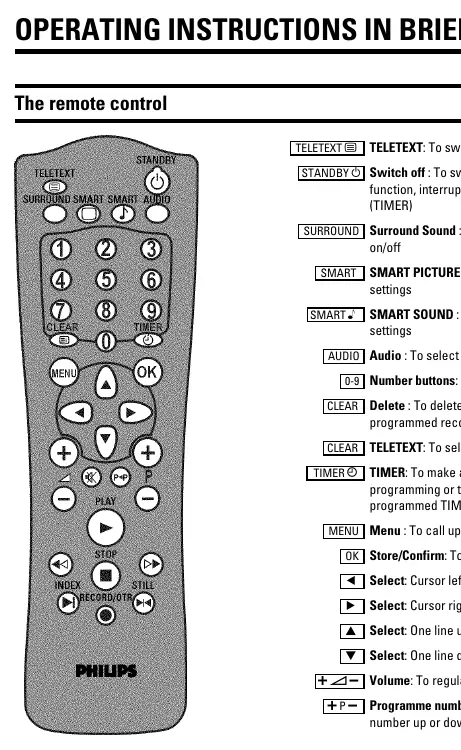
- The remote control diagram shows dedicated buttons for Teletext, Timer, and playback controls.
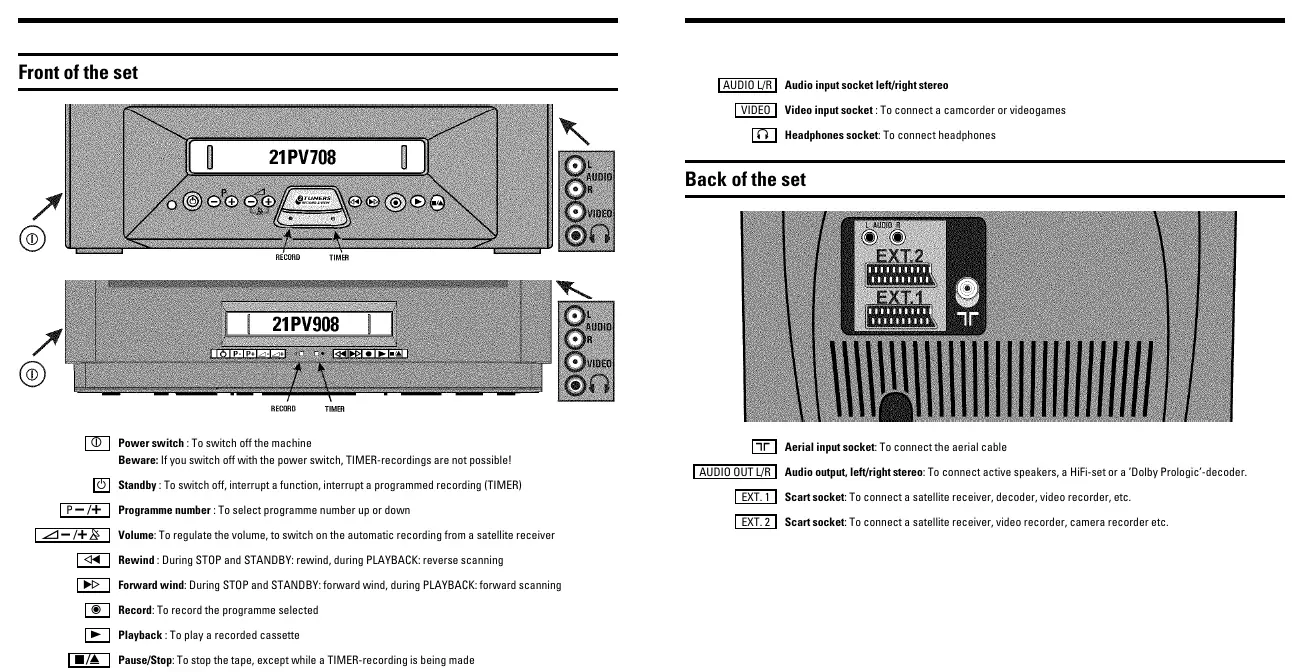
- The front panel diagram identifies the power switch, record/timer buttons, and input sockets.
- The back panel diagram shows the aerial input, audio output, and two SCART sockets for external devices.
Model compatibility
- Supports NTSC cassette playback.
- Requires SCART cable for satellite receiver recording.
- Internal speakers can be switched off when using external HiFi or Dolby Prologic decoders.

Manual page author
Michael Turner
Technical manual editor