Electronics / Monitors
User Manual for Philips 24B2U3301D Business Monitor
Comprehensive user guide for the Philips 24B2U3301D monitor. Includes instructions for installation, OSD menu navigation, image optimization, daisy-chaining, power delivery settings, and troubleshooting.
Quick answers from the manual
Quick answer
- The Philips 24B2U3301D is a 24.1-inch business monitor. This manual covers installation, OSD menu navigation, image optimization (SmartImage), daisy-chaining, and power delivery settings. p. 1, 7, 10, 16
Key actions
- Install the base by attaching the stand to the monitor VESA mount. p. 7
- Connect your PC using HDMI, DisplayPort, or USB-C. p. 8
- Navigate the OSD menu using the rear toggle button. p. 10
First start
- Connect the power cord and signal cable, then turn on the monitor and your computer. p. 8
Show 4 more answers Show less
Problems and fixes
No picture
Check power and signal cable connections.
p. 29
Blurred text/image
Set resolution to native 1920 x 1200.
p. 30Maintenance and reset
- To reset to factory settings, press the OSD button, select 'Setup' > 'Reset'. p. 31
Technical specifications
| Parameter | Value | Meaning | Pages |
|---|---|---|---|
| Panel Size | 24.1 inch | Physical screen size | p. 22 |
| Native Resolution | 1920 x 1200 | Optimal resolution | p. 22 |
| Power Delivery | 90W | Max power via USB-C | p. 22 |
Where to find it in the PDF
- Installation p. 7, 8
- OSD Menu p. 10, 11
- Technical Specifications p. 22, 23
Table of contents
Manual images
Click an image to enlargeQuick guide from the manual
This guide provides essential information for setting up and operating your Philips 24B2U3301D monitor. Key features include a 24.1-inch IPS display with 1920 x 1200 resolution, USB-C power delivery up to 90W, and daisy-chain support. Always ensure your monitor is placed on a stable surface and connected to a compatible power source.
Installation
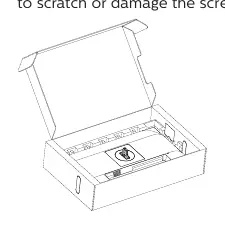
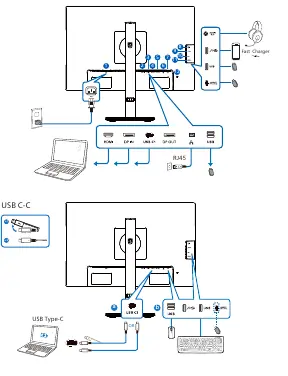
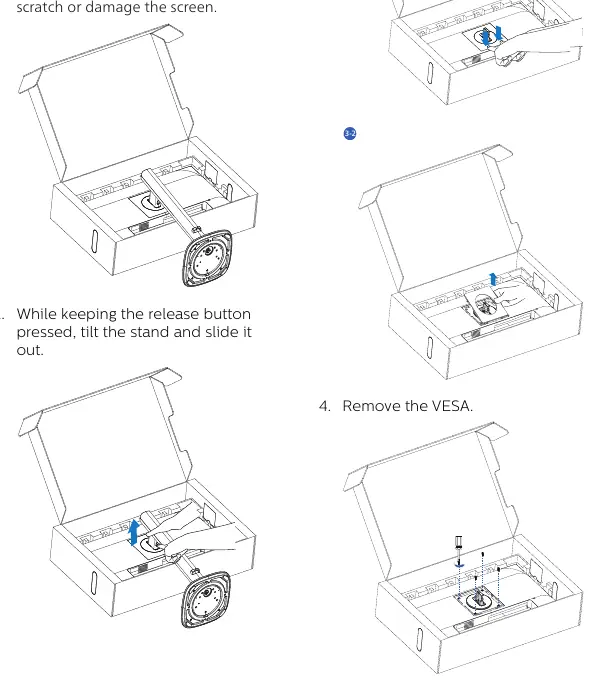
To install the base, place the monitor face down on a smooth surface. Attach the stand to the base and tighten the screw. Then, attach the stand to the VESA mount area until the latch locks. To connect to your PC, plug the power cord into the display and a nearby outlet, and connect the signal cable (HDMI, DisplayPort, or USB-C) to your computer.
Operating the monitor
The monitor features a single toggle button on the rear side that acts as a joystick to navigate the On-Screen Display (OSD) menu. Use this to adjust settings such as brightness, contrast, input source, and color temperature. You can lock or unlock the OSD by pressing and holding the button while the monitor is off, then turning it on.
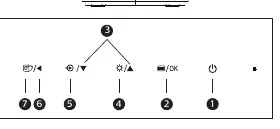
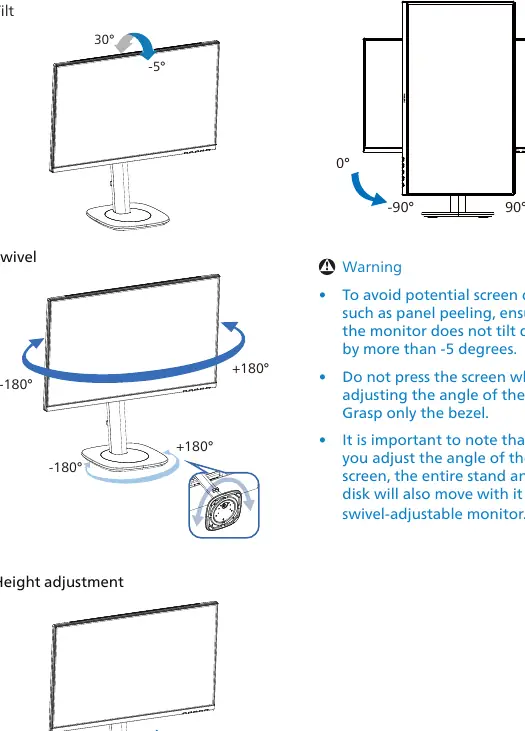
Image optimization
The monitor includes SmartImage, which provides presets for different content types (EasyRead, Office, Photo, Movie, Game, Economy, D-Mode, Off). SmartContrast dynamically analyzes displayed content to optimize contrast ratio for maximum visual clarity.
Daisy-chain function
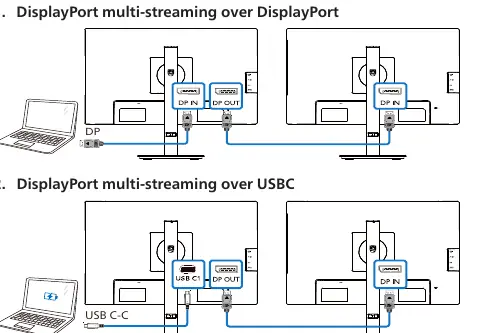
This monitor supports DisplayPort Multi-Stream (MST) for daisy-chaining multiple displays. Ensure your PC's GPU supports DisplayPort MST. You can configure this in the OSD menu under Setup > DP Out Multi-stream. Select 'Extend' to enable the function.
Power delivery and smart power
The monitor can deliver up to 90W of power through the USB-C port. Smart Power allows for flexible power delivery options. You can enable or disable this in the OSD menu under Setup > Smart Power. Note that maximum power delivery depends on the monitor's brightness settings.
Troubleshooting
If you encounter issues, check the following:
- No Picture: Ensure the power cord is plugged in and the power button is ON. Check if the signal cable is properly connected.
- Blurred Image: Adjust contrast and brightness in the OSD. Ensure the PC resolution is set to the native 1920 x 1200.
- Cannot display this video mode: Set your PC resolution to 1920 x 1200.
Technical specifications
The monitor features a 24.1-inch W-LED IPS panel with a native resolution of 1920 x 1200 at 100Hz. Connectivity includes HDMI 1.4, DisplayPort 1.4, USB-C (upstream/downstream), and RJ45. It supports Adaptive Sync and has built-in 2W x 2 speakers.
Manufacturer information
Philips
Practical help
Common problems
No picture (Power LED not lit)
Ensure the power cord is plugged into the outlet and the back of the monitor. Check that the power button is in the ON position.
No picture (Power LED is white)
Ensure the computer is on and the signal cable is properly connected. Check for bent pins on the cable.
Image appears blurred or distorted
Set the PC's display resolution to the native 1920 x 1200.
Cannot display this video mode
Set the resolution to 1920 x 1200 and refresh rate to 60Hz or 75Hz in Windows Display settings.
Before use
- Ensure the monitor is placed on a smooth surface to avoid scratches.
- Verify the power cord is securely connected.
- Check that the signal cable is firmly connected to both the monitor and the PC.
- Ensure the PC is turned on.
- Check that the OSD settings are configured for your preferred input source.
Show more Show less
Specs in practice
- Native Resolution
- 1920 x 1200 @ 60Hz (Max 100Hz) for optimal display quality.
- Power Delivery
- USB-C port provides up to 90W of power to compatible devices.
- Adaptive Sync
- Technology to eliminate screen tearing and stuttering in games.
Images and diagrams
- The base installation involves attaching the stand to the base and then to the monitor VESA mount.
- The rear port layout includes HDMI, DisplayPort, USB-C, RJ45, and audio out.
- The OSD control button is a single toggle joystick on the rear of the monitor.
Model compatibility
- Compatible with Windows 11/10 and Mac OS X.
- Daisy-chaining requires a GPU that supports DisplayPort MST.
- USB-C power delivery depends on the connected device's capabilities.

Manual page author
Michael Turner
Technical manual editor