Lighting / Outdoor Lighting
Philips Hue Calla Outdoor Freestanding Light User Manual
Quick guide for the Philips Hue Calla outdoor light. Includes installation steps for ground spike and surface mounting, power supply requirements, and maintenance tips.
Quick answers from the manual
Quick answer
- The Philips Hue Calla is a 24V low-voltage outdoor light. It must be used with a compatible Philips Hue 24V SELV IP67 power supply. Installation can be performed using either a ground spike or surface mounting. p. 2, 11
Key actions
- Install using ground spike p. 4, 5
- Install using surface mount p. 6, 7
First start
- Connect the light to the 24V power supply and plug it into an outdoor socket. p. 8, 9
Maintenance and reset
- Clean the fixture with a damp cloth. p. 10
Technical specifications
| Parameter | Value | Meaning | Pages |
|---|---|---|---|
| Voltage | 24V | Low-voltage system | p. 11 |
| Max System Length | 35m | Maximum cable length for the system | p. 11 |
Where to find it in the PDF
- Installation (Ground) p. 4, 5
- Installation (Surface) p. 6, 7
- Power Requirements p. 11
Table of contents
Manual images
Click an image to enlargeImportant Information
The Philips Hue Calla is a 24V low-voltage outdoor lighting system. It is essential to use only with a compatible Philips Hue 24V SELV IP67 LED power supply. The total system length must not exceed 35 meters, and the total wattage must not exceed the capacity of the power supply (40W or 100W).
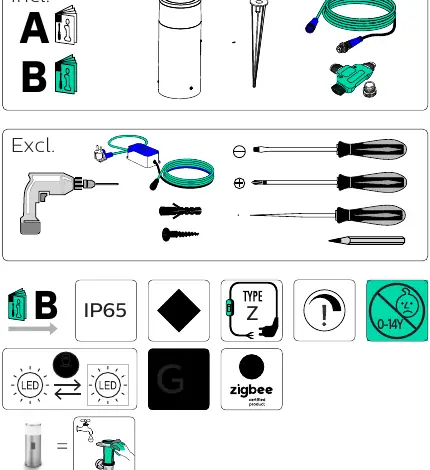
What's in the box
The package includes the light fixture, a ground spike, and connection cables. You will need to provide your own tools, such as a drill, screwdriver, and pencil, depending on the installation method.
Installation
There are two primary methods for installing the Calla light:
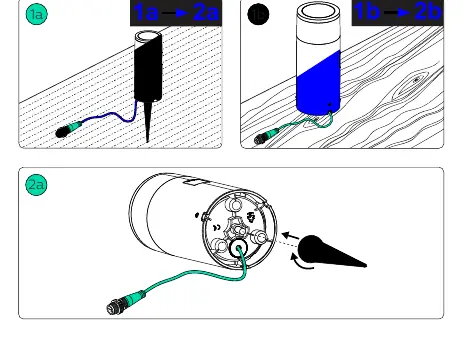
Ground Spike Installation
- Prepare the ground area.
- Connect the cable to the light fixture.
- Secure the ground spike into the ground.
- Attach the light fixture to the ground spike.
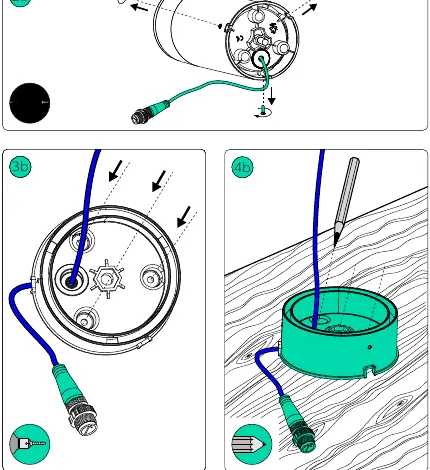
Surface Mounting
- Mark the mounting holes on the surface using the base as a template.
- Drill holes and insert wall plugs if necessary.
- Secure the base to the surface using screws.
- Attach the light fixture to the mounted base.
Power Supply Requirements
This product operates on a 24V low-voltage system. Ensure your power supply is a Philips Hue 24V SELV IP67 unit. Do not exceed the maximum system length of 35 meters or the maximum wattage of the power supply unit (40W or 100W).
Maintenance
To clean the light fixture, use a damp cloth. Ensure the power is disconnected before performing any maintenance. Do not use harsh chemicals or abrasive materials.
Manufacturer information
Philips
Practical help
Common problems
Light does not turn on
Verify that the 24V power supply is correctly connected and that the total system length does not exceed 35 meters.
Installation surface issues
Use the ground spike for soft ground (soil/grass) or the screw-mount base for hard surfaces (wood/concrete).
Before use
- Ensure you have a Philips Hue 24V SELV IP67 power supply.
- Check that the total system length is under 35 meters.
- Verify total wattage is within the PSU limit (40W or 100W).
- Have a drill, screwdriver, and pencil ready for installation.
Images and diagrams
- The manual provides two distinct installation paths: one for ground spike mounting and one for surface mounting.
- The power supply diagram illustrates how to connect multiple lights in a chain, ensuring the 35m limit is respected.
Model compatibility
- Must be used with Philips Hue 24V SELV IP67 LED power supply.
- Not suitable for children aged 0-14 years.

Manual page author
Emily Carter
User documentation editor
Prepares concise manual descriptions and highlights the most useful setup, operation, and maintenance information for readers.