Lighting / Outdoor Lighting
User Manual for Lightpro Castor 3 177S Outdoor Light
Quick guide for the Lightpro Castor 3 177S outdoor LED spotlight. Includes installation steps for wall or ground mounting, wiring instructions, and safety guidelines.
Quick answers from the manual
Quick answer
- The Lightpro Castor 3 is a 12V LED outdoor spotlight. It can be mounted on a wall/surface or in the ground using the included spike. It must be connected to a Lightpro 12V transformer system. p. 6, 8
Key actions
- Mounting on wall/surface p. 8
- Mounting in ground p. 8
First start
- Connect to the 12V transformer system using the provided connector. p. 5, 8
Maintenance and reset
- Clean regularly with a soft, clean cloth. Do not use high-pressure washers or abrasives. p. 11
Technical specifications
| Parameter | Value | Meaning | Pages |
|---|---|---|---|
| Power | 2.5W | Maximum power consumption | p. 8 |
| Protection class | IP44 | Water resistance rating | p. 8 |
Where to find it in the PDF
- Parts List p. 2
- Installation p. 3, 4, 8
Table of contents
Manual images
Click an image to enlargeImportant Information
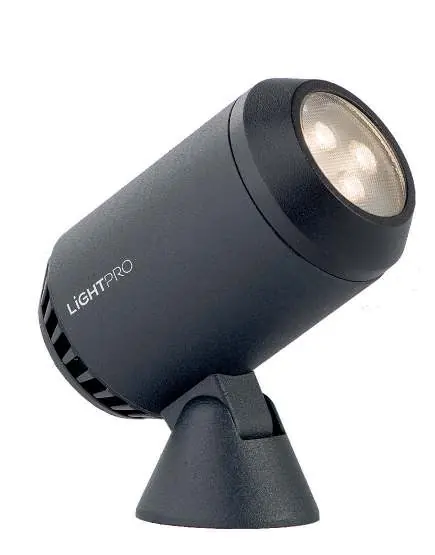
The Lightpro Castor 3 is a 12V LED outdoor spotlight. This document provides instructions for correct and safe installation. This product must be used in combination with the Lightpro 12-volt system. Always consult the manual of your transformer for specific lighting plan details.
Product Description
The Castor 3 is an LED spot designed for outdoor use. It features a durable design and can be mounted on solid surfaces or placed in the ground using the provided spike. The light source is non-replaceable.
Packaging Content
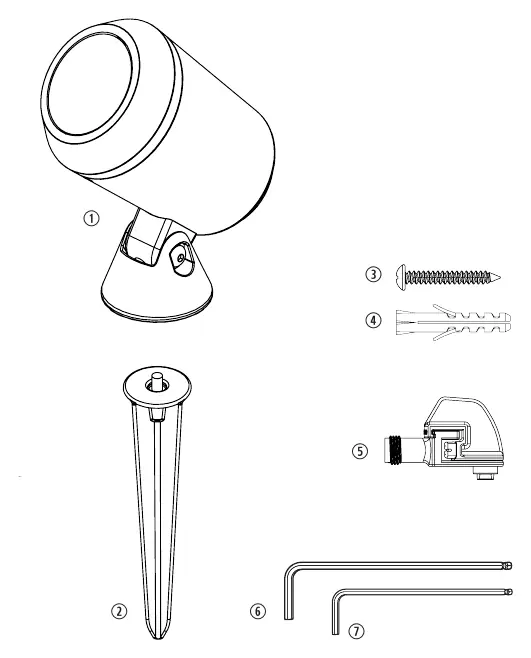
- 1. Fixture Castor 3
- 2. Ground spike
- 3. Screw
- 4. Plug
- 5. Lightpro connector
- 6. Large hex key
- 7. Small hex key
Installation
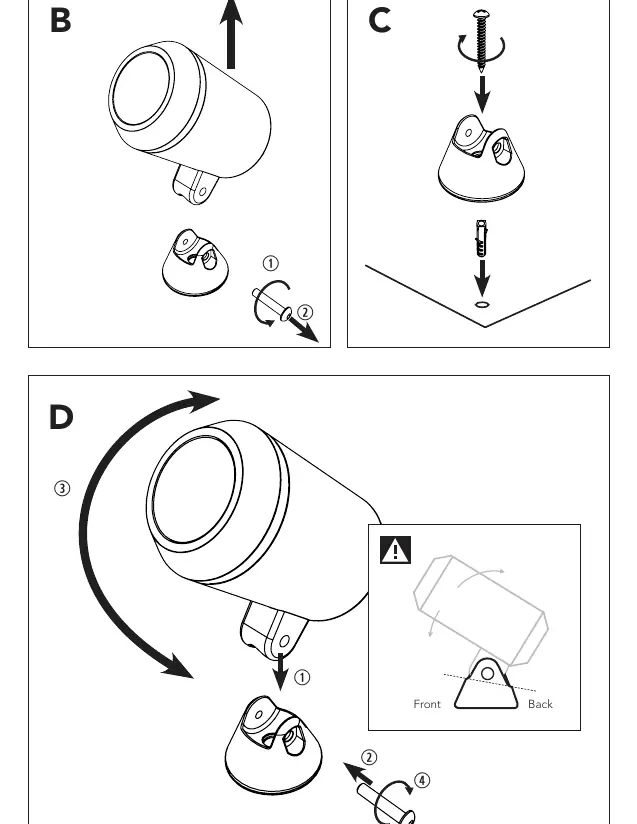
Option 1: Placement on a fixed surface or wall
- Remove the screw from the base using the included large hex key.
- Remove the fixture from the base.
- Install the base onto the surface using the included screw. If necessary, drill a hole and use the included plug.
- Place the fixture back into the base.
- Insert the screw into the base.
- Adjust the fixture to the desired position.
- Fasten the screw using the large hex key.
Option 2: Placement in the ground
- Place the spike underneath the base.
- Properly fasten the spike.
- Adjust the fixture to the desired position.
- Fasten the screw using the large hex key.
- Place the fixture in the ground.
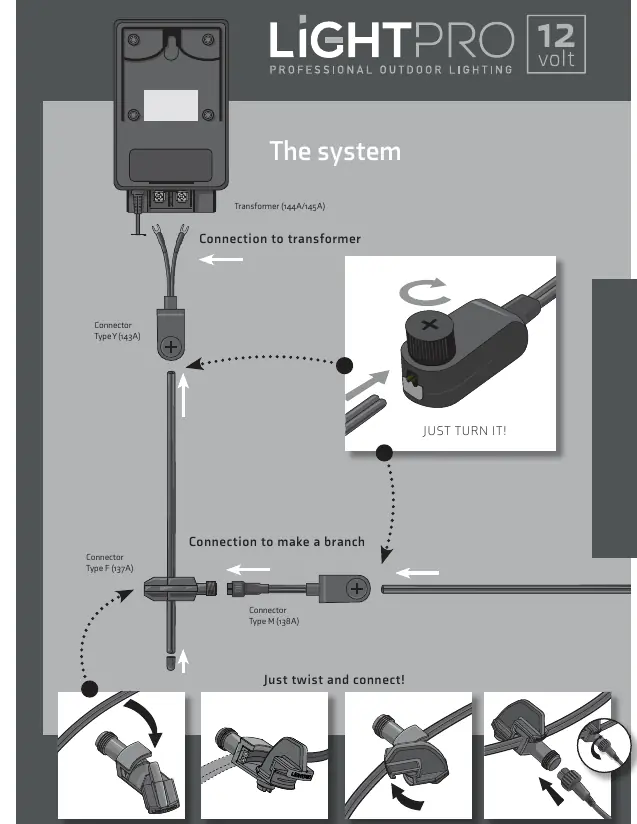
Wiring and System
Connect the lights to the main cable using the Lightpro connector. Ensure the system is connected to a compatible 12V transformer. If the product has a drain hole for water, ensure it is pointing downwards.
Safety and Maintenance
- Always install the product so it remains accessible for maintenance.
- Do not permanently embed or brick in the product.
- Turn off the system by unplugging the transformer before maintenance.
- Clean regularly with a soft, clean cloth. Avoid abrasives.
- Clean stainless steel parts with a stainless steel cleaning agent once every 6 months.
- Do not use high-pressure washers or aggressive chemical cleaning agents.
- Do not use in areas where combustible gases, fumes, or liquids are stored.
Technical Specifications
- Product: Lightpro Castor 3
- Article number: 177S
- Light source: LED 2.5W AC/DC 12V
- Luminous flux: 200 lm
- Colour temperature: 3000K
- Protection class: IP44
- Ambient temperature: -20 °C to 50 °C
- Dimmable: No
Practical help
Common problems
Light not working
Check the connection to the transformer and ensure the 12V system is powered.
Fixture is loose
Ensure the screw in the base is tightened securely using the provided large hex key.
Before use
- Verify all parts are present (fixture, spike, screw, plug, connector, hex keys).
- Ensure you have a compatible Lightpro 12V transformer.
- Check the mounting surface is suitable for the screw and plug.
- Ensure the installation location is not in an area with combustible gases or liquids.
Images and diagrams
- Figure A: Identification of all parts included in the package.
- Figure B, C, D: Step-by-step guide for wall or surface mounting.
- Figure E: Step-by-step guide for ground spike installation.
- Page 5: Wiring diagram showing how to connect the fixture to the main cable and transformer.
Model compatibility
- Must be used with Lightpro 12V system.
- Not dimmable.
- Light source is not replaceable.

Manual page author
Emily Carter
User documentation editor
Prepares concise manual descriptions and highlights the most useful setup, operation, and maintenance information for readers.