Lighting / Smart Lighting
User Manual for Philips Hue Impress Extension
A comprehensive guide for the Philips Hue Impress Extension outdoor light. Includes installation steps, mounting instructions, power requirements, and system compatibility details.
Quick answers from the manual
Quick answer
- The Philips Hue Impress Extension is an outdoor light that operates on a 24V low-voltage system. It must be used with a compatible Philips Hue 24V SELV IP67 power supply. p. 10
Key actions
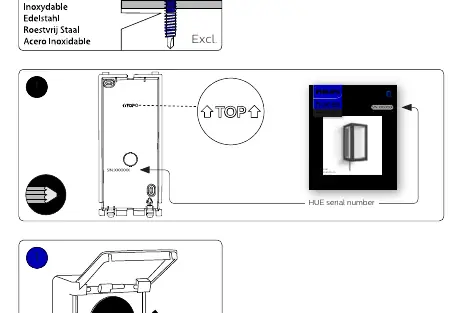
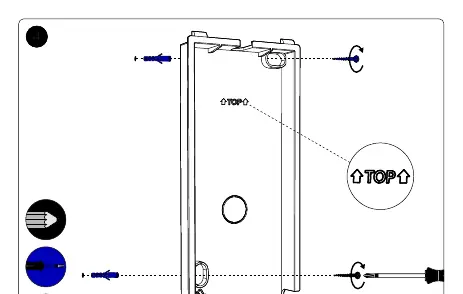
- Mount the bracket with the 'TOP' indicator facing upwards. p. 3, 6
- Connect the light to the 24V power supply. p. 8, 9
First start
- Ensure the power supply is connected to an outdoor socket and the light is properly mounted. p. 9
Technical specifications
| Parameter | Value | Meaning | Pages |
|---|---|---|---|
| Voltage | 24V | Low-voltage system | p. 10 |
| Max Cable Length | 35m | Maximum distance for the system | p. 10 |
Where to find it in the PDF
- Installation p. 3, 4, 5, 6
- Technical Requirements p. 10
Table of contents
Manual images
Click an image to enlargeQuick guide from the manual
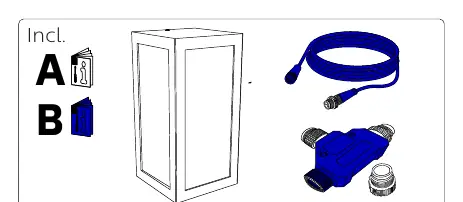
This document provides installation and setup instructions for the Philips Hue Impress Extension. This device is an outdoor light designed to be part of the Philips Hue low-voltage system. Ensure you have all necessary components before beginning installation.
Safety and Requirements
The Philips Hue Impress Extension is a 24V low-voltage device. It is critical to follow these requirements:
- Power Supply: Use only with a Philips Hue 24V SELV IP67 LED power supply.
- Rating: The device is IP44 rated, suitable for outdoor use.
- Compatibility: Designed for the Philips Hue low-voltage system (24V).
- Age Restriction: Not suitable for children aged 0-14.
Installation
Follow these steps to mount and install your light:

- Preparation: Gather necessary tools: drill, screwdriver, pencil, and the included mounting hardware.
- Mounting: Mark the drilling holes on the wall. Drill the holes and secure the mounting bracket using the provided screws and wall plugs. Ensure the 'TOP' indicator on the bracket is facing upwards.
- Wiring: Route the cable through the designated opening. Connect the light cable to the power supply cable using the provided connectors.
- Assembly: Attach the light fixture to the mounting bracket. Ensure it clicks into place securely.
- Connection: Connect the system to the 24V power supply and plug it into an outdoor socket.
Technical Specifications
The system operates on a 24V low-voltage standard. The maximum total cable length for the system is 35 meters. Ensure the total wattage of the connected lights does not exceed the capacity of your power supply (40W or 100W).
Manufacturer information
Philips
Practical help
Common problems
Light does not turn on
Verify that the 24V power supply is connected to a live outlet and that all cable connections are securely tightened.
Cable length issues
The maximum cable length for the system is 35 meters. Ensure your setup does not exceed this limit.
Before use
- Verify you have a compatible Philips Hue 24V SELV IP67 power supply.
- Ensure you have the necessary tools: drill, screwdriver, and pencil.
- Check that the installation surface is suitable for drilling.
- Confirm the 'TOP' orientation of the mounting bracket.
Images and diagrams
- Page 2: Overview of included parts and required tools.
- Page 3-8: Step-by-step mounting and cable connection sequence.
- Page 10: System wiring diagram showing power supply and light connections.
Model compatibility
- Compatible only with Philips Hue 24V low-voltage system.
- Requires Philips Hue 24V SELV IP67 power supply.

Manual page author
David Miller
Documentation analyst
Organizes user manual content into clear summaries, with attention to model details, product context, and everyday usability.