Lighting / Smart Lighting
User Guide for LIFX SuperColor Neon Flex 16ft
Quick setup guide for the LIFX SuperColor Neon Flex 16ft. Includes installation instructions, wiring, app pairing, troubleshooting, and safety warnings.
Quick answers from the manual
Quick answer
- To set up your LIFX SuperColor Neon Flex, download the LIFX app, connect the device to power (either via outlet or low voltage system), and follow the in-app instructions. For Matter setup, scan the code on the back of the manual. p. 2, 8
Key actions
- Install the Neon Flex using the provided channels (screws or adhesive) or ground stake. p. 4
- Connect to power by either plugging into an outdoor outlet or clamping to a 12V low voltage system. p. 5, 6
First start
- Download the LIFX app, sign in, and ensure the light is powered on before tapping the '+' button in the app. p. 2, 8
Problems and fixes
Device not lighting up or not detecting pieces
Reset the device by holding the button on the control unit for 5-7 seconds.
p. 9Maintenance and reset
- Press the button on the control unit for 5-7 seconds to restore factory settings. p. 9
Technical specifications
| Parameter | Value | Meaning | Pages |
|---|---|---|---|
| Input Voltage | 12-15V AC 60Hz or 12-15V DC | Power requirements | p. 15 |
| LED Lifespan | 25,000 hours | Rated usage time | p. 15 |
Where to find it in the PDF
- Setup and Pairing p. 2, 8
- Installation p. 4
- Power Connection p. 5, 6
- Resetting p. 9
- Safety and Compliance p. 7, 11, 12
Table of contents
Manual images
Click an image to enlargeQuick Start Guide
To begin using your LIFX SuperColor Neon Flex, download the LIFX app and sign in. Ensure your light is powered on before attempting to pair it with your device. The system requires a 2.4 GHz Wi-Fi connection and a device running iOS 14.0+ or Android 8.0+.
Installation
You can install the Neon Flex in the ground or attach it to surfaces. Use the provided accessories to suit your space.
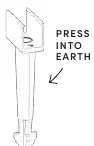
- In the Ground: Use the provided ground stake to press the flex into the earth.
- Attach to Surfaces: Use the provided channels. You can secure these channels using screws or double-sided adhesive to create your desired shape, then press the Neon Flex into the channels.
Powering the Device
Choose the power method that suits your setup:
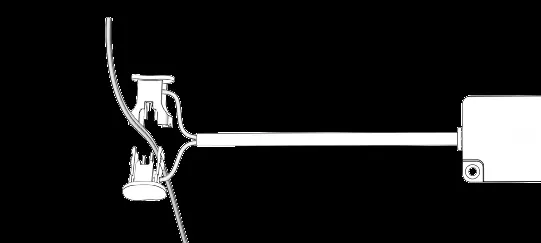
- Low Voltage System: Attach the connecting piece to clamp to your existing low voltage wiring. Ensure your system is 12V and you have an 85 Watts allowance available on your transformer.
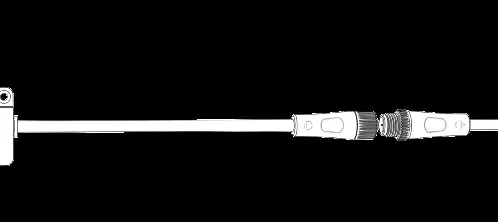
- Outlet: Choose the connector with the plug at the end and plug it into an appropriate outdoor outlet.
Important: When connecting, screw the cap over the join tightly to ensure it is waterproof.
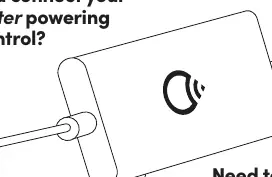
Pairing and Setup
Open the LIFX app and tap the '+' button in the bottom right corner to begin the setup process. If you are using Matter, you can scan the code on the back of the manual to add the light to your preferred smart home platform.
Resetting
If the flex is not lighting up or not counting pieces, you may need to reset it to factory settings. Press the button on the control unit for 5-7 seconds. A light will run down the full length of the Neon Flex as it detects it.
Wi-Fi Requirements
The device connects to 2.4 GHz Wi-Fi networks. If you have a 5 GHz connection, ensure your phone is connected to the 2.4 GHz band during setup. If you change your Wi-Fi password or router, you will need to reset the lights and reconnect them.
Safety and Cautions
- Always disconnect from power before assembling, disassembling, installing, or cleaning.
- Do not mount near gas or electric heaters, fireplaces, or other heat sources.
- Do not secure wiring with staples, nails, or sharp hooks.
- Do not submerge the product.
- Ensure all connectors are tightly secured to prevent water entry.
- Do not bury the wire more than 6 inches underground.
Technical Specifications
- Input: 12-15V AC 60Hz or 12-15V DC.
- Connectivity: 2.4 GHz Wi-Fi (802.11 b/g/n).
- LED Rating: 25,000 hours.
- Brightness: Reaches 100% in 1 second or less.
Practical help
Common problems
Device not lighting up or not counting pieces
Perform a factory reset by pressing the button on the control unit for 5-7 seconds.
Weak Wi-Fi signal during setup
Move the product closer to your router. Ensure you are using a 2.4 GHz network.
Low voltage system compatibility
Ensure your system is 12V and has at least 85 Watts of available allowance.
Before use
- Download and log in to the LIFX app.
- Ensure your smartphone is connected to a 2.4 GHz Wi-Fi network.
- Verify your low voltage system is 12V (if applicable).
- Check that you have sufficient wattage allowance (85W) on your transformer.
- Ensure all cable connections are screwed tight for waterproofing.
Specs in practice
- 12-15V AC/DC
- The required input voltage range for the device.
- 2.4 GHz Wi-Fi
- The required frequency band for network connectivity; 5 GHz is not supported for setup.
- 25,000 hours
- The rated lifespan of the high-quality LEDs.
Images and diagrams
- The control unit features a button for pairing (2-3 seconds) and resetting (5-7 seconds).
- Waterproof connections are achieved by twisting the cap tightly over the join.
- Mounting channels can be secured with screws or adhesive.
Model compatibility
- Requires a 2.4 GHz Wi-Fi network.
- Compatible with Matter-enabled smart home hubs.
- Requires 12V low voltage systems for hardwired installations.

Manual page author
Michael Turner
Technical manual editor
Reviews PDF manuals for structure, safety notes, and practical product details so readers can find the right information quickly.