Electronics / Monitors
User Manual for Philips 196V3L LED Monitor
Quick guide for the Philips 196V3L LED Monitor. Includes setup instructions, OSD menu navigation, image optimization, technical specifications, and troubleshooting tips.
Quick answers from the manual
Quick answer
- The Philips 196V3L is an LED monitor with a native resolution of 1366 x 768 @ 60 Hz. It features SmartControl Lite for software-based adjustments and supports VESA mounting (100x100mm). p. 16, 18, 21
Key actions
- Install base stand p. 6
- Connect to PC p. 7
- Adjust OSD settings p. 8
First start
- Connect power and signal cables, then turn on the monitor and PC. p. 7
Show 4 more answers Show less
Problems and fixes
No picture (LED is white)
Check if computer is on, signal cable is connected, and monitor cable pins are not bent.
p. 34Maintenance and reset
- If lost in OSD adjustments, press the OK button and select 'Reset' to recall factory settings. p. 36
Technical specifications
| Parameter | Value | Meaning | Pages |
|---|---|---|---|
| Native Resolution | 1366 x 768 @ 60Hz | Optimal display resolution | p. 18, 21 |
Where to find it in the PDF
- Installation p. 6, 7
- OSD Menu p. 8
- Technical Specifications p. 18, 19, 20
- Troubleshooting p. 34, 35
Table of contents
Manual images
Click an image to enlargeQuick guide from the manual
The Philips 196V3L is an LED monitor designed for optimal performance at a native resolution of 1366 x 768 @ 60 Hz. This guide covers the installation, operation, and maintenance of your monitor. For best results, ensure your PC is set to the native resolution. The monitor supports VESA mounting (100mm x 100mm) and includes SmartControl Lite software for easy on-screen adjustments.
Setting up the monitor
Installation: Place the monitor face down on a soft surface to avoid scratches. Attach the base column to the monitor until it clicks, then attach the base stand. Connect the power cord and the signal cable (VGA or DVI) to your PC. Turn on your computer and the monitor.
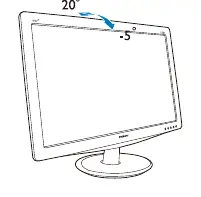
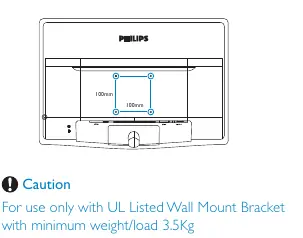
Physical Adjustments: The monitor supports a tilt function of -5 to +20 degrees.
Operating the monitor
Front View Controls: Use the buttons on the front bezel to navigate the On-Screen Display (OSD) menu. Key functions include power on/off, OSD menu access, brightness adjustment, and automatic adjustment (Auto).
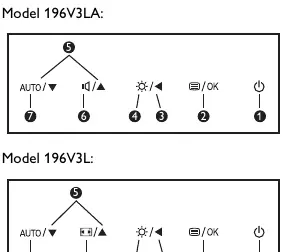
OSD Menu: The OSD allows you to adjust picture settings (format, brightness, contrast), color temperature, language, and OSD settings (position, transparency, timeout).
Image Optimization
SmartContrast: This technology dynamically analyzes displayed content and automatically optimizes the contrast ratio for better visual clarity.
SmartControl Lite: This software allows you to control your monitor via an easy-to-use on-screen graphic interface. It guides you through fine-tuning resolution, color calibration, and other display settings.
Troubleshooting
If you encounter issues, check the following:
- No Picture: Ensure the power cord is connected and the power button is ON. Check if the signal cable is properly connected to the PC.
- Image not centered: Use the Auto function in the OSD menu.
- Flicker: Use the Auto function or adjust Phase/Clock settings in the OSD (VGA mode only).
- Cannot display this video mode: Set your PC resolution to 1366 x 768 @ 60 Hz.
Technical Specifications
The monitor features a 18.5-inch TFT-LCD panel with LED backlight. It supports 16.7 million colors and has a typical response time of 5ms. Power consumption is approximately 15.6W - 17.7W depending on the model. Operating temperature is 0°C to 40°C.
Manufacturer information
Philips
Practical help
Common problems
No picture (LED not lit)
Check if the power cord is firmly plugged into the outlet and the back of the monitor. Ensure the power button is in the ON position.
No picture (LED is white)
Ensure the computer is turned on and the signal cable is properly connected. Check for bent pins on the cable connector.
Image not centered
Use the 'Auto' function in the OSD Main Controls or adjust the Phase/Clock settings.
Vertical or horizontal flicker
Use the 'Auto' function in the OSD Main Controls to automatically adjust the monitor.
Before use
- Ensure the power cord is connected firmly.
- Check that the signal cable is properly connected to the PC.
- Verify the PC resolution is set to 1366 x 768 @ 60 Hz.
- Ensure the monitor is placed on a stable surface.
- Check that the power button is accessible.
Show more Show less
Specs in practice
- Native Resolution
- 1366 x 768 @ 60 Hz for the best display quality.
- Operating Temperature
- 0°C to 40°C.
Images and diagrams
- Base stand installation steps.
- Front view controls description.
- OSD menu structure.
- Tilt adjustment range.
Model compatibility
- Compatible with Windows 7/Vista/XP, Mac OSX, and Linux.
- Auto function is only applicable in VGA-Analog mode.
- DVI-D input available on selected models.

Manual page author
David Miller
Documentation analyst