Sports / Fitness
User Manual for Reebok i-rower 2.5e Rowing Machine
Comprehensive user guide for the Reebok i-rower 2.5e. Includes assembly instructions, folding and unfolding procedures, proper rowing technique, safety precautions, and maintenance tips.
Quick answers from the manual
Quick answer
- The Reebok i-rower 2.5e is a home-use rowing machine. It requires assembly, regular maintenance of bolts, and proper folding/unfolding procedures to ensure the sliding rail is locked securely. p. 1, 4, 13, 14
Key actions
- Unfolding the rower p. 13
- Folding the rower p. 14
First start
- Ensure the rower is on a flat surface, check all bolts are tight, and verify the power supply is 230V. p. 4, 5, 9
Problems and fixes
End cap not locking
Lift the rear end, fold the rear foot in, and move the sliding rail up and down until it clicks.
p. 13Maintenance and reset
- Check all bolts and nuts every 1-2 months. p. 5, 9
Technical specifications
| Parameter | Value | Meaning | Pages |
|---|---|---|---|
| Max Weight | 120 kg | Maximum user weight capacity | p. 4, 8 |
Where to find it in the PDF
- Assembly p. 10, 11, 12
- Folding/Unfolding p. 13, 14
- Parts List p. 17, 18, 19
Table of contents
Manual images
Click an image to enlargeQuick guide from the manual
The Reebok i-rower 2.5e is a home-use rowing machine designed for physical exercise. Before using the equipment, ensure it is placed on an even, non-slippery surface and that you have sufficient space. The maximum user weight is 120 kg. Always consult a physician before starting any exercise program, especially if you have health restrictions.
Assembly
Follow the assembly instructions carefully using the provided checklist. Ensure all adjustable parts are tightened to prevent movement during training. Use only original Reebok parts. If necessary, ask for assistance during assembly.
Unfolding and Folding
Unfolding: Keep the rear foot in the folding position. Pull the end cap up to disengage the lock of the sliding rail from the upright position. Rotate the sliding rail down until the end cap returns to the lock position with a "click" sound. Rotate the rear foot out and press the plastic plate down to lock the sliding rail.
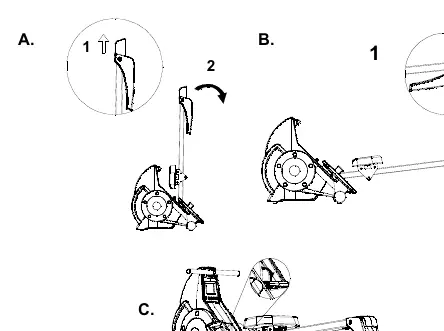
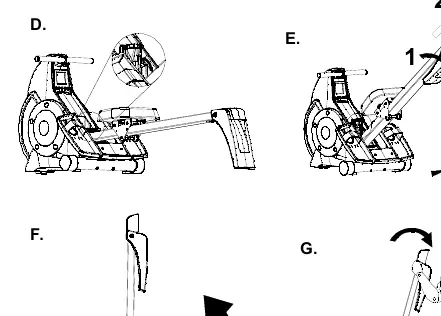
Folding: Pull the plastic plate up, lift the rear end slightly, and fold the rear foot in. Pull the end cap to unlock the sliding rail. Rotate the sliding rail all the way up until the end cap clicks into the lock position. You can then hold the sliding rail at an angle to roll the rower away on its transportation wheels.
Correct Use
Begin in a seated position with knees bent. Lean forward slightly with arms outstretched and grip the handlebar. In a smooth, fluid motion, extend back, pushing out with your legs while pulling your arms into your chest. Avoid locking your knees or leaning back too far. Return to the starting position.
Maintenance
To ensure safety and longevity, perform the following maintenance:
- Check all components, especially bolts and nuts, every 1-2 months.
- Pay particular attention to the tightness of bolts for the saddle and handlebars.
- Disconnect the apparatus from the mains before doing repair, maintenance, or cleaning work.
- Replace damaged or worn parts immediately.
- Do not perform electrical repairs yourself; contact a qualified electrician.
Safety
The unit requires a power supply of 220V – 230V / 50Hz and should be connected to a safety socket with a 10A fuse. Ensure no liquids or perspiration enter the machine or electronics. Do not use the rower without shoes or with loose footwear.
Practical help
Common problems
End cap does not lock after unfolding
Lift the rear end, fold the rear foot in, and move the sliding rail up and down slightly until the end cap clicks into the lock position.
Loose parts during training
Check all bolts and nuts every 1-2 months, especially for the saddle and handlebars.
Before use
- Ensure the device is on an even, non-slippery surface.
- Check that all adjustable parts are tightened.
- Verify the device is connected to a 230V, 50Hz power supply.
- Ensure the area is clear of hazards.
- Wear appropriate footwear.
Specs in practice
- Max User Weight
- 120 kg (Do not exceed this limit).
- Power Supply
- 230V, 50Hz (Requires a 10A fused socket).
Images and diagrams
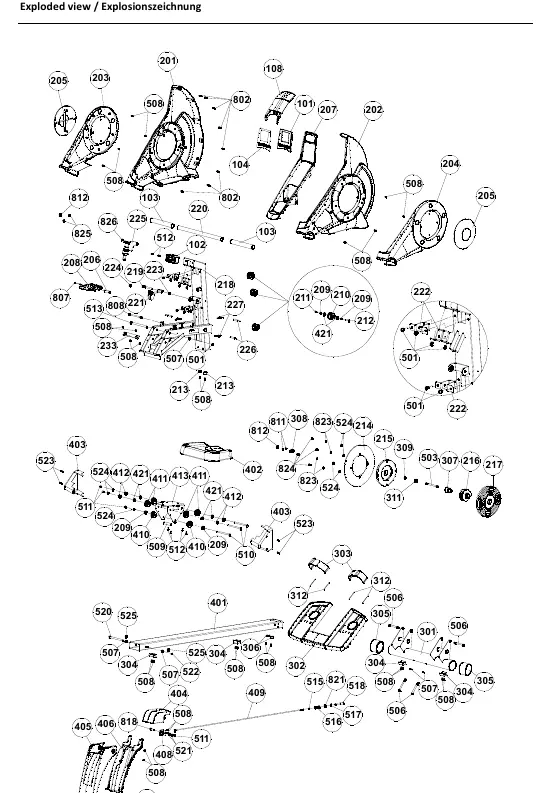
- Exploded view shows all components for assembly and spare part identification.
- Folding/Unfolding diagrams illustrate the locking mechanism for the sliding rail.
Model compatibility
- For home use only.
- Not suitable for commercial or rental purposes.

Manual page author
David Miller
Documentation analyst
Organizes user manual content into clear summaries, with attention to model details, product context, and everyday usability.