Garden / Outdoor Furniture
User Manual for Costway SuperFit Weight Bench
Quick guide for the Costway SuperFit weight bench. Includes assembly instructions, parts list, and setup steps for your fitness equipment.
Table of contents
Quick guide from the manual
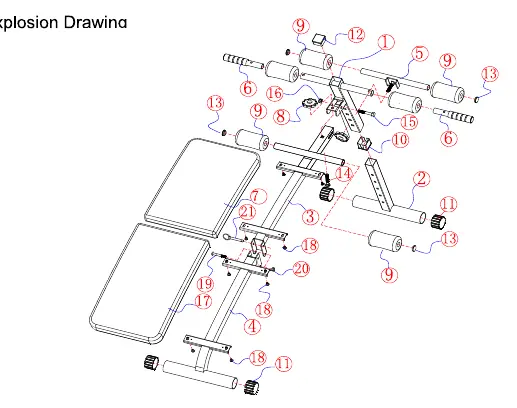
This document provides assembly instructions for the Costway SuperFit weight bench. It includes a parts list, an explosion drawing, and step-by-step assembly procedures to ensure the equipment is set up correctly.
Assembly Instructions
1. Take the machine out of the box.
2. Open the front bracket (1) forward and the rear bracket (4) backward.
3. Use the carriage screw (14) to pass through the front bracket and the intermediate bracket, then tighten with the Plum Knob (8).
4. Pass the hook stand (5) through the front bracket tube (1) and the front foot tube (2) according to the height requirement, and tighten with the plum knob (8).
5. Insert the two handles (6) into the tube (1) and insert the pull-ring latch (21) into the middle bracket and the rear bracket cross hole.
Parts List
The following parts are included for assembly:
- Front Bracket (1)
- Forefoot Tube (2)
- Intermediate Bracket (3)
- Rear Support Bracket (4)
- Hook Stand (5)
- Handle (6)
- Middle Padded board (7)
- Plum Knob (8)
- Foam (9)
- Reducing Sleeve (10)
- Round Footpad (11)
- Square Tube Plug (12)
- Round Tube Plug (13)
- Carriage Bolts (14)
- M10*50 Bolts (15)
- M10 Nuts (16)
- Rear Padded board (17)
- M6*10 Bolts (18)
- M8*50 Bolts (19)
- M8 Nuts (20)
- Pull-Ring Latch (21)
Manufacturer information
Costway
Practical help
Common problems
Bench feels unstable
Ensure all bolts are tightened securely and the pull-ring latch is fully engaged in the bracket hole.
Before use
- Unpack all components from the box
- Verify all parts against the parts list
- Ensure the front and rear brackets are fully opened
- Tighten the Plum Knob securely after adjusting height
- Verify the pull-ring latch is locked in place
Images and diagrams
- The explosion drawing shows the correct placement of all bolts, nuts, and tubes.
- The assembly diagram illustrates the unfolding process and the connection points for the brackets and handles.

Manual page author
David Miller
Documentation analyst
Organizes user manual content into clear summaries, with attention to model details, product context, and everyday usability.